JavaScript Coding Course
JS 101
Part 8. More User Interaction
Five More Fun Projects

In keeping with this theme of learning about input types, we offer these five fun projects to help you learn more about them. Each of these projects has a lot going on in terms of code, but we will try to narrow our focus to these different input types and how they relate to user interaction. And we will point out the more unique sections of code in each project. Our great hope here is that you will find these projects to be both fun and instructive. Click on links below to preview the next five projects or to go to each one directly.
- Guessing Game
- Easter Calculator
- Custom Color Mixer
- Chinese Zodiac Signs
- Mayan Calendar Stele
Links To Previews
- Guessing Game
- Easter Calculator
- Custom Color Mixer
- Chinese Zodiac Signs
- Mayan Calendar Stele
Links To Projects
Guessing Game
Let's download this project, unzip it, and open it in VS Code so we can see the code inside. The first thing we notice is that there are three HTML files in this project. There is index.html, help.html, and examples.html. And thanks to the way this project was designed, there is only one style.css stylesheet. Each web page also has a very narrow footprint that places all of its elements in the center of the web page, and that eliminates the need for a lot of media queries. But there are two JavaScript files here: game.js is the script file that is linked to the index.html page. And examples.js is shared by both help.html and examples.html.
The document body of the index.html file starts with two h1 elements, each with a unique id. The first one is #messages1 and the second one is #messages2. Their main purpose is to help inform the player of how to play this game. Below them is a table with an id of #hints. This table has 10 rows and 3 columns. It shows the player each guess that they made, and gives hints about whether each guess is Too High, Too Low, or Correct. We've seen tables and elements that offer messages before, so we will skip long explanations about how these tags and elements work for us. However, and for our purposes here, the code gets much more interesting below the table.
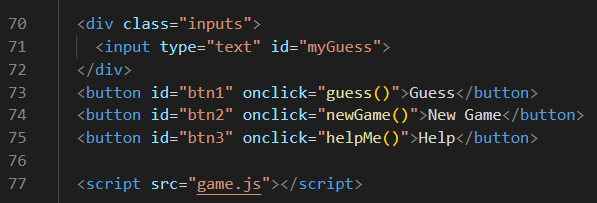
Wait a minute! There is nothing very interesting about this HTML code! In fact, we've seen all of this before, right? On lines 70 through 72, there is a div with a class called inputs, and we don't ever do anything with that classname in CSS or in JavaScript, so it is probably unneccesary. Inside the div is an input of type="text", but it has id of myGuess. Well OK then. That might be important. Below that div we see three buttons, each with uniquely-numbered ids of #btn1, #btn2, and lastly #btn3, even though we only see two buttons there when we run the program. Perhaps one of these buttons is hidden when we first launch the program. And yet, we see that each of these three buttons has an inline onclick event that calls a function when clicked. So let's look at the game.js file to see what is going on there.
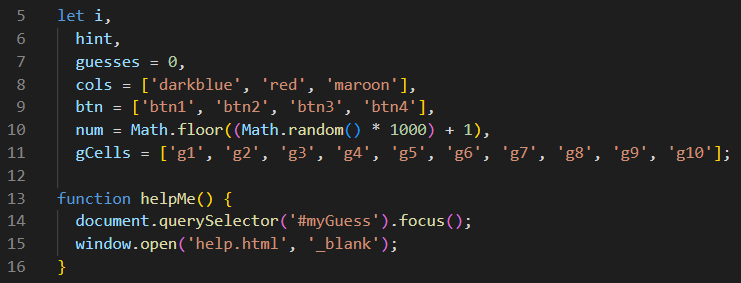
Ah yes! Here we are, declaring our global variables on lines 5 through 11 above. But we are doing something differently here. Line 5 starts out with a let keyword, but each of these lines (except the last one) ends with a comma instead of a semicolon. And believe it or not, this is a perfectly acceptable way to declare multiple variables using JavaScript. Many would call this practice the lazy man's way, but it is valid, and it gets the job done. Notice that we are declaring variables i and hint here without assigning them values. But we are assigning a value of 0 to guesses. We are also declaring and initializing three array objects. The first one called cols appears to be three colors. The second one called btn is an array of four buttons. We already know about three of these buttons, so there must be a fourth button on one of the other HTML pages.
Oh! And on line 10, we are declaring a variable called num. And we are generating a random number between 1 and 1000 using the Math namespace object that is already built-in to JavaScript. Here we are using two of its methods: the floor method, and the random method. This is perfect for a guessing game such as this one because a player cannot easily cheat. Only the program knows the correct number. Of course Math is a deep subject that is far beyond the scope of this project. Nevertheless, if you have an interest in this subject, we provide this complete W3Schools JavaScript Math Reference.
While we are here, we wanted to quickly mention the function shown above called helpMe. It only does two things. It places the focus on the #myGuess input element. And it opens the help.html page in a separate tab of the browser. This function can only be triggered by the onclick event that occurs when the player clicks the Help button on the index.html page.
Now let's look at the JavaScript code displayed below.
At the very bottom of this script on lines 149 through 157, we have an event listener. You've already seen us use similar event listeners. Take a look at the two examples below. The top example waits for the DOM to be fully loaded and parsed before it runs the function. The bottom example waits for the web page to be fully loaded before it runs the function. It's a very subtle difference. And in reality, you could use either one of these event listeners to produce basically the same result. But the event listener we are using in this project is like the one illustrated here in the bottom example. And the exact code we are talking about can be found on line 149 below.


But on line 150, we have yet another event listener. And this one is waiting for a keydown event. And only a keydown event coming from the Enter key will trigger the guess function. So it waits for that event to happen, even if it never does. By the way, the code on line 152 simply prevents the Enter key from doing whatever its normal default function would be. For keyboard events, we almost always include this line of code.
Anyway, regardless of how long this keydown event listener spends waiting, line 156 immediately calls the newGame function on lines 133 through 147.
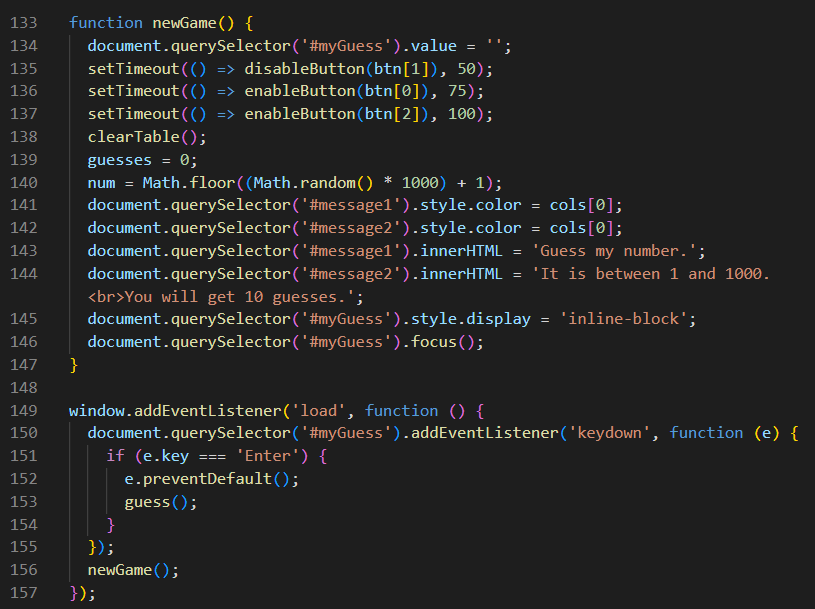
The newGame function above looks like it contains a lot of code, but it's all pretty simple stuff if you look at it line-by-line. On line 134, we assign an empty string to the #myGuess input box, which clears out anything that might have been there before. Then on lines 135 through 137, we run three setTimeout functions in order to either enable or disable the three buttons associated with this web page. Each one of these has a time delay that is 25 milliseconds longer than the previous one. This happens faster than the player will ever notice, but it happens in the correct order to prevent conflicts between these three buttons. On line 138, we run the clearTable function. We will look at that code later, but it does exactly what you would expect a function with that name to do. It clears all of the previous date (if it exists) from the table so that we can start a newGame.
On line 139, we set guesses to 0. On line 140, we generate a new random number between 1 and 1000, inclusive. On lines 141 through line 144, we set the color of our two messages to darkblue. Then, we print two lines of text there to help the player. Line 145 sets the display property of the #myGuess input box to inline-block. And on line 146, we set the focus to that input box as well. That in essence makes the cursor blink in that input box.
And before we move on, let's talk about that. Having the focus always be on the input box means that the player can start typing numbers at any point in the game. The player can also press the Enter key afterwards, and that triggers the guess function, which means that clicking on the Guess button is actually optional. For the most part, the player can than play this game using the keyboard. Then they will be using the mouse very little, or maybe not at all.
Now let's look at the guess function displayed below.
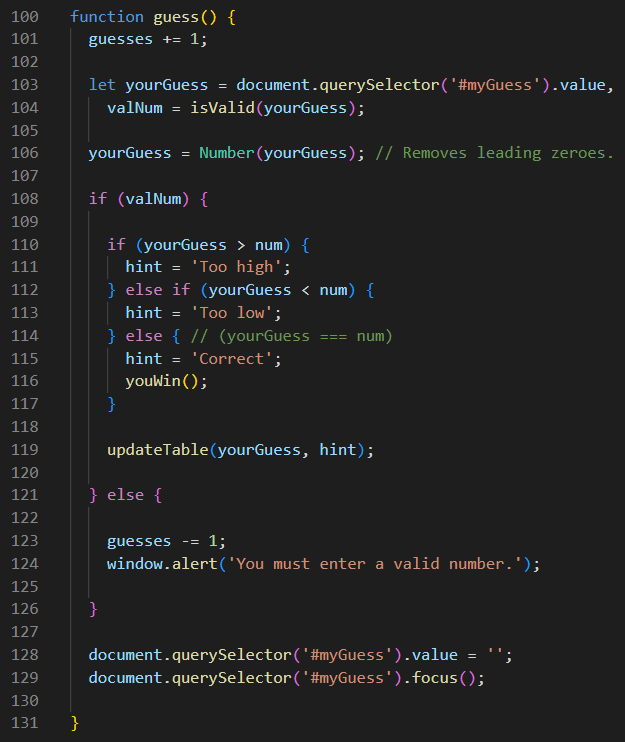
On line 101, we charge the player with 1 guess, regardless of whether their guess is correct or not. On line 103, we grab the value typed in the #myGuess input box, and we assign that value to the yourGuess variable. And in the same line of code, we send that variable to the isValid function, which returns a boolean that is either true or false. That boolean is then assigned to the variable we call valNum. Line 106 removes any leading zeroes from the number, just in case the player typed any.
But the real fun begins on line 108, where we check to see if valNum is true or not. If it is, we run the code on lines 110 through 119. The if-else-statements on lines 110 through 117 evaluate yourGuess. If it is Too High, then that string is assigned to hint. If it is Too Low, then that is the string that is assigned to hint. And if yourGuess is identical to num, then Correct is assigned to hint, and the youWin function is called. The last thing we do in this block of code is run the updateTable function, to which we send the parameters of yourGuess and hint.
However, if valNum is not true, then we execute the code on lines 123 and 124. We give the player back 1 credit for their guess. And we send an alert telling them to enter a valid number.
And regardless of what happens with valNum, the last thing that happens is that we clear the data from the myGuess input box, and then return the focus back to it as well. The player is now ready to take their next guess... unless of course, they already won.
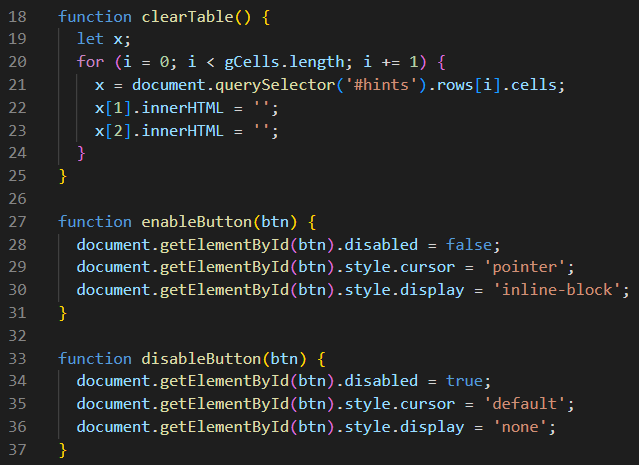
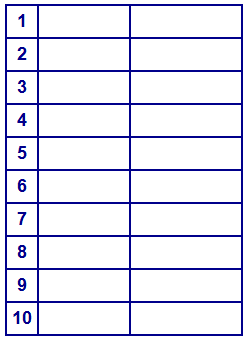
Now let's take a look above at the clearTable function. It's actually easier to comprehend than it looks. On line 20, we are setting up a for-loop that will run ten times. In other words, it will run once for every row in the #hints table as define by the length of items in the gCells array. On line 21, we assign the variable x to the cells in the current row of the table as defined by the index variable in the for-loop called i. And what do we know about each row in this table? We know that it has three cells: one for each column. So we are addressing each of these numbered cells by its numbered location in each row. For instance, x[0] is the first cell which contains the number of the guess we are on. So we have no intention of changing that cell. However, we do want to clear any data that is in the cells at x[1] and x[2]. And that is what is happening on lines 22 and 23. Simple, right?
The functions named enableButton and disableButton are even easier to understand. We pass the button we want to change as a parameter to the function. Then we will toggle its disable property to either true or false. We will also change interesting cursor type and its display property. Piece of cake, right?
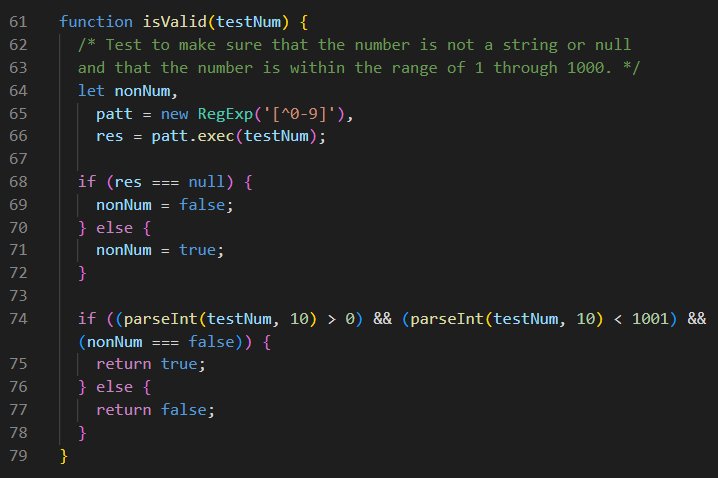
Now let's look at the isValid function below. And of course we cannot test the validity of any number that we are not passing to the function as a parameter. We can name that parameter anything we want, but we chose the name testNum. On line 64, we are declaring a variable called nonNum without assigning it a value. However, we are assigning a value to the variable patt on line 65. The value we are assigning is actually a new regular expression. This RegExp basically says to accept only a pattern of digits [0-9] of any length. On line 66, we use the exec method for regular expressions to see if our testNum can pass that test, and we assign the result to a variable called res. On lines 68 through 72, we want to make sure that only digits were in our testNum, but a null value means that there were not. But the real test happens on line 74. If our base-10 number is an integer that is greater than 0 and is less than 1001 and is not a non-number, then we return the value of true from this function, meaning that the number we sent to it isValid. Otherwise, we return the value of false, and it is pretty obvious what that means.
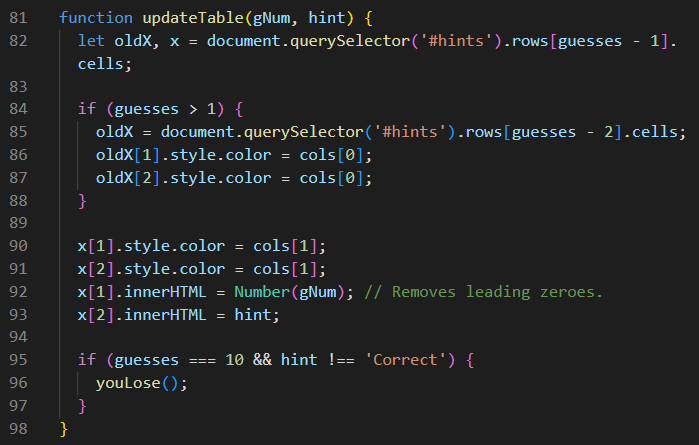
However, the heavy-lifting is done by the updateTable function as shown below. And we send two parameters to that function: the gNum and the hint. In best practice, variable names are always descriptive and therefore self-defining. The programmer who wrote this script chose short variable names rather than descriptive names. So gNum is the guessed number, and the hint is the string of text that was was determined by the guess function. If you recall, that string of text can be of only three different values: it can be Too High, or it can be Too Low, or it can be Correct.
Now let's boil down several lines of code at once. On line 82, we are declaring a variable named oldX without assigning a value to it, and we are also assigning a variable named x to the row of the current guess. If we rapid boil several lines of this code down, we can see that all that happens here is that the color of the previous guess is changed to darkblue, and the color of the current guess is changed to red. On line 92, we remove any leading zeroes from the guessed number (if they exist), and then place the gNum in its proper cell. On line 93, we place the hint in its proper cell. On lines 95 through 97, we check to see if the player has used up all of their 10 guesses without being correct. And if that is indeed the case, we called the youLose function.
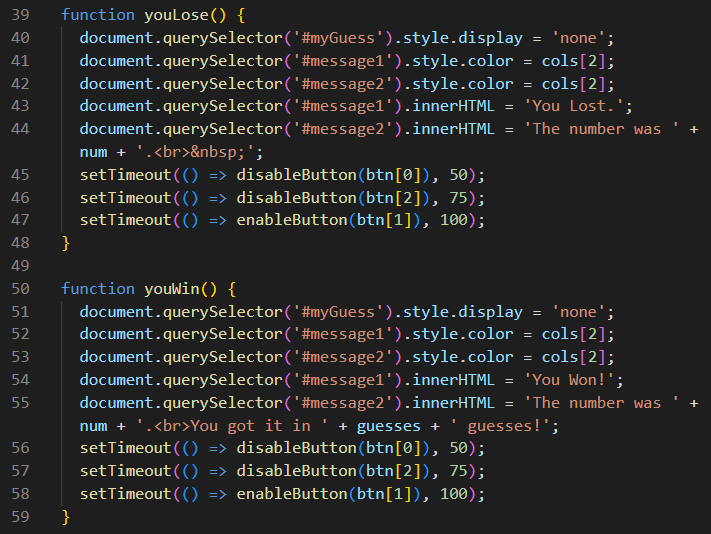
If the player had 10 incorrect guesses, then line 96 calls the youLose function. On line 40, we clear all data from the #myGuess input box. Then on lines 41 and 42, we change the color of our #message1 and #message2 h1 elements to the color of maroon. Then on line 43, we give the player the bad news. And on line 44, we tell that player what the correct number was. On lines 45 through 47, we do the button shuffle again, to get us ready for a new game. That means basically that we disable the Guess button, but we also enable the New Game button at the same time.
Now let's look at the youWin function. If the player guessed the correct number, then the youWin function is called from line 116 of the guess function. And amazingly enough, the code is almost identical to the code in the youLose function... except for line 54 which gives the player the good news, and line 55 which verifies for the player what the correct number was, and it also tells the player how many guesses it took the player to get it right.
Help & Examples
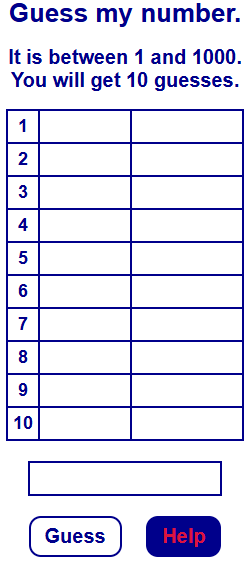
When the Guessing Game web page opens for the first time, it looks very similar to the image on the left. Of course, we are not showing you the interesting fractal background image, or the semi-transparent overlay, but you get the general idea here. So, the player basically has two options. If they already know how to play the game, then they can start typing their first guess into the #myGuess input box, and then they can either press the Enter key, or click on the Guess button. Taking either action will call the guess function, and so on and so forth, as gameplay continues.
But if the player has never played the game and has no idea what to do next, then Help is available. Notice that there are two buttons at the bottom of this web page. There is a Guess button. And there is a Help button. Thanks to the styles in our CSS stylesheet, anytime we hover our mouse over either button, it changes the background color of the button to the color of darkblue, and the color of the text on the button to the color of crimson. And there is something else important to know about button elements and input type="button" elements, and that is that the cursor will not automatically change to a pointer when a hover event is happening. For that reason, you must make that cursor behavior change through code for both of these elements: either through CSS or JavaScript. And remember what we learned from the Fun With Buttons 2 project. There we learned that anchor tags do automatically change to a pointer when a hover event is happening. But we regress.
The image on the left is showing you the result of not hovering the mouse over the Guess button. And it is also showing you the result of hovering the mouse over the Help button. Should the player actually click on that button, the help.html page will open in a separate tab of the web browser. If you look at line 75 of the index.html file, wyou will see that this button has an id of #btn3 and it has an inline onclick event that calls the helpMe function. And lines 13 through 16 of the game.js file is where that function resides.

Most of the HTML content in the help.html file is basically a bunch of code you have seen before so we will will not show it to you here. However, we can see from the code above on line 28 that we have now found the mysterious fourth button named #btn4 that we were wondering about earlier. And we also see that this button also has an inline onclick event, but this one calls the showExamples function. And that function resides on lines 8 through 10 of the examples.js file, that is linked through line 30. So what does that function do? It opens the examples.html file in a separate tab of the browser.
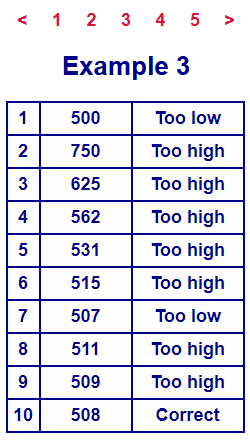
And when the examples.html file opens, it looks very much like this image on the right. But when it opens, it shows the image file named example1.png. To see the image file named example3.png, you have to click on the 3 at the top of the page, or you can also use the left and right arrows < and > at the top of the page to navigate your way through all five of the examples.
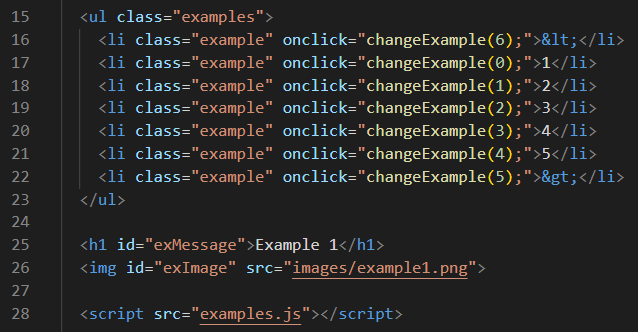
Let's take a look below at the HTML content in examples.html file to see how this is done. What we see on lines 15 through 23 is an unordered list <ul> with a class named examples. Then there are seven list items <li>, and each one of those list items also has an inline onclick event that calls the showExample function, but it passes a numerical parameter to that function as well. Let's jump ahead to the examples.js file to see how that works.
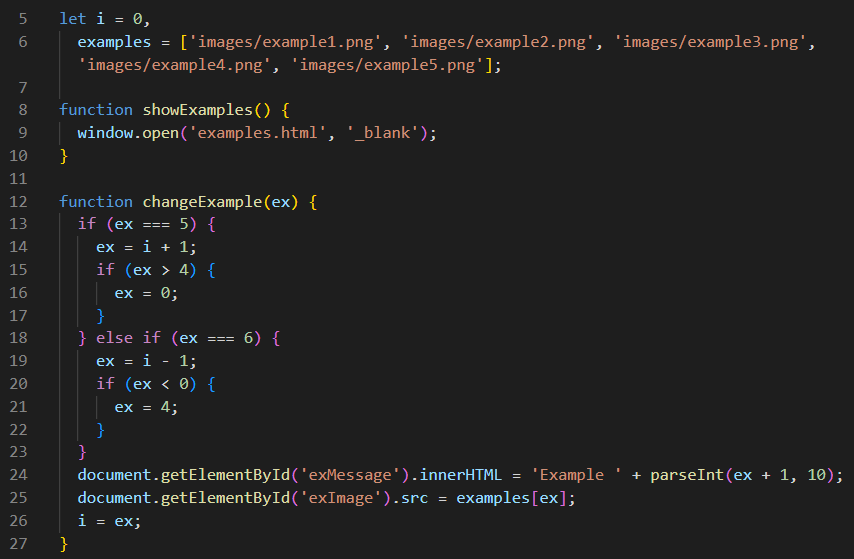
So let's take it from the top. On line 5, we create an index variable named i, and we create an array object named examples which holds the five images files that we see when we use the selectors at the top of the page. We already talked about the showExamples function on lines 8 through 10, so let's skip over that. And instead, let's look at the changeExample function that starts on line 12 and ends on line 27. Notice that we send a numerical parameter to this function each time we call it. And even though we could have named it anything we want, we decided to name it ex. And we will let you figure out all of the different iterations that happen in the if-else-statement that starts on line 13 and ends on line 23. In particular, it is interesting how sending ex values of 5 or 6 makes the examples loop back through the entire array. After the if-else-statement finishes its computations, line 24 changes the message to indicate which example is being displayed. Line 25 then ensures that the correct example image is being displayed. And line 26 assigns ex to the index variable i, and then the player can select another example to view.
Easter Calculator
The Easter Calculator is a fun little JavaScript project. It calculates the correct dates for the Roman Catholic / Protestant Easter, the Eastern Orthodox Easter, and the dates for Jewish Passover. But why are these dates so difficult to predict?
The dates for Easter Sunday are difficult to predict because these two moveable feasts are tied to complex lunar-solar calendar discrepancies and distinct religious rules that prevent them from aligning perfectly. Western Christianity calculates Easter as the first Sunday after the first full moon after the vernal equinox, using the Gregorian calendar and ecclesiastical moon tables rather than astronomical data. On the other hand, Eastern Orthodox Churches use the older Julian calendar and astronomical observations, which often leads to separate calculations that frequently result in different dates for Easter.
Passover or Pesach is another matter entirely because it is determined by the Hebrew calendar, a lunar system where 12 months total only 354 days, roughly 11 days short of the solar year. To keep the holiday in spring, a 13th leap month is added seven times every 19 years. And to make matters worse, this system is further constrained by rules preventing Passover from starting on certain days of the week to avoid conflicts with other high holy days, creating a rigid but shifting schedule that drifts slightly from the solar year over centuries.
We will not be getting deep into the algorithms that others have previously written to make these complex calculations, but that code is definitely here, if you find that sort of thing interesting. We will also restrict users from entering years that are pre-Gregorian (before 1583), or more than 100 years in the future. These restrictions ensure the accuracy of these extremely difficult-to-calculate dates.
Let's never forget that our primary purpose in this part is to learn about most of the different input types and how they enable user interaction. And if we learn more about JavaScript along the way, that's a secondary benefit as well. But we cannot view code that we have not downloaded, unarchived, and opened in VS code, so please click on this link. And when you are ready, we can continue.
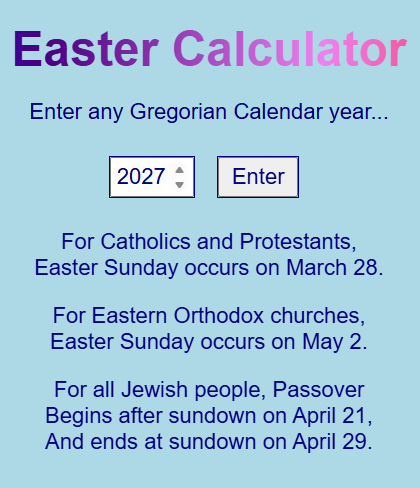
Speaking of user interaction, notice the utter simplicity in this user interface (UI). We have one <input type="number"> and one <button>. Does a UI get any easier than that? A user only needs to select a year, and then they can either click the Enter button with their mouse, or they can press the Enter key on their keyboard.
So far, we have not seen an <input type="number"> before. It differs from the <input type="text"> significantly. For one thing, the number type input has a little up-arrow and a little down-arrow which are both very convenient to the user. If for instance, a user simply wants to find out when those Holy Days will occur next year, they are only required to click once on the up-arrow, and then click once on the Enter key, and the answers will be revealed immediately. That is basically what we are seeing in the image above. And does it seem odd to you that in 2027 none of these three religious holidays are overlapping? Or even occurring within the same months? Neverthless, a user could also type any valid year into that input box and then press Enter. The number-type input offers us this versatility as well. Type 2028 into the input box if you want to see an instance where all three of these holidays align perfectly. It's nice to see that we can all agree on one thing in these troubled times. But we regress.
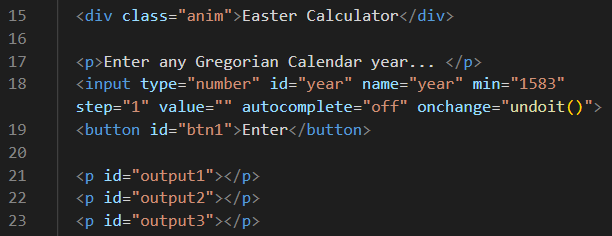
With tongue-in-cheek, let's look at the HTML code for this project as shown below. For the moment, we will quickly step over line 15. Line 17 is a simple paragragh. On line 18, we have the number-type input element. Since we are using this element to select a year, we are giving the id and name properties of this element the value of year. We are also giving the min property a value of 1583. That sets a minimum value for the input box so that a value less than 1583 cannot be selected using either the up-arrow or the down-arrow. That does not stop the user from typing in a value like 1492, but as you will see later, we have other controls in place to stop the program from attempting to use years that are not Gregorian calendar years. You should also know that we had the option of adding a max property in addition to the min property. As you have already guessed, that would have set a maximum value for the input box, but we chose not to do that here. The next property is the step property, and giving it a value of 1 means that the two arrows can only increment or decrement the year by the value of 1 with each click. Next, we assigned no value to the starting value property, but we will give it a value of the current year through JavaScript, as you will see later. As desired for many input elements, we don't want it to suggest any previously-entered years, so we are turning autocomplete off. Lastly, we are adding an onchange property that will call the undoit JavaScript function in the event that the input box detects a change, and will learn all about that when we look at the JavaScript code as well. But let's not ignore the three paragraph elements on lines 21, 22, and 23, each with its own unique id of output1, output2, and output3.
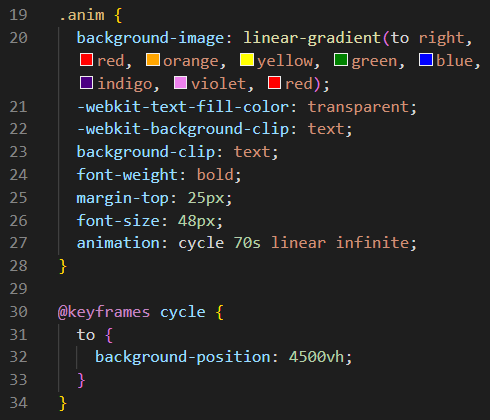
Did you know that those eponymous brightly-colored, hard-boiled eggs that are an Easter tradition were originally a pagan tradition that predates Christianity? Fact is often more fascinating than fiction! And that fun fact was the inspiration for the colorful div with the classname of anim on line 15 above. Since this course is based on JavaScript, not CSS, we will not spend time explaining how this works. However, you can view the CSS code below. You can also download the Rainbow Text project that was quickly sneaked in at the very end of Part 8d in our CSS Coding Course. But let's get back to learning how we used JavaScript in this project.
Ah yes, JavaScript. The very first thing that happens here on line 15 of the script.js file is that the window object immediately calls the fillit function as soon as it loads. Yes, I know that we've been teaching you to add event listeners that wait until either the web page or the browser window loads before running other JavaScript code as best practice. And that is still true. But our HTML and CSS here is extremely simple. So for this project, we know that this will not create conflicts.
Since it happens first, let's look at the fillit function on lines 27 through 32. The name of the function seems to vaguely suggest what it does. First, it creates a new Date object. Then it performs the getFullYear method on that object and assigns it to a variable called year. Doing this will give us the current year, even 30 milliseconds after midnight on New Year's Day. Then we assign our current year value to the empty value property we left unassigned in our <input type="number"> element that has the unique id of year. Lastly, we set the focus to that element so that it is ready for user interaction.
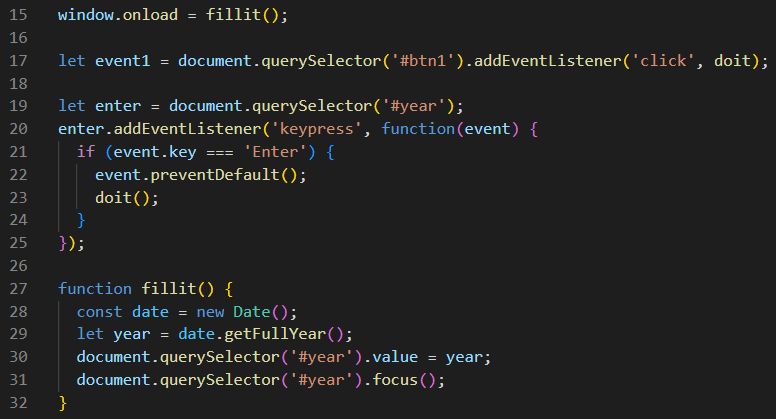
Now let's look at line 17 above. That long line of code can be easily summed up to make sense. Since we only have one button and it has the unique id of btn1, we can add a click event listener that will run the doit function when that button is clicked. We also assigned this long statement to a variable named event1, but that variable is never used, so the assignment was unnecessary. Perhaps the programmer thought it might have another use later.
But on line 19, the programmer assigned the one input with its unique id of year to the variable named enter. And that variable name is used on the very next line where the programmer adds a keypress event listener that calls the doit function when the Enter key is pressed. This event listener performs the same task as the button code on line 17, but offering more options like this one is what kind user interaction is all about.
The doit function code is displayed below. First we grab the year value from the #year input box, and then we do two validity tests on it. As mentioned earlier, if the year is less than 1583, it is not a valid Gregorian calendar year, but it must be for our calculations to produce correct results. So in that case, we alert the user with that information and then call the fillit function. And to ensure accurate calculations by our algorithms, we arbitrarily decided that any year that is over 100 years in the future should also be excluded. Should the user try to enter a year of this type, a similar alert will appear before the fillit function is called. However, for any year value entered that is between 1582 and 2126, we pass that year as a parameter to the calculateGreg function, and then to the calculateJuli function, and then to the calculatePesach function. And for now, we will skip any long discussions about these three functions.
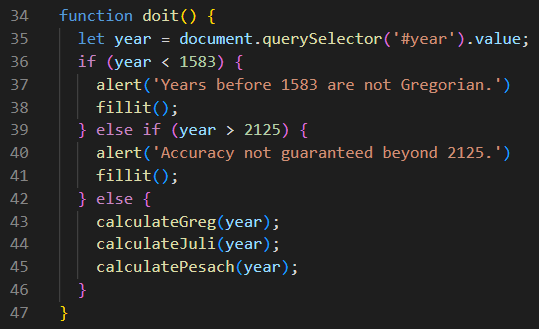
However, after lots of number-crunching, the calculateGreg function is able to determine both the month and day of Easter Sunday given the year value that we pass to it as a parameter. The image below illustrates what it does with that information at the very end of that function.

In a similar fashion, the calculateJuli function is able to calculate the month and day of Easter Sunday from the year value we pass to it as a parameter. The image below shows us what it does with that information at the very end of the function as well.

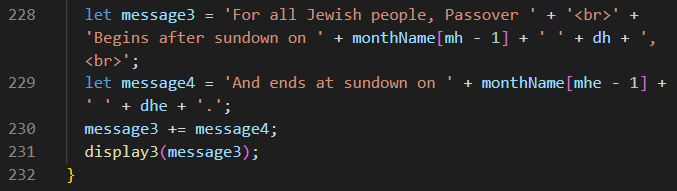
Given what we saw happen above, it should not surprise you to learn what the calculatePesach function does. Granted, it is a little more complicated than the other two examples above. Yet it is able to calculate the month and day that Passover begins and ends from the year value that we pass along to it as a parameter, only using much different variable names. Since it requires multiple lines of text to display those dates, we assign the beginning date message to message3, and then we assign the ending date message to message4. And then on line 230, we simply concatenate message3 and message4 together, before passing it to the display3 function on line 231.
And what about these three functions named display1, display2, and display3? As you can see below, we simply send each message that we passed to it as a parameter to one of the appropriately-named output paragraphs at the bottom of the index.html page. Simple, right?
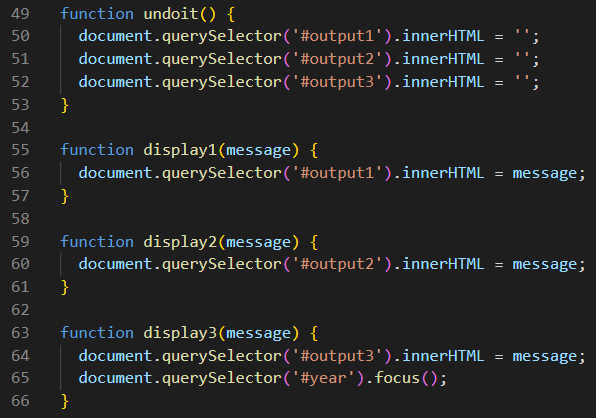
The only function left to explain is the undoit function shown above. If you recall, that function is triggered by an onchange event that happens in the year input box. But typing in that box is not detected as a change per se. However, clicking on either of those two little arrows will set it off. And once the function is called, it performs the simple task of erasing the data in those three output paragraphs at the bottom of the index.html page.
Optional History Lesson
As explained earlier, unless you are an avid astronomer and mathematician, we will try to discourage you from deep-diving into the code inside the function of calculateGreg, which calculates the date for Easter Sunday with algorithms based on the Gregorian calendar. Similarly, the function of calculateJuli calculates the date for Easter Sunday with algorithms based largely on the Julian calendar. And then there is the the calculatePesach function that calculates the beginning and ending dates for Passover using algorithms that are based mostly on the Hebrew calendar.
A ton of research went into finding these algorithms, and then compiling and adapting them to our own code found here. The code is well-commented, and the research references used at the time this project was written are listed at the top of the script.js file. Oftentimes we used console.logs during testing to ensure the validity and accuracy of the algorithms used. The greatest obstacles we had to to overcome for this project were the differences between the calendars used in these calculations.
Just imagine for a moment that you are the Venerable Bede (673 - 735 CE), an English monk tasked with the job of calculating future dates for Easter Sunday. But you discover that the Julian calendar you are using to determine these dates does not properly coincide with the true Vernal Equinox. And it is your job to set the date of Easter to the first Sunday that follows the first full moon that occurs after the Vernal Equinox. But you determine from your own accurate astronomical observations that the date of the Vernal Equinox is off by about a week according to your calendar, thus making your job completely impossible, while the Vatican is very unhappy that you cannot properly perform these duties that were assigned to you. So now what do you do?
Sometimes change happens very slowly. And so, Aloysius Lilius (1501 - 1576), an astronomer and chronologist formed the basis for what would eventually become the Gregorian calendar. In 1582 after the death of Lilius, the Gregorian calendar was instituted by Pope Gregory XIII in his own name to get the calendar back on track with the true solar year, mostly because Easter Sunday could no longer be reliably celebrated at the correct time relative to the Vernal Equinox. The addition of leap year made that possible.
However, it was the Julian calendar that was instituted by Julius Caesar in 46 BCE as a reform to the Roman calendar that had issues of inaccuracies of its own. But even today, without the addition of leap years, the Julian calendar continues to lose time, to the point that the clergy of Eastern Orthodoxy have acknowledged openly that the two different dates for Easter Sunday will never again coincide after the year 2700.
To do our calculations here, we had to make sure that we could adapt our Julian calendar dates to Gregorian calendar dates, despite the drift that happens between the two calendars over time. When the Gregorian calendar was instituted, the offset between the two calendars was ten days. Today the offset is 13 days and it will be 14 days in the year 2100. Just imagine where we'd be if change happened this slowly at NASA and SpaceX. We wouldn't have visited our Moon or sent robotic rovers to Mars. That much is certain.
Nevertheless, differences between the Hebrew calendar and the Gregorian and Julian calendars have a much wider gap to bridge. We mentioned this at the beginning of this project. However, a team of brilliant mathematicians have built the bridge that spans that gap, but that algorithm is largely incomprehensible to the majority of us.
And at one point, we even considered trying to find an algorithm that would help us to calculate the dates for Ramadan. However, we found that the Islamic calendar is even more convoluted than the Hebrew calendar. And since Ramadan can occur twice in the same Gregorian calendar year, we found that there is very little hope that any such algorithm could be written to easily solve this problem.
Calendars are indeed a fascinating subject! But we have learned over time (pun intended) that calendars that are not solar in nature, and are not based on something close to 365.24219 days per year can have serious consequences. Happy Easter!
Custom Color Mixer
We worked with this project in Part 6 of the CSS Coding Course. That part of the course was devoted to Color. And at the time, we were only interested in learning about CSS, especially as it applies to choosing background colors and foreground colors. Perhaps we should describe how this UI works before we dive deep into the code. It is actually quite easy to use.

As you can see, there is a set of three slider controls in the block on each side of the UI. The set of sliders controls in the block on the left side allows the user to change the color of the document body background. But there is also a set of three slider controls in the block on the right side that allows the user to change the color of the document body foreground. The three slider controls in each block are arranged in the order of red, green, and blue. And by moving each slider bar back and forth, the user can quickly change the value of each of these primary color components. And by clicking the button of the left side of the slider, the user can decrease the value by one with each click of the button. And by clicking the button of the right side of the slider, the user can increase the value by one with each click of the button. Below the three slider controls on each side, the program produces CSS code in both RGB and Hex values that the user can then cut-and-paste into their projects. Another nice feature is that the colors in the document body background and text are updated with every slide and/or click, and that helps the user to find an ideal mix of colors for their next project. However by design, the colors inside the two blocks of slider controls do not change. And the reason for that seems obvious. One more nice feature of this UI is that each one of these 18 controls has an instructive title that pops up as the user hovers their mouse over each control. Click here to take the Custom Color Mixer for a fun little test drive.
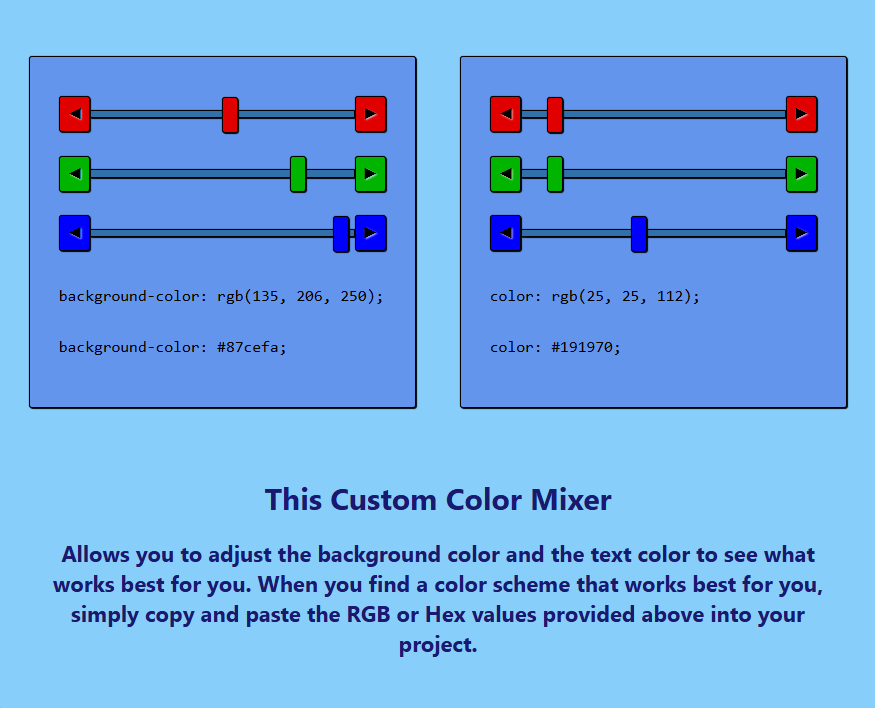
This project uses 6 <input type="range"> elements and 12 <buttons>, so we will be especially interested in how these elements provide for helpful user interaction. And so, without further ado, let's download, unzip, and then let's open this Custom Color Mixer project in VS Code.
We also want you to know that we learned all of the CSS styling for these <input type="range"> elements from the good people at CSS Tricks. This particular tutorial was written over 10 years ago, but this code seems to work just fine on every web browser we used to test it. So click here to see this incredibly well-written tutorial. CSS Tricks is often our go-to source for CSS information, especially when nobody else seems to provide good solutions. And as usual, we will skip most of the CSS styling in this project so that we can focus instead on the JavaScript code. But you might find it helpful to know that we are loading two separate CSS stylesheets for the project. We are loading sliders.css which contains all of the styles for the 18 controls we just mentioned. And then we are loading style.css which contains all of the styles for the rest of the tags and elements.
The document body of the index.html file appears below. However, you can see that the two divs with classnames of container1 and container2 were compressed down so that we could see the entire body. This is a fairly simple layout. We have a div with a classname of container, and those two other previously mentioned divs are nested inside of it. Below the container div, we have another div with a classname of text-area with an h1 element and an h2 element inside of that div as well. Simple, right?
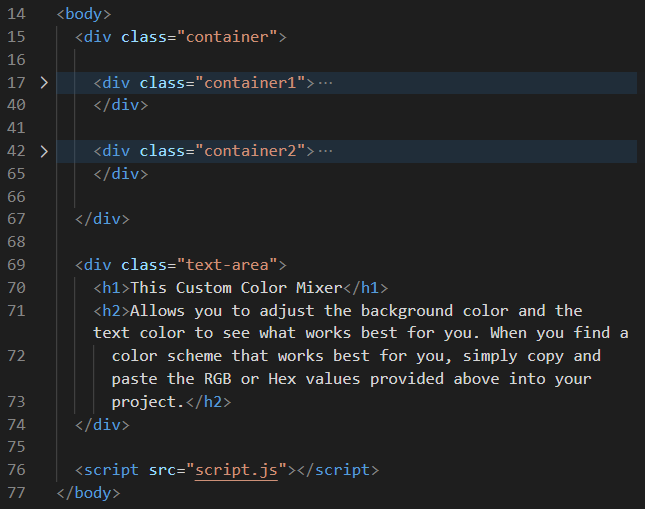
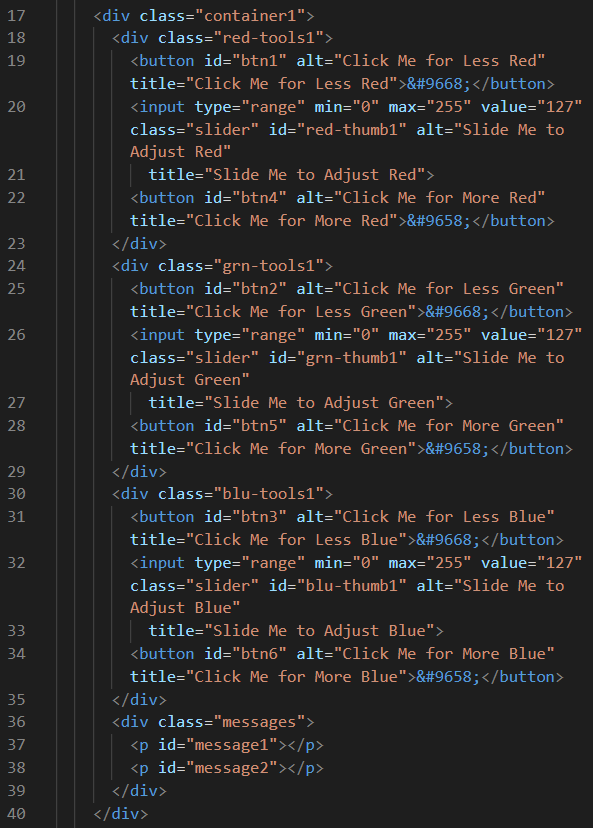
Now when we expand the container1 div, we can see all of the other elements inside of it. And there are actually quite a few, but they are not very difficult to understand because there is a lot of repetition here.
And likewise, if we expand the container2 div, we can see all of the elements inside of it as well. If it looks a lot like the container1 div, that was done by design.
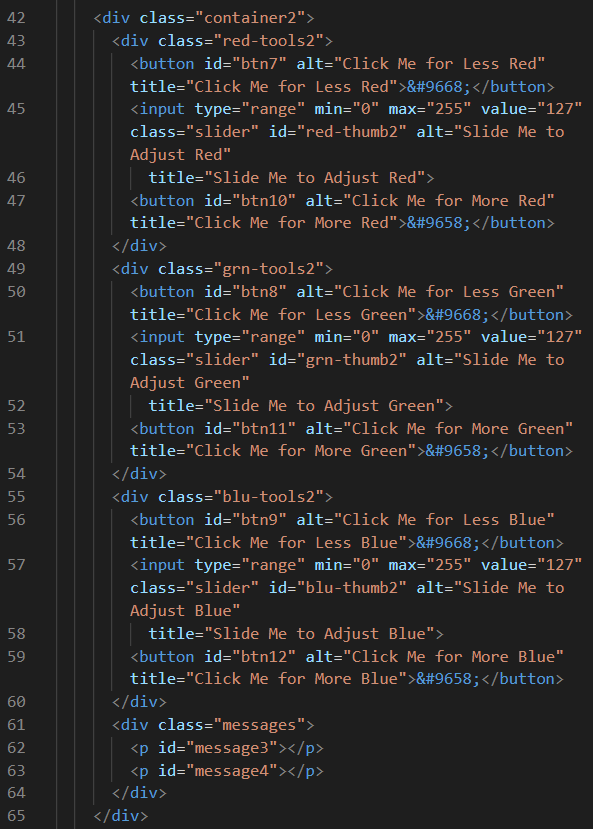
Probably the easiest way to keep this discussion informative and brief at the same time is to show and describe just one of these slider controls like this one, which is named red-tools-2. You can find the code for this div on lines 43 through 48 above. Since all six of these slider controls are similar, there is no need to describe each and every one of them.
However, each one of these slider controls has a slider bar in the middle of it with two parts. We are calling that long bar the track, and we are calling the button that slides on the track the thumb. Both parts of the slider bar are parts of the <input type="range"> element that we styled here in the primary color that best describes its purpose. By using the slider, the user can rapidly change the value of the color component they are adjusting. In the red-tools2 div above, this particular range input was given the unique id of red-thumb2, but it also has an alt and a title property that tells the user Slide Me to Adjust Red when they hover over that control. It also has two other properties of interest. It has a min property with a value of 0, a max property with a value of 255, and a default value property of 127, which would place the thumb in the middle of the track, until that value and position is changed by the user or by JavaScript. Of course we already know that the minimum and maximum limits of this value are 0 and 255, respectively.
But each one of these slider controls also has two buttons: one on the left side of the control, and one on the right side of the control. Even though we've alread described how they work, we will repeat that clicking the button on the left side will decrease the value by one with each click, while clicking the button on the right side will increase the value by one with each click. All of these buttons are your standard <button> elements, but each one is given a unique id that ranges from btn1 to btn12. In our red-tools2 div above, they are uniquely identified as btn7 and btn10. The btn7 button has alt and title properties that tell the user Click Me for Less Red when they hover over that control. The btn10 button has alt and title properties that tell the user Click Me for More Red when they hover over that control. And the unicode symbols used here of ◄ ◄ and ► ► as labels on these buttons are also helpful to the user as well.
That was a closer look at the HTML code in this Custom Color Mixer project. When looking back at code you wrote a few years earlier, you will find that there are often better and more efficient ways to perform the same tasks, thus reducing much of your code that duplicated repetitive tasks. That doesn't mean that the older code does not work. It simply means that you have evolved as a programmer to the point where you now know much better ways to write code. And that's just a brief and unapologetic disclaimer. Now let's take a look at the JavaScript code in this project.
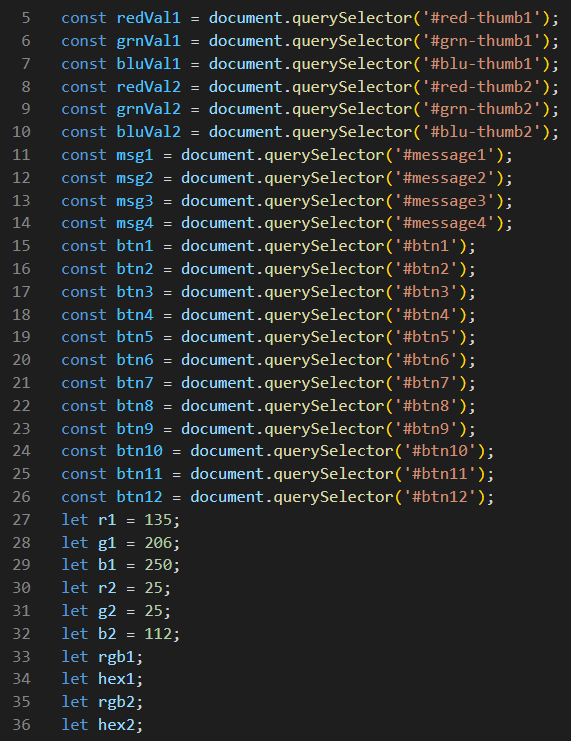
At the very top of any JavaScript file, it's considered to be best practice to declare global variables that you will be using throughout your script file. On lines 5 through 36 in the script.js file as shown above, we are declaring 32 global variables. The first six variables on lines 5 through 10 are basically the locations and the value properties for each of our six different slider bar thumbs. Lines 11 through 14 are the locations of the four message paragraphs. Lines 15 through 26 define where our sixteen button elements exist. All of the elements on lines 5 through 26 do not change, so they are declared with the const keyword. However, the variables on lines 27 through 36 have values that must be able to change, so they are declared with the let keyword. The six variables on lines 27 through 32 are the starting RGB values for our document body background and text, so they are initialized and assigned those values. However, the variables on lines 33 through 36 are simply declared without being initialized or assigned values, because their values change constantly.
If we jump all the way to the bottom of the script file, we find that the script calls the updateAll function as soon as the web page is loaded completely, thanks to this event listener.

And since the updateAll function is the first function to run, let's look at that function next. On line 59, we are creating the string value for the variable rgb1, and on line 60, we are creating the string value for the variable rgb2. These are important lines of code because on line 61, we are setting the background color of the document body to rgb1. And on line 62, we are setting the text color of the document body to rgb2. On line 65, we are displaying the value of rgb1 for the user. That value will appear in #message1 on the index.html page. And on line 67, we are displaying the value of rgb2 for the user, and that value will appear in #message3 on the index.html page.
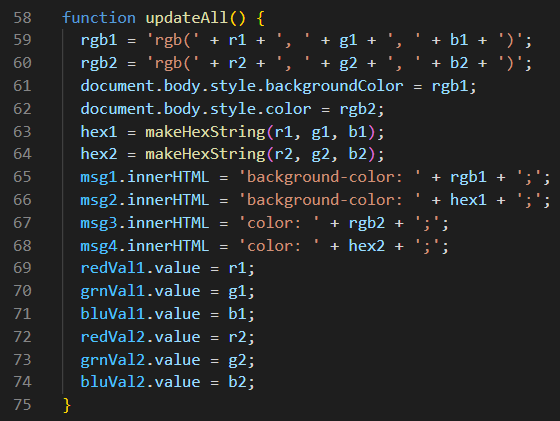
On line 63 above, we are calling the makeHexString function, which will return a value that we will store in the variable named hex1. On line 66, that value will then become part of the string value displayed for the user as #message2 on the index.html page. And on line 64, we are calling the makeHexString function, which will return a value that we will store in the variable named hex2. And on line 68, that value will then become part of the string value displayed for the user as #message4 on the index.html page.
Now let's look at lines 69 through 74. Here we are updating the values for r1, g1, b1, r2, g2, and b2. These variables determine the values and locations of our six slider bar thumbs. Let's look at the makeHexString function next to see how it processes those three parameters we pass to it: r, g, and b.
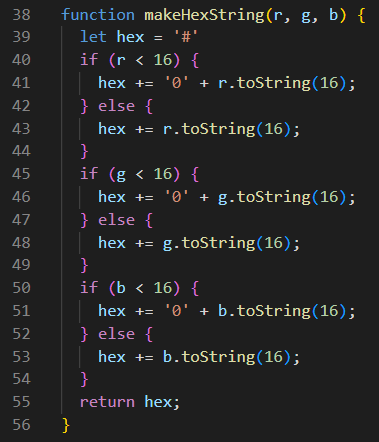
On line 39, we declare a variable named hex and assign a string value of '#' to it. We will build the rest of the hex code from there. And you must remember that hexadecimal numerals are base-16 numbers. So on line 40, we have an if-statement that is checking to see if r is less than 16. And if it is, then the JavaScript built-in function of toString(16), when passed the parameter of 16, will first convert the number r to its hexadecimal equivalent, and then return it as a string variable. Then we are going to concatenate a '0' along with the base-16 string value of r to the variable named hex. Let's say that the value of r was 15. that means that on line 41, it will be converted to f, and then the value of hex will be '#0f'. But what happens if r is greater than 15? Suppose it has a value of 250 instead. Then on line 43, it is converted to 'fa', and then the value of the variable called hex will be '#fa'.
But we are not done. We also have to convert the variables on g and b, and they must be concatenated to hex as well. Let's suppose here that the value of g is 57 and the value of b is 9. Then follow the rest of the code in that function to its ulimate conclusion. And in that case, the value of hex becomes '#0f3909' (a shade of dark green) if r had a value of 15. Or the value of hex becomes '#fa3909' (a shade of bright orange) if r had a value of 250.
The last thing that happens after we have a proper hex code assigned to the variable called hex is that the variable named hex is returned to the line of code that initially called the function. And that value is then assigned to the variable named hex1 if the function was called from line 63. Or, it is assigned to the variable named hex2 if the function was called from line 64. Remember that those lines of code are found inside of the updateAll function.
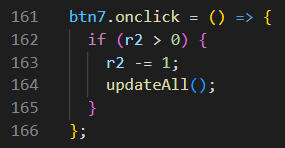
There are twelve buttons in this project, and each one of them has an onclick event attached to it. And we said from the beginning that we would only concern ourselves with elements that are part of the red-tools-2 div. So let's look at the code for btn7 below. It's actually pretty simple code. Each and every click on that button triggers a nameless arrow function that checks the value of r2 to ensure that its value is greater than 0. And if it is, it then decreases the value of r2 by 1, and then it calls the updateAll function. Piece of cake, right?
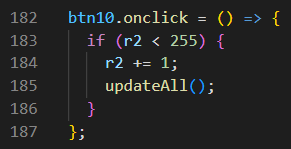
But what happens if the user clicks on the btn10 button? Well, each and every click on that button triggers a nameless arrow function that checks the value of r2 to ensure that its value is less than 255. And if it is, it then increases the value of r2 by 1, before calling the updateAll function. Easy as pie, right?
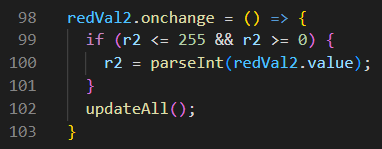
But what happens between those two buttons? Don't forget that we have a slider bar that is actually a input type="range" that we have given the unique id of redVal2. And each time the user slides the thumb on the track of that control, it changes its value. But let's look at line 99 first. If the value of r2 is less than or equal to 255 and the value of r2 is greater than or equal to 0, then we take the value of redVal2, convert it from a string to an integer, and then we assign it to the variable named r2, before calling the the updateAll function.
Put it all together and you can see that each slide or click action performed on any of these 18 elements triggers the updateAll function, so that the results of each action causes an immediate change in the Custom Color Mixer UI. Could there be any better example of user interaction that this one?
The JavaScript code in this project was written with you in mind. We wanted to make it as simple and easy to understand as possible. But we also noticed a lot of redundant and repetitive code. There were far too many variables and way too many event listeners. In reality, a good programmer writes code that uses the DRY Principle. The DRY acronym stands for Don't Repeat Yourself.
With no added comments, our script.js file is over 200 lines of code in length. So we decided to feed it to our favorite AI chatbot, ChatGPT, to see if it could make it any DRYer. And the result of that inquiry is attached to this project as script1.js which has only 85 lines of code, and is much more efficient than our script.js file. So please feel free to look at the code in that file. You can also change line 76 of your index.html file to link to that file as well.
We have purposely sidestepped any discussion of CSS for this project. But we encourage you to dive in a little deeper if this sparks your interest. Remember that we talked about how we learned how to style the sliders from the nice folks at CSS Tricks. Feel free to follow the link to their tutorial, and to view the sliders.css file to see how that was done. It includes lots of comments, and we found that this is the minimum amount of code required to make it all work. We tried to remove some of it, and found that every line is important, regardless of which web browser you are testing it on.
And for the style.css file, it contains all of the CSS for all of the other tags and elements in this project. We are very proud of how well it all works together. We used flexbox CSS rules extensively, and we think that decision made a world of difference. In fact, this project is a model of perfection in terms of mobile-responsiveness. Considering that the UI covers the width of almost any screen size, only two media queries were required to make it conform to every possible screen size.
In conclusion, we hope you learned a lot here, and we hope enjoyed working with this project.
Chinese Zodiac Sign Finder
Please feel free to take our Chinese Zodiac Sign Finder for a spin. It's actually a fun project. Simply enter the date of birth for anyone, living or dead, with a birthdate that falls within the Gregorian calendar, and this program can correctly identify their sign on the Chinese Zodiac including their element, and whether they are yin or yang.
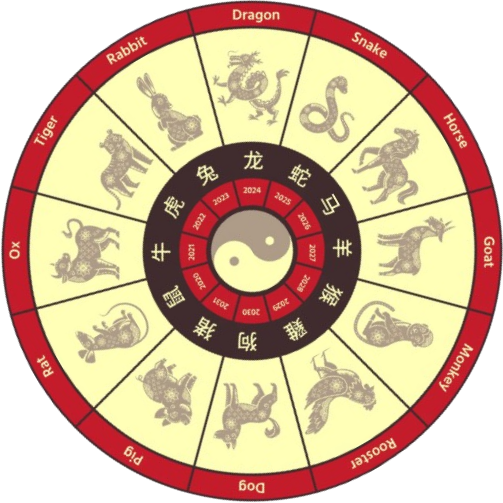
For instance, if you were born on May 16, 1976, then you are a Fire Dragon, which makes you Yang. And much like with our Easter Calculator project, the greatest challenge to overcome was performing calculations based on the phases of the moon, simply because they don't align well with our solar calendar. In most respects, modern Chinese culture has adapted to using the Gregorian calendar, except when it comes to establishing the date for Chinese New Year each year. That means that your sign on the Chinese Zodiac is dependant upon whether you were born before or after the date for Chinese New Year in that particular year. And like with Easter and Passover, these dates can be vastly different from year to year. One other cultural problem we faced is that the Chinese regard sheep and goats to be the very same animal. So we chose to go with Goats. If you were told that you are a Sheep, our program will identify you as a Goat. Please don't be offended by that. GOAT is an acronym for the Greatest Of All Time.
But enough of this chit-chat. Let's download this project, unzip it, and then open in VS Code so we can begin to see how this program works.
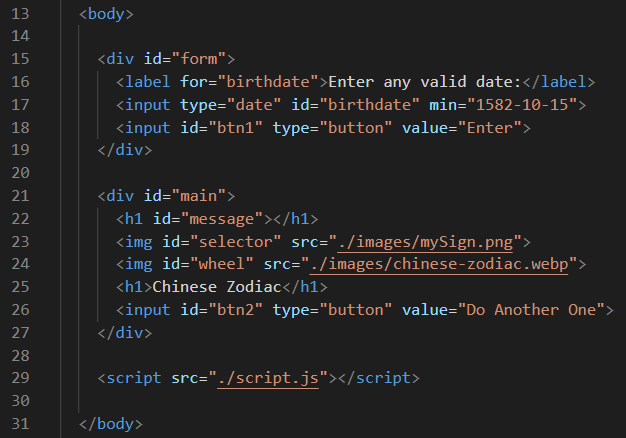
The document body of the index.html is displayed below. Notice that it has two parts: there is a div with an id or form, and there is div with an id of main. Only one of these parts will be visible at a time. When the program starts, the form will appear. It only has two important elements: it also has an <input type="date"> with an id of birthdate, and it has an <input type="button"> with an id of btn1. After this fake form performs its user interaction, it is then hidden, and then the main appears. The h1 element with the id of message will tell the user what sign they are. Below that, is an image with an id of wheel which will then spin to display the correct Chinese Zodiac sign for the user. The main div also has another <input type="button"> with an id of btn2 that will allow the user to do it all over again. And when the user clicks that button, the main disappears, and the form once again becomes visible.
The main reason for this one-page, two-part design is to avoid having to pass variables between pages. If you recall, the Mandalorian Login project had to store sessionStorage variables for the two separate web pages to share information. But this one-page design makes that unnecessary. Now let's dive down into our JavaScript code.
The very last line in our script.js file is on line 252, and by now you already know what that does. So let's look at the init function on lines 230 through 250. Notice that on lines 231 through 235 we are declaring and assigning five block-scoped const variables. They define the locations of form, main, btn1, btn2, and dateInput. On lines 237 and 238, we show the form, but we hide the main. Then on lines 240 and 241, we add click event listeners to btn1 and btn2, even though only one of those buttons is currently visible. This means that a click event on btn1 calls the getDateValue function, while a click event on btn2 calls the resetForm function. And you'e seen the code on lines 244 though 249 before. These lines of code add a keydown event listener to dateInput which then listens for and traps the Enter key. And if it detects that event, it does the same this as line 240: it calls the getDateValue function. So let's take a look at the getDateValue function next. And we will do that in two parts because this is a long function.
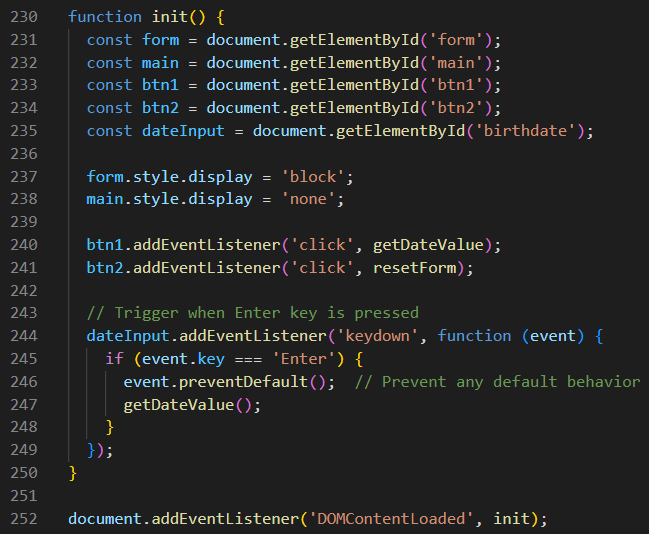
The code in Part 1 of the getDateValue function is displayed below. On line 175, we are declaring and assigning a const variable that defines the location of dateInput. Wait! Didn't we already do that in the init function? Yes, but that declaration and assigment was block-scoped, just as this one is as well. That means that it will go away when we are done running this function.
Line 176 is also a little bit mysterious. This JavaScript code dateInput?.value is a nullish coalescing or optional chaining expression that safely accesses the value property of the dateInput object. And if that just sounded like a word salad to you, then let us explain that further. Basically it is checking to see if dateInput is missing. And if it is, then the expression evaluates to undefined instead of throwing a TypeError. But it actually does more than that, because it is also checking for a properly-formatted dateInput, which would be correctly formatted as YYYY-MM-DD. But that is only the first half of that line of code, which also states, OR, if it is an empty string, then take that value and use the trim method on that string to remove any leading and/or trailing zeroes. Then, the take that trimmed value and assign it to the const variable named selectedDate.
On lines 178 through 181, we check to see if there in a selectedValue. And if there is not, then we trigger an alert to tell the user to enter a value, before we return to wait for the user to enter a value. On lines 183 to 185, we are passing the selectedDate variable to the function named assertGregorianDateOrAlert which basically returns true if the selectedDate was indeed found to be a Gregorian calendar date, but it returns false if the selectedDate was not a Gregorian calendar date, and then it will return to wait for the user to enter a valid value. (And we'll look at that function later.)
On lines 187 though 189, we are defining three const variables, and you know the reasons why. The last thing that happens if everything else went right is that we hide the form and show the main.
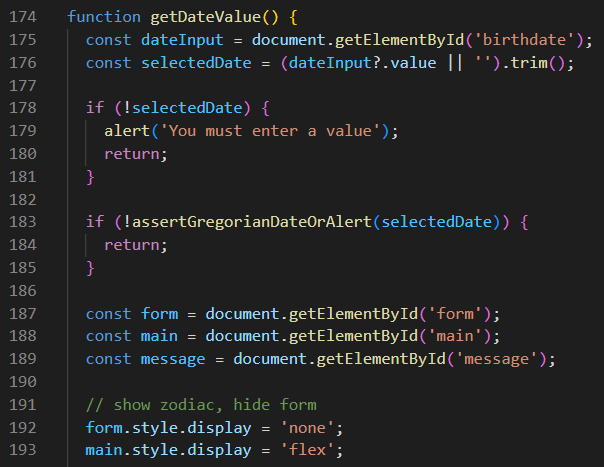
The code in Part 2 of the getDateValue function is displayed below. Remember that the main div is now displayed, and the form div is now hidden. On lines 195 through 201, we are declaring seven const variables. Yes, these seven consts are block-scoped, but they have not been declared before so they are new. On line 195, we are passing the selectedDate to the evaluateDate function, and assigning the value it returns to us to the variable named z. Then on line 196, we are passing the selectedDate variable to the makeItPretty function, and assigning the value it returns to us to the variable named zz.
Let's talk about this before moving on. The selectedDate variable has the ISO Date format of YYYY-MM-DD. So let's say that our selectedDate is 1976-10-15. Then after line 195, our z variable is assigned a date that is formatted like 15 Oct 1976. Then after line 196, our zz variable is assigned a date that looks prettier to Americans, like October 15, 1976.
Line 197 is where the magic begins! We create a new ZodiacSign object, using the ZodiacSign class on lines 5 through 83 of the script.js file. But in order to do that, we must create a value we can pass to it. In this case, we are creating a template literal by combining the value of selectedDate with T12:00:00. We know that working with the Date object can get tricky and confusing, so we will try to help you understand this. Basically T12:00:00 means 12:00 noon in your local time zone. So suppose we add that to our imaginary selectedDate. Then the template literal value becomes 1976-10-15T12:00:00. But we are also attaching the .chinese property to it as well, which will convert that Gregorian calendar date to the modern Chinese calendar date, and the result it returns will be assigned to the variable named MyDate. Thanks to the Date object, your web browser already knows how to do what we just explained, so it now already knows the date of Chinese New Year for 1976.
OK, but what does myDate know that these other date objects do not know? That's a great question! We are so glad you asked it! The answer is that the myDate object is not a date at all. It only contains these three properties: myDate.sign, myDate.element, and myDate.yinyang. So believe it or not, the web browser did all the heavy lifting for you, and you can put away those moon phase charts of the past 445 years. The hard work has already been done for you already.
On line 198, we pass the myDate.sign value to the getRotationValue. In our imaginary example, that value is Dragon which returns the value of 8, which we assign to the variable named val. Then on line 199, we multiply val by 30, and then add another 360 to it. Why add another 360 to our rotation value? Ah, good question! Because in the event that our animal is a Rat, then the getRotationValue function returns 0. And 0 times 30 = 0 which means that the wheel would not rotate at all. By adding 360 to it, it ensures that we get at least one complete wheel rotation. And why do we multiply the number it returns by 30? Because 360 degrees / 12 signs = 30 degrees for each sign. OK, fair enough.
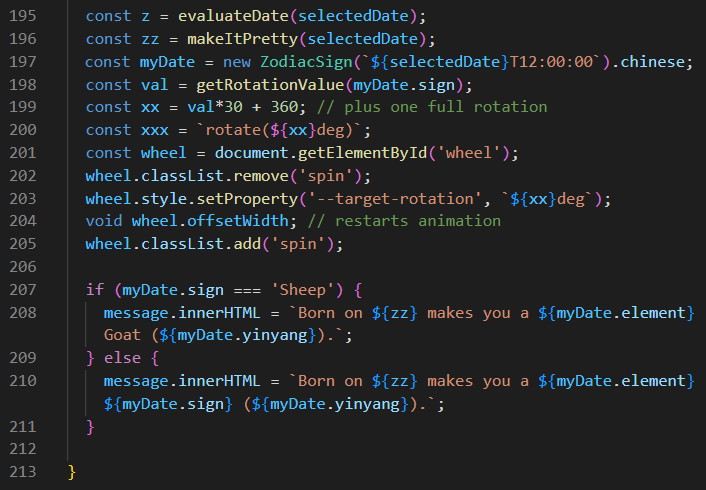
Anyway, getting back to our imaginary Dragon example, 8 times 30 = 240 + 360 = 600. So on line 199, we assign that value to the variable named xx, and that is the number of degrees the Zodiac Wheel will spin before it lands on the Dragon. On line 200, we create another template literal that becomes the rotate command that we assign to the variable named xxx. And on line 201, we tell JavaScript where it can find this wheel image.
So what do we already know about CSS animation? Well, we know that it can only be triggered by events and initialization. Did you notice that the star at the top of this web page rotates when you first loaded the page? That is because it was being initialized by CSS. And JavaScript can do this through simulation. That's what is happening on lines 202 through 205. On line 202, we are removing the class of spin from the wheel. On line 203, we are setting the --target-rotation property to essentially 600deg. Line 204 essentially says, hold the wheel steady so we can spin it, and void means we won't return a value when we do this. And then on line 205, we are adding the class of spin back to the wheel, and that is what actually initializes it to make it spin.
But wait! The HTML code does not have a class of spin assigned to the wheel image! Ah yes, good catch! That is all happening in the CSS stylesheet. For a closer look at the relevant lines of CSS, please click here. You see, the class name of spin is attached to wheel on line 123 of the style.css CSS stylesheet, not through code on the index.html web page itself. And luckily for us, JavaScript will not throw an error if it attempts to remove a class name that does not exist from the wheel's classList.
Now let's talk about lines 207 through 211 above. This simple if-else-statement first checks to see if the value of myDate.sign is Sheep. In Chinese culture, a sheep and a goat are the same animal. But our Zodiac Wheel has a Goat on it, even though our ZodiacSign class prefers to herd Sheep. So on line 208, if the class returns Sheep, then we substitute Goat for Sheep and print that message in the message h1 element. Otherwise, no substitution is necessary and we proceed normally with line 210. That is the basics of how this project works.
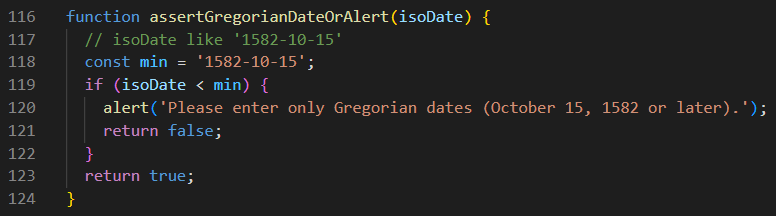
But now let's look at some of these other functions that we mentioned above, but never completely explained. The assertGregorianDateOrAlert function shown below is extremely easy to understand. We are checking to make sure that the date that the user entered is a Gregorian calendar date ( i.e. — not a date that happened before October 15, 1582 ). If it is Gregorian, then we return true. If it is not, we alert the user to enter a valid date, and then we return false, so the user can try again.
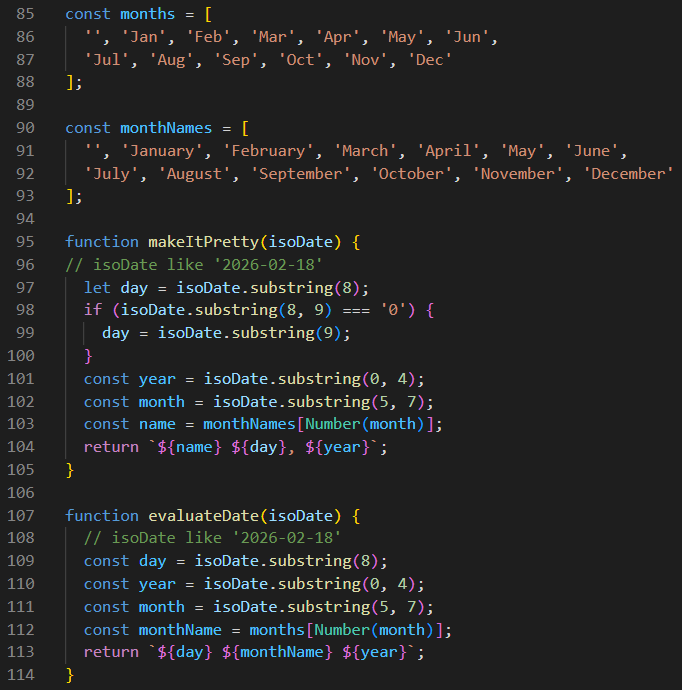
The evaluateDate function shown below on lines 107 through 114 is passed an ISO Date in YYYY-MM-DD format, and then it converts it to a date like 15 Oct 1976. This function uses a lot of substring methods to extract what it needs to build the new date format. Of special interest is line 112 that uses the number of the month to get the three-letter abbreviation for that month from the global variable array named months on lines 85 through 88. Notice how the zeroeth member of that array is am empty string. That ensures that months[10] will be Oct, without having to do any extra math. On line 113, it returns that date in the proper format by creating yet another template literal.
Something very similar happens with the makeItPretty function on lines 95 to 105, except that the date format it creates from the ISO Date is in a much prettier format (hence the name). And it uses the monthNames array on lines 90 through 93. So the string it gets back from monthNames[10] is October. And the much prettier date that it returns is something like October 15, 1976.
Remember that these two functions were called from lines 195 and 196, and the values returned from these two functions are assigned to the variables named z and zz respectively.
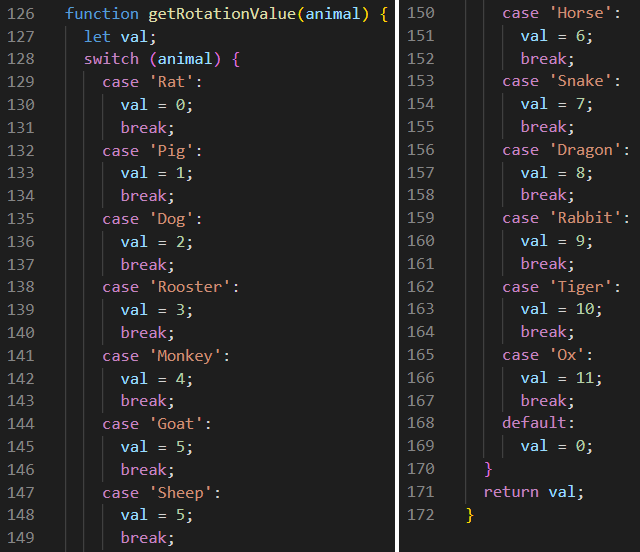
Now if you recall, on line 197, the ZodiacSign class is going to give us an object that has three properties. But the myDate.sign property is actually the name of an animal. So on line 198, we are sending that animal name as a parameter to the getRotationValue function, which is an enormously long switch-case statement that we had to show in two parts. And if we look down the list of animals, we find that Dragon gives us a value of 8 which is returned and assigned to the variable named val. And if you look at the rest of the code, you will see that val helps us determine how many degrees of rotation we will be sending to the wheel, as explained earlier.
We have barely mentioned all of the data that is contained inside the ZodiacSign class that stretches all the way from line 5 to line 83. And as much as we would love to give credit to the person who wrote this class, we must admit that we lost that information. Nevertheless, that programmer is absolutely brilliant! Did you notice that it supports 8 different languages? It supports English, French, Spanish, Arabic, Ukrainian, Chinese, Turkish, and Japanese. And it supports has the data required to support the Western Astrological Zodiac as well. The main reason why we mention this is because of all the class data provided, we are only extracting the tiny amount shown below.
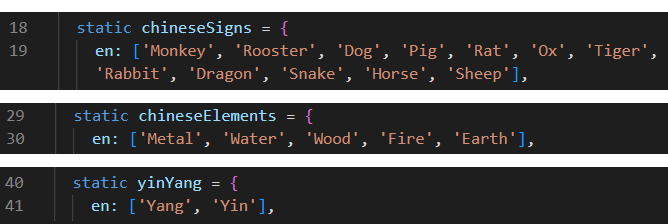
And yet aside from using only the top line in the three static arrays shown above, we are using this ZodiacSign class constructor and these two private methods shown below. They are the getSign and getChineseSign methods. Just FYI, the # before the method name means that it is private, and can only be accessed from within this class. Of course that means that the constructor can access both of those methods.
Let's look at this constructor on lines 51 through 60. Remember that we created a new ZodiacSign on line 197. And using our imaginary Dragon example, when we passed it our selectedDate variable which was 1976-10-15T12:00:00, which was 12:00 noon in our (T) local time zone on October 15, 1976, but according to the (.chinese) modern Chinese calendar. Then, that data was received as the value, and processed by the constructor in this class. Notice that second parameter in the constructor has a default 2 value of lang = 'en', and that is why we only needed to pass our selectedDate to it. And let's not forget that despite using noon in our local time zone to prevent errors, the modern Chinese calendar knows when Chinese New Year occurs for every year in the Gregorian calendar, thanks to our web browser.
So now on line 52, we set this.sign to an empty string, and on line 53, we set this.chinese to an empty string as well. Line 55 is some fancy JavaScript double-talk that says, if this object does not specify another language, then lang = 'en'. Now that officially makes it twice that we had to tell the constructor that. But if we had sent 'tr' as the second parameter, then we would be getting Turkish names back from ZodiacSign. And in the case of Dragon, it would be sending us Ejderha.
Line 56 is also fancy JavaScript double-talk that says, this value is not a number, it is a Date object, so we should process it that way, so line 57 calls the getSign private method to get us the this.sign value. And line 58 calls the getChineseSign private method to get us the this.chinese value. To both of these methods we are passing two values: a Date object like 1976-10-15T12:00:00, and lang which in our case is en.
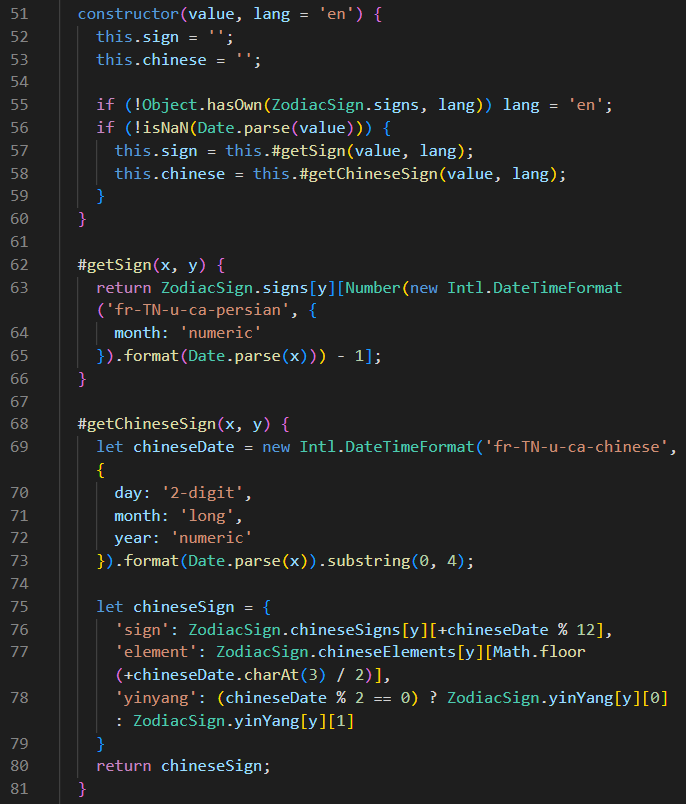
And while most of this code is obscure and nearly incomprehensible to mere mortals like ourselves, lines 75 through 79 are the most interesting to us because it defines for us the three properties of the chineseSign: sign, element, and yinyang. That object is then returned to us on line 80. And we know what to do that object. Thank you for passing it to us!
Now at this point, we must humbly admit that the author of the ZodiacSign class is a genius. These two private methods work perfectly, but we are not entirely sure why. This code is not commented, probably because the programmer was French Tunisian. And how do we justify these suspicions? Because of two string values being used here: 'fr-TN-u-ca-persian' and also 'fr-TN-u-ca-chinese', which are being used here by the Intl.DateTimeFormat built-in JavaScript constructor. The first one, 'fr-TN-u-ca-persian' specifies a custom language setting that formats dates according to the Persian (Jalali) calendar, using French language conventions and Tunisian regional rules. The second one, 'fr-TN-u-ca-chinese' specifies a Unicode Locale Identifier that tells JavaScript to format dates using the French language, with Tunisian conventions, but using the traditional Chinese calendar. An American programmer would have probably used different custom language settings like 'en-US' and 'en-US-u-ca-chinese' respectively, but would have gotten the same results. But we chose not to modify the ZodiacSign class in any way. We live by the old adage that says, If it works, don't fix it. And your Sheep can be our Goats, as long as we know how to deal with that distinction.
It might interest you to know that Intl.DateTimeFormat is a built-in JavaScript constructor that enables language-sensitive date and time formatting. It is part of the ECMAScript Internationalization API (Intl) and provides a native, high-performance way to format dates without relying on heavy third-party libraries.
And furthermore, an "isoDate" in JavaScript refers to a date and time string formatted according to the ISO 8601 international standard. JavaScript standardizes this as a simplified extended format: YYYY-MM-DDTHH:mm:ss.sssZ. For instance, 2011-10-10T14:48:00.000+09:00 is a date-time form with milliseconds and time zone, and is considered to be a valid date time string. But strictly speaking, native JavaScript does not have a unique data type called ISODate, unlike databases like MongoDB. Instead, it uses standard strings formatted this way to represent specific moments in time. And we would like to request that you learn everything you can about the dreaded JavaScript Date object. That knowledge will ultimately help you in the end.
Mayan Calendar Stele
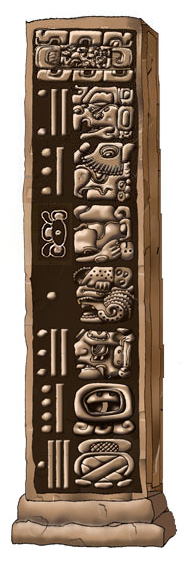
The Maya civilization is an absolutely fascinating subject to study. The Mayans had a very advanced written script language of glyphs that are not completely understood today. But it keeps researchers and scholars busy as they endeavor to learn everything they possibly can about these people, their knowledge, and their daily ways of life.
What is understood is the Mayan Numeral system. Mayan arithmetic uses the vigesimal or base-20 numbering system, with 20 unique numerals for placeholders. And in the ancient Mayan civilization, the important dates of events, like victories in battles, or the dates that kings ascended to the throne, were often recorded on stone pillars called steles. Archeologists have learned much about the Mayan people from their recorded histories cast in stone.
Perhaps of greatest interest is the Mayan Calendar systems, especially the Long Count calendar, which has 360 days in each year. The Long Count calendar was used not only by the Mayans, but by almost all of the other different cultures in Mesoamerica. But in addition to the Long Count calendar, the Mayans also had two other calendars they used: the 260-day Tzolk'in and the 365-day Haab' calendars. And when all three calendars were used together, they had an accurate solar calendar system that was just as accurate as any other calendar in the world that was in use at the time. If you have an deep interest in this subject, please feel free to download and read this PDF document on the subject.
Of course, the next project will allow you to create your own Mayan Calendar Steles. But you can try that project now by clicking here. And you can also download the source code for this project as well. Just FYI, the calendar stele on the right was created using this project. And that is the Mayan Calendar stele for the date of July 4, 1776. That is an important date worthy of being cast in stone.
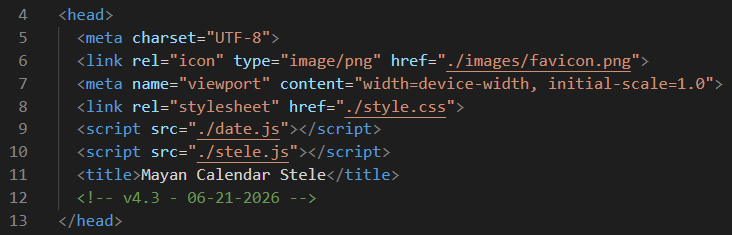
Once you have this project downloaded, unzipped, and opened in VS Code we can begin. So let's begin by looking at the document head in the index.html file. Notice that we have a link to date.js on line 9, and a link to stele.js on line 10. The file called date.js is an old JavaScript extension that is actually both minified and complicated. However, if you do want to see the code inside, you can look at the date-expanded.js file, which is included though not used. In its expanded form, it has over 1,500 lines of code that only its creator can fully understand. We will blindly use the minified verion. However, we will use and fully understand the stele.js helper file. It contains four very useful JavaScript functions. The third JavaScript file in this project is aptly named main.js.
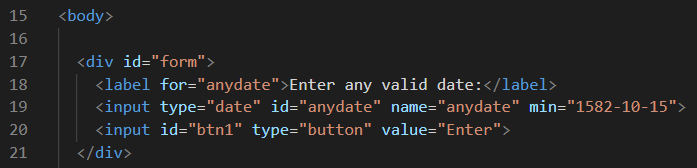
Now let's look at the first part of the index.html document body. if it looks familiar to you, it is because it has a similar architecture to the Chinese Zodiac Signs project. It has two parts: a div with an id of form, and a div with an id of main. And just like in the Chinese Zodiac Signs project, only one of these parts will be visible and active at a time. This project also has one <input type="date"> element, and two <input type="button"> elements. The date input has an id of anydate, and the buttons have the ids of btn1 and btn2, even though btn2 appears near the bottom of the main part of the project.
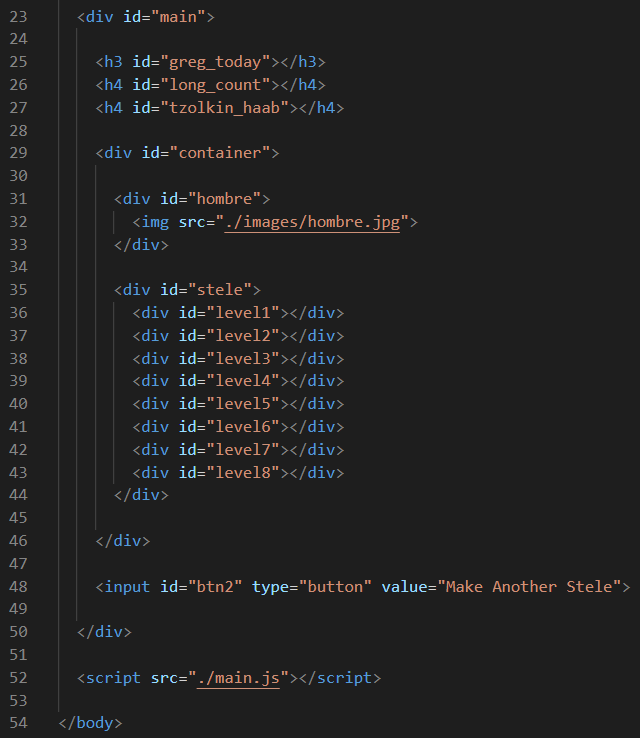
Now let's look at the code in the main part, because unlike the code in form part, this main differs greatly from the last project. After the date is successfully entered from the form, that part disappears and the main part appears. On line 25, the Gregorian calendar date will appear. On line 26, the Mayan Long Count calendar date will appear. And on line 27, the Tzolk'in and Haab' calendar dates will appear.
Then, there is a container div that uses flexbox rules to create a row, with an image of an hombre on the left, and the eight levels of the stele on the right. Below the container div is where btn2 exists, and the main.js is linked just before the closing body tag. And speaking of main.js, let's look at that file of JavaScript code next.
At the very bottom of that file on line 332 in an event listener that is waiting for DOM content to be loaded before it launches the init function. We've all seen this before and we know how this works. The first five lines of the init function are block-scoped const declarations for form, main, btn1, btn3, and anydate. The form is then displayed while the main in hidden. Then we add two more event listeners: one for btn1 that triggers the getDateValue function, and one for btn2 that triggers the reloadForm function on line 306. We also set up one more event listener that triggers getDateValue when the Enter key is pressed down. There is really nothing new here. Déjà vu. We've seen all of this before. So let's move on to the getDateValue function.
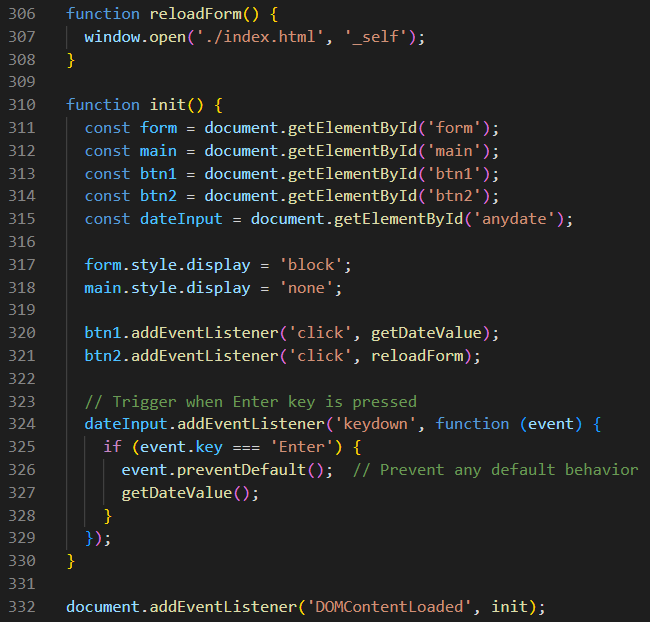
Is this Ground Hog Day? Is there anything new here? This is nearly identical to the getDateValue function in the Chinese Zodiac Signs project, but with a few exceptions. One difference is that in this project, we are making this function asynchronous, so that we can await completion of the ensureImagesPreloaded function. This is smart because we don't really want it to attempt to display immages that hasn't cached into memory already. But just before that, we are also assigning the value returned from the evaluateDate function to the const variable named z. Then, we will run the initSteleDomOnce function before we pass the value of z to the doCalculations function. After that completes, we will hide the form and display the main, and our stele should be ready for viewing.
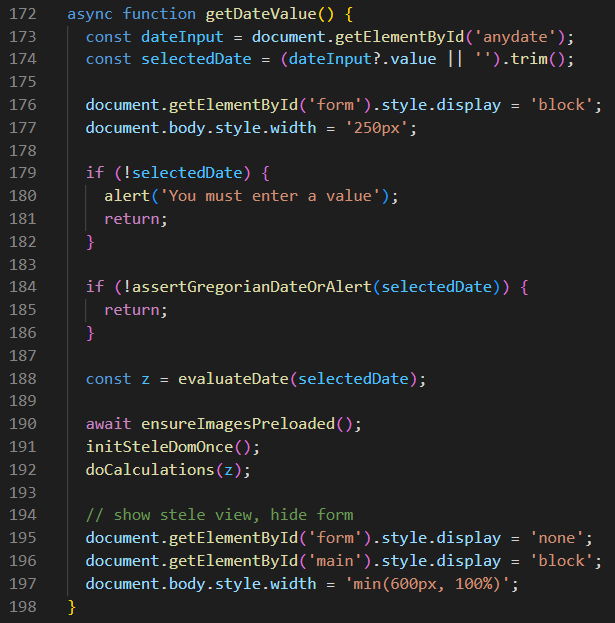
You have seen both of these functions below before. So we won't really talk about them again. But remember where you saw them. We might revisit one of these function again later.
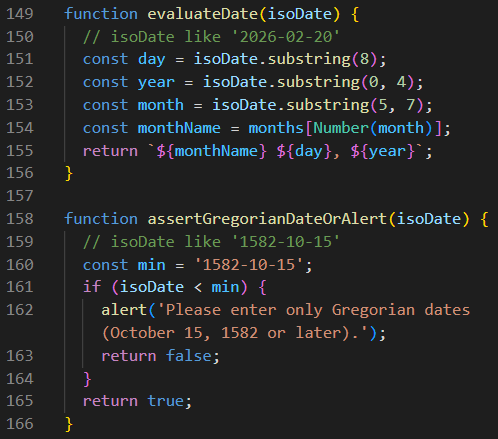
Image Preloading
Ah yes! Notice that we are finally seeing our first global variable being declared with a let keywords here, because it will change values later. It is named imagesPreloaded, and we are assigning the boolean value of false to it.
And here on line 139 is that ensureImagesPreloaded function. Notice that it is also asynchronous, meaning that it will await completion of image preloading before it finishes. On line 140, it is checking to see if imagesPreloaded is true. And if it is, it returns without going any further. However, if it is false, then on line 141, it must await all the processes on the rest of line 141 to complete, before it can move on to line 142 to set the imagesPreloaded boolean value to true.

And if you are wondering why Image Preloading is necessary in the first place, it is because the project has 177 images, and those images must be stored in memory long before we need to display them on the screen. So let's look at the big picture (pun intended) before we get hung up on individual lines of code. What the image preloading code is saying overall is this: "Build a list of every image URL, start loading all of them in the background, wait until all load attempts are finished, then continue."
Line 141 above could actually be broken down into two lines of code for better understanding. The first line could then be const urls = buildAllImageUrls();, and the second line could be await preloadImages(urls);. So when an array of all the image URLs is finally created, line 142 can set the imagesPreloaded boolean value to true.
Of course both of the functions called on line 141 have big jobs to do. So let's take them in the order listed with preloadImages first. This might sound confusing because a Promise sounds difficult to explain. But deep down, you know what it is. If we make you a promise, you fully expect us to follow through on it, right? But what if we made you 177 individual Promises? That doesn't change your expectations, does it? In the big picture, line 82 is attempting to resolve each one of those promises. And on line 84, it resolves the attempt whether it had an error or not. That way, it can try to preload another file and eventually retry each failed one later. Then, after all 177 images are preloaded, it can finally fulfill all of its Promises on line 79. That is essentially what is happening in the preloadImages function.
But how does it keep track of all of the promises? Well, that is the job of map on line 80. Map creates its own array of promises: one for each image URL. And when it finally collects all 177 of them, it is able to return Promise.all. Once again, try to look at the big picture rather than each line of code and the preloadImages function will make better sense to you.
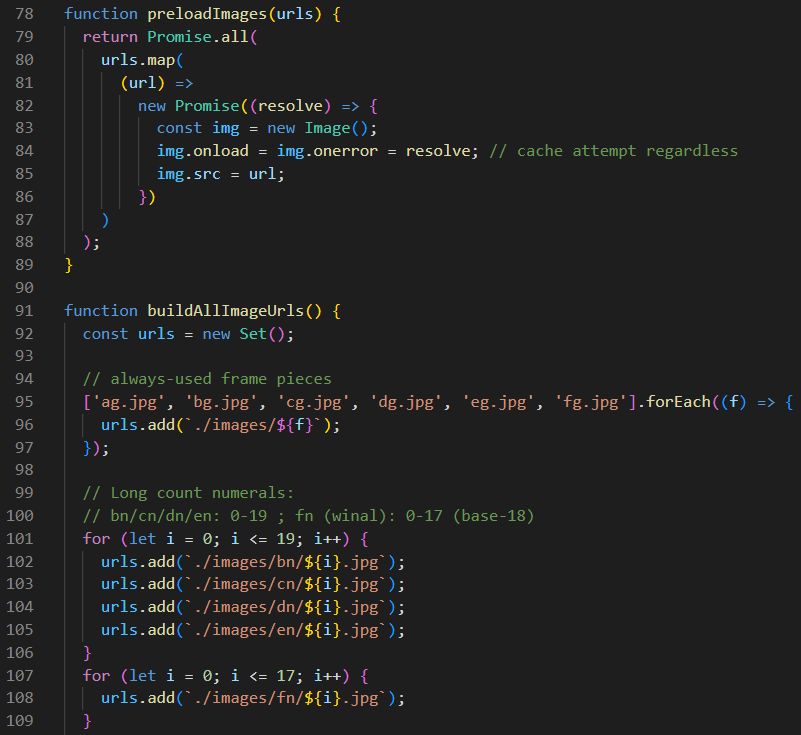
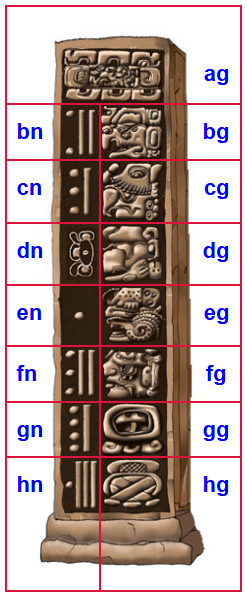
But the real workhorse here is the buildAllImageUrls function. It is long, so we have to show it in two parts. And this might also be the perfect place to display a map of the stele on the right side of this text. This will prove helpful when we start describing the images found in named folders below. On line 92 above, we are declaring a const named urls and assigning a new empty Set to it. We are using a Set instead of an Array at this stage of the game because a Set does not allow duplicates, while an Array object does. Lines 95 through 97 are adding the 6 always used image URLs first to our Set. On lines 101 through 106, we are adding the 20 image URLs in each of 4 folders: the bn, cn, dn, and en folders. And on lines 107 through 109, we are adding the 18 image URLs in the fn folder. By the way, g stands for glyph, n stands for numeral. That's everything that happens in the first part of this function, as shown above.
Now we will continue on with the second part of the function as shown below. And we see that 13 more image URLs are added from folder gn on lines 112 through 114. We add 20 more from the hn folder on lines 117 through 119. Then we add 20 more from the gg folder on lines 122 through 124. And we add 19 more image URLs from the hg folder on lines 127 through 129. Now, is that all of them? 6 + 20 + 20 + 20 + 20 + 18 + 13 + 20 + 20 + 19 = 176. And don't forget hombre on line 132, so that's all 177 image URLs.
Now something amazing is happening on line 134. By using the spread operator ... inside of square brackets [] , we are changing our Set into an Array, and that eliminates any duplicates, if they exist. The buildAllImageUrls function then returns the array to the function that called it, which is the preloadImages function on line 141, thus fulfilling its Promise of all, and that sets the variable imagesPreloaded to the boolean value of true on line 142. Now all of the image URLs are in an array named urls. And the Image Preloading operation is complete. It might sound complicated, but it actually is not.
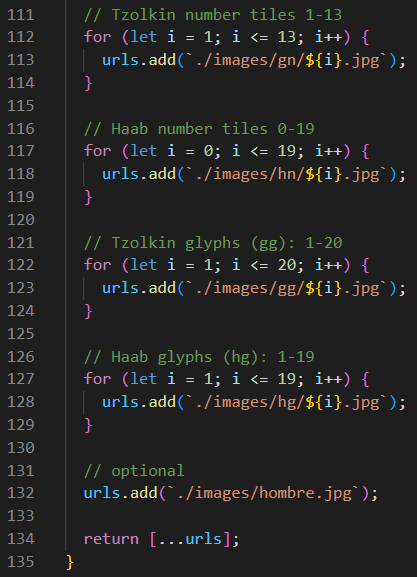
But let's back up a little bit before we continue. We got side-tracked into a long discussion about Image Preloading when we got to line 190 in our getDateValue function. So let's get back on track now.

On line 188 above, we now have z, which is the data we received from the evaluateDate function. Then, we preloaded the images. Now on line 191, we need to execute the initSteleDomOnce function first. But we can't really do that unless we know what our STELE_STRUCTURE is, and that is declared in the global variables at the top of the main.js script that we have not talked about until now. And here they are, displayed in the image below. Yes, we see that the STELE_STRUCTURE has 8 levels, and that each level has two parts, all except for level 1 which only has one part. Having now seen the stele map, this makes a lot more sense.
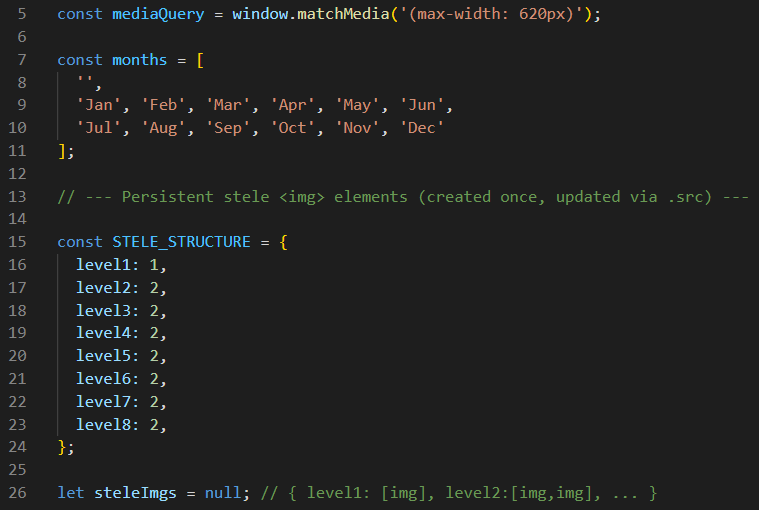
The very last line above sets the steleImgs variable to null. And so now, let's look at the initSteleDomOnce function below. Of course line 29 is making sure that we have already done this. If we have, then we are done, and we return from this function. But if we have not, then on line 31 we change that null-valued steleImgs variable into an empty Object. Then we begin to build the stele level-by-level, and image-by-image, according to the specifications laid out in the STELE_STRUCTURE. And that all happens (think big picture here) on lines 33 through 52.
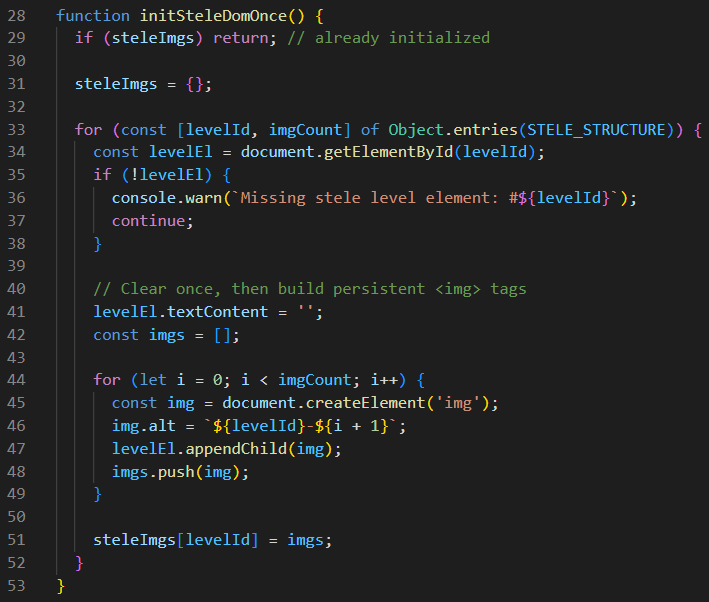
Now that we've completed builing the STELE_STRUCTURE through the initSteleDomOnce function, we are ready to run the doCalculations function, and we will pass the date information in z to that function to make those calculations happen.
The first thing that happens in the doCalculations function is that we finally get today's date from the date.js JavaScript extension file. Then on lines 209 through 225, we define four const variables as arrays of data we will need later. Knowing the names and concepts behind the three different Mayan calendar types is helpful here. They are the Long Count, the Tzolk'in, and the Haab' calendars. Please read this document for a better understand of what it happening here.
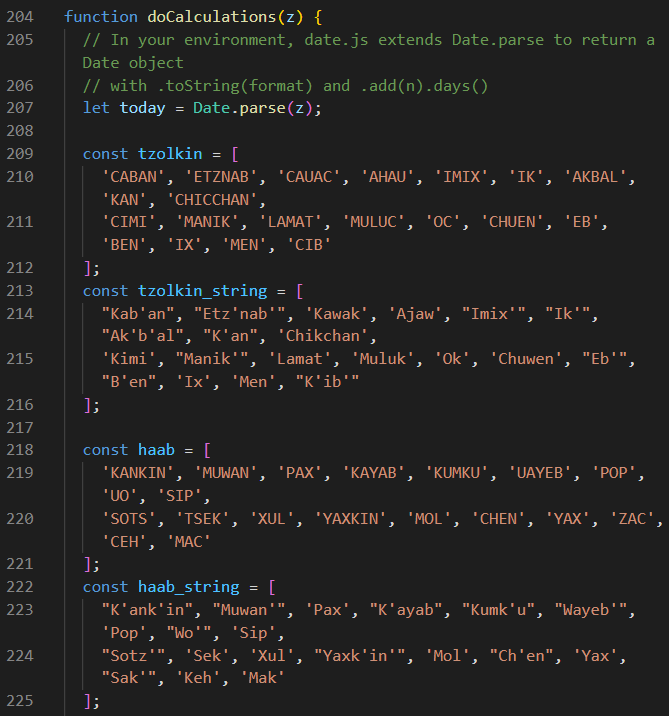
But on lines 227 through 238, we define two more const variables as Objects of data we will need later. Notice that an array (although technically classified as an object) is a list of single items. An object that is a collection of key-value pairs cannot be called an array per se. An array list is indexed sequentially: we find each value by which numbered location it holds in the array. But a key-value pair gets each value by first specifying its key. For instance, if we want to find the value of YAX in the haab_images object, we use that key and the object returns the string value of '10'. And we should probably mention here that in order to build both the Tzolk'in, and the Haab' calendars, we need three files. For instance, to build the Haab' calendar, we need these two arrays: haab and haab_string. And we need this key-value-pair object: haab_images. Something similar is true for the Tzolk'in calendar.
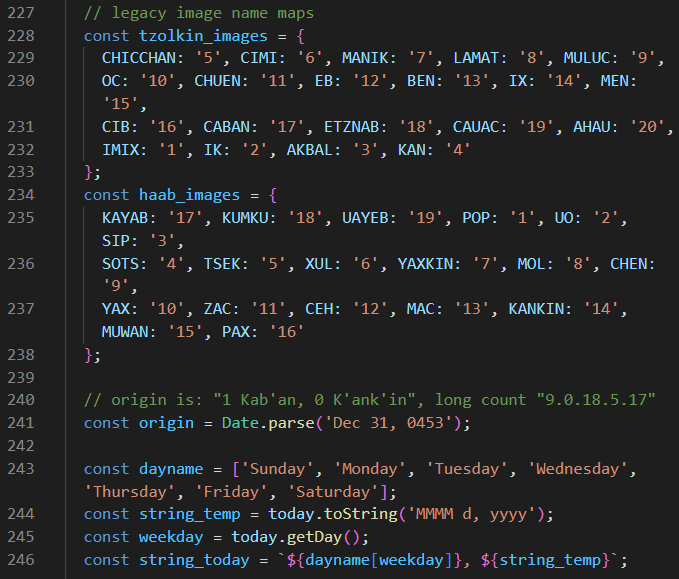
Starting on line 240, the doCalculations function gets a lot more interesting. The comment on line 240 is telling us that all calculations done here are based from this beginning date in the proleptic Gregorian calendar. Proleptic simply means that dates from the distant past are adjusted to the Gregorian calendar algorithm to preserve their historical accuracy. Line 241 tells us that date.js will parse all dates from the beginning reference date of December 31, 453 CE, which is named origin. Hold that thought. We'll come back to it. Lines 243 through 246 define more const variables that should look somewhat familiar as well.
Lines 248 and 249 below are very important! Although line 249 is commented out on purpose, it allows us to adjust the result of our calculations by one or more days in either direction. And why is that important? Because unlike the Chinese Zodiac Signs project, which did all of its calculations based on local time zones, this project bases each date calculation on the GMT time zone which could throw them off by one day in either direction. To find out if your Mayan calendar is correctly aligned with GMT, you can use Wikipedia as a reference. This web page shows a Mayan calendar date that is based on GMT. Just remember that the calculations in our program find today's date based on your local time zone and the time of day. Future versions of this program will attempt to fix this problem permanently. We also wanted to mention here that some scholars believe that our modern-day Mayan calendar calculations are off by two days. And if you subscribe to that belief, then you can also use line 249 to adjust these calculations to your liking as well. Now let's move on.
Line 251 calculates the number of milliseconds in a day and stores that as a variable named ONE_DAY which line 252 uses to calculate diff which is the difference between this current millisecond in time and the origin date. Lines 254 through 256 calculate the tzolkin calendar date for us. Lines 258 through 261 do the calculations for our haab calendar date. Notice that lines 258 and 259 use functions in the stele.js helper file to accomplish that.
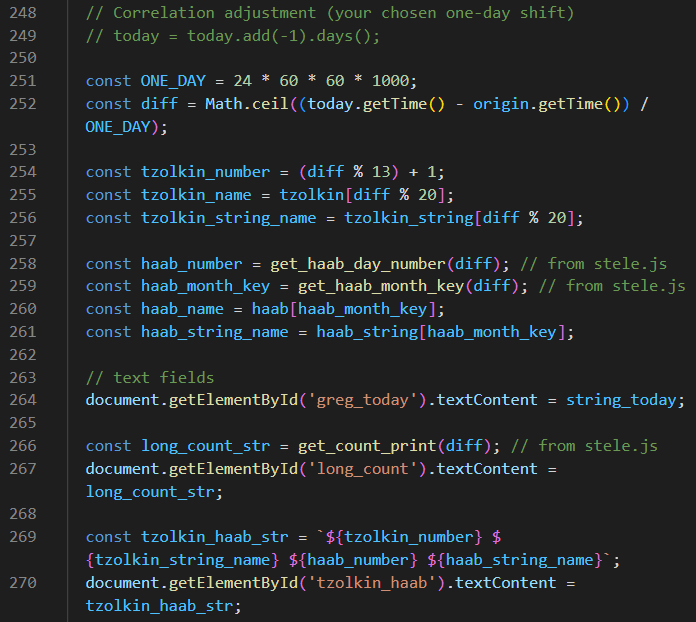
Line 264 prints the Gregorian calendar date we chose (not really "today", despite the variable name). Line 266 gets the Long Count calendar date and use a function in the stele.js helper file to accomplish that. Line 267 prints the Long Count calendar date for us. Lines 269 and 270 print the Tzolk'in & Haab' calendar dates for us as well.
Finally, the hombre is ready to chisel out our stele. Yes, yes, how many more times do we need to make sure that our STELE_STRUCTURE is in place? On line 274, we check one more time, just for good measure. On line 276, we gets the Long Count from a function in the stele.js helper file to help usd build our stele. And from here, it all happens pretty fast. It build all eight levels on lines 279 through line 304, and we are done!
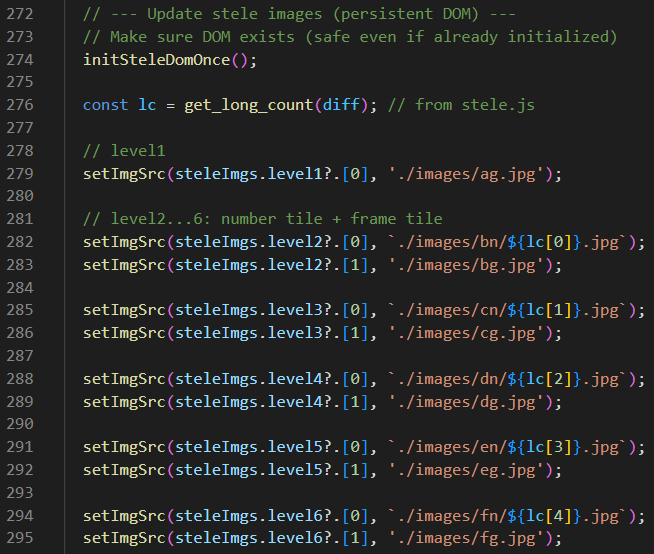
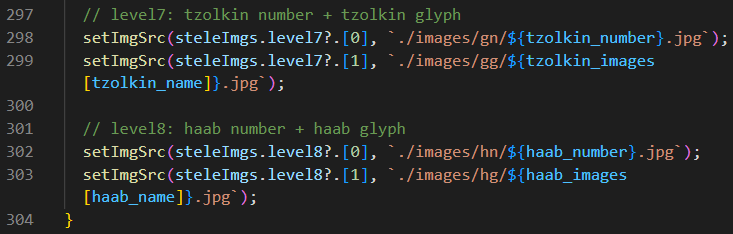
Of course we quickly skipped over the 14 optional chaining operators used here. If you want to learn more about them, please click here. The quick and dirty explanation is that optional chaining operators basically check to make sure properties exist before they try to use them. These operators were supposedly designed to prevent null and undefined errors.
And we also skipped right over this setImgSrc function shown below. It only changes the image source for an image element if somehow it changed. And in this program, that never happens.
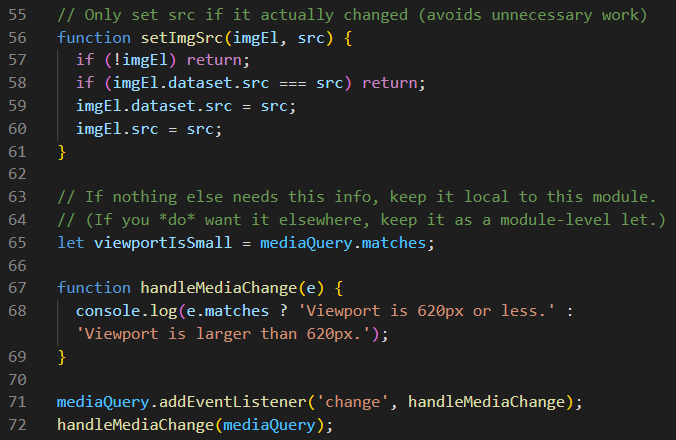
There are four functions in the stele.js helper file that we call from out doCalculations function. All of them require the diff variable to do their calculations before returning a value. These four functions are get_haab_day_number and get_haab_month_key which are both shown below.
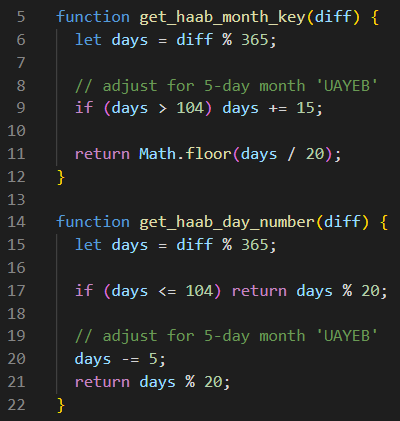
The get_count_print function shown below creates that Long Count calendar date for us so that we can show it above the stele. But in order to successfully do that, it must know what the long count is and it gets that the get_long_count function which is displayed after this one.
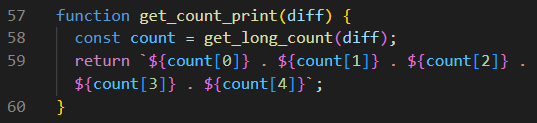
Not only does the get_count_print function use this function, but the doCalculations function calls it when making the stele. Lines 24, 25, and 26 are simply showing us three important Long Count dates. Of course, 12/21/2012 was the beginning of the 13th B'ak'tun which some conspiracy theorists claimed marked the end of the world. Apparently, they were wrong about that. 10/15/1582 was the first day of the Gregorian calendar. Why is that important to us? Because if we plan to try to access Mayan calendar dates before that date, then we need to remove that date from the min property on line 19 of the input type="date" element in the index.html file. And we also would need to comment out lines 184 through 186 in the main.js file to prevent it from calling the assertGregorianDateOrAlert function which blocks those dates and triggers an alert. And of course 12/31/0453 is our origin reference date that is used by our date.js JavaScript extension file, and by our doCalculations function as well.
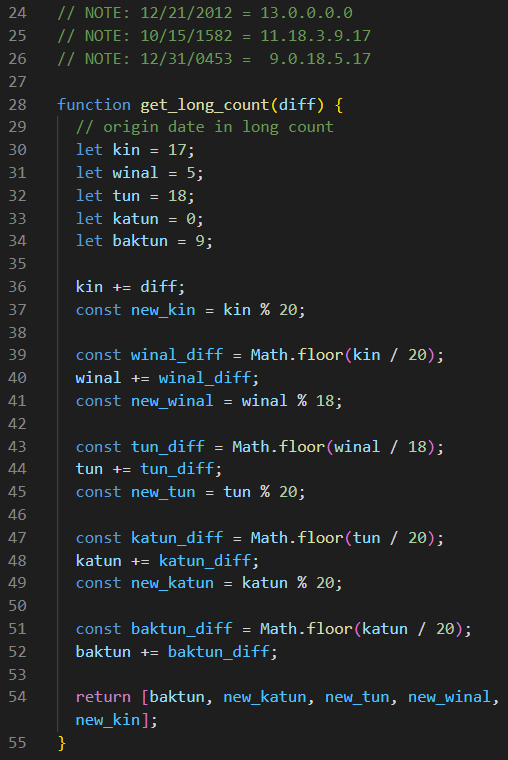
This concludes our Five More Fun Projects. We hope you had fun and learned a ton of JavaScript in the process.