JavaScript Coding Course
JS 101

Part 4. Ascending Back To The Surface
Let's Start Writing Real JavaScript Code!
Did you survive the deep dive without getting decompression sickness? It is even more important to ascend slowly from a deep dive than it is to descend slowly. But you are back now, and you look healthy enough to start writing real JavaScript code, so let's begin.
Now It's Your Turn!
So far, we've written just about all of the code for you, but the best way to learn is by doing. You can watch somebody do something all day long, but you'll never know how amazingly easy or incredibly difficult it is until you actually try doing it yourself. So let's do that right now. And while you could create new project folders and all of the files for each project, we've always found that it's easier and faster to start with a folder of template files, and then modify them to best suit your immediate needs. You should already have a my-template folder in the JavaScript Coding Course folder inside your computer's Documents folder, but just in case you don't have one, you can download this My Template zip file, and extract the folder in the same location.
For each new project, you can simply make a copy this template folder, and then rename it to the name of the new project you are starting. So let's make three copies of the my-template folder, and then rename them to deep-dive-test-1, deep-dive-test-2, and deep-dive-test-3. Now, let's open the deep-dive-test-1 folder in VS Code and rename its title in the document head of the index.html file to Deep Dive Test 1. Congratulations! You just completed all of the HTML and CSS for this project! Now the fun begins as you can start writing all of the JavaScript code for this project's script.js file. And your instructions for this project will follow.

Deep Dive Test 1
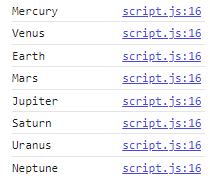
For this project, you will need to first declare a global variable that is a const and an array object that contains the names of all eight planets in our solar system. Your array will consist of eight individual string variables, and they should be arranged in the order of each planet's distance from the sun. Then, you will need to write a function that includes a function-scoped index variable, and a while-loop that outputs the name of each planet in the array to the console. Don't forget to increment the index variable. And don't forget to call the function as well. This project should be fairly easy for you because we saw all of this code before in the Months of the Year project, so please review that project if you get stuck and need help. Don't bother to write text to the document body, but see if you can use the length property of your array in your while-loop. When you are all done, something similar to this on the right should appear in your console.
How did you do? If everything worked as expected, or you were able to debug your code successfully if it did not work on the first try, then you are ready to move on to the next project. To do that, close this open folder in VS Code, and then open the folder called deep-dive-test-2 in VS Code, then rename the title in the document head of the index.html file to Deep Dive Test 2.
Deep Dive Test 2
For Deep Dive Test 2, you should have the very same results in the console as you had with the first project, because we are basically going to do the exact same thing, except that we are going to accomplish this task using a for-loop instead of a while-loop. And if you run into trouble, go back and review the Days of the Week project we saw on our deep dive adventure. Remember that the main differences between a while-loop and a for-loop is the way we handle the three parts of the for-loop header: initialization, condition, and update. Once you get used to using for-loops, you might find that you actually prefer them over while-loops because all three of the required parts of the loop can be accomplished on one single line of code. The big difference is that these same three parts of a while-loop are more spread out.
Deep Dive Test 3
And if you have successfully completed Deep Dive Test 1 and Deep Dive Test 2, then you are actually doing quite well! There was a lot to learn on our deep dive adventure, so pat yourself on the back if you've gotten this far. For Deep Dive Test 3, we are going to show you the required code, but you will need to type it yourself. Practice makes perfect. And besides that, Deep Dive Test 3 is basically a series of if-else statements that use conditionals all wrapped in one for-loop. We expect this project will be quite thought-provoking for you, but it really isn't very hard. However, you will need to focus and pay strict attention to detail. You will learn quickly that it only takes one wrong piece of punctuation or one misspelled word to break your code. So pay attention, and you will master these code-writing skills in no time!
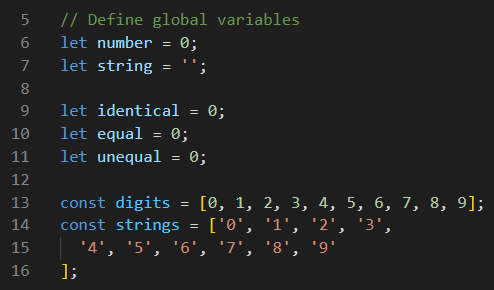
The very next thing to do is to declare these seven global variables on lines 5 through 16 as illustrated above. The first five are declared with the let keyword, and the last two are declared with the const keyword. These variable assignments are all rather simple. Four of these let variables are assigned the number data type with a value of 0. The one on line 7 is assigned an empty string data type. And the last two are arrays of the object data type. The one on line 13 is a collection of numbers, while the one on lines 14 through 16 is a collection of strings.
But the real fun begins below on lines 18 through 47. On line 19, we are creating our for-loop with the standard three parts of the for-loop header: initialization, condition, and update. The initialization requires a let keyword since we did not declare and initialize an index variable beforehand. The for-loop condition is using the length property of the digits array, so there's a clue there about how many times this for-loop will actually loop. The last part of the for-loop is the update part which increments our index variable by 1 each time it loops. And of course, the block of code inside the for-loop starts with the yellow opening curly bracket at the end of line 19, and it ends on line 47 with the yellow closing curly bracket.
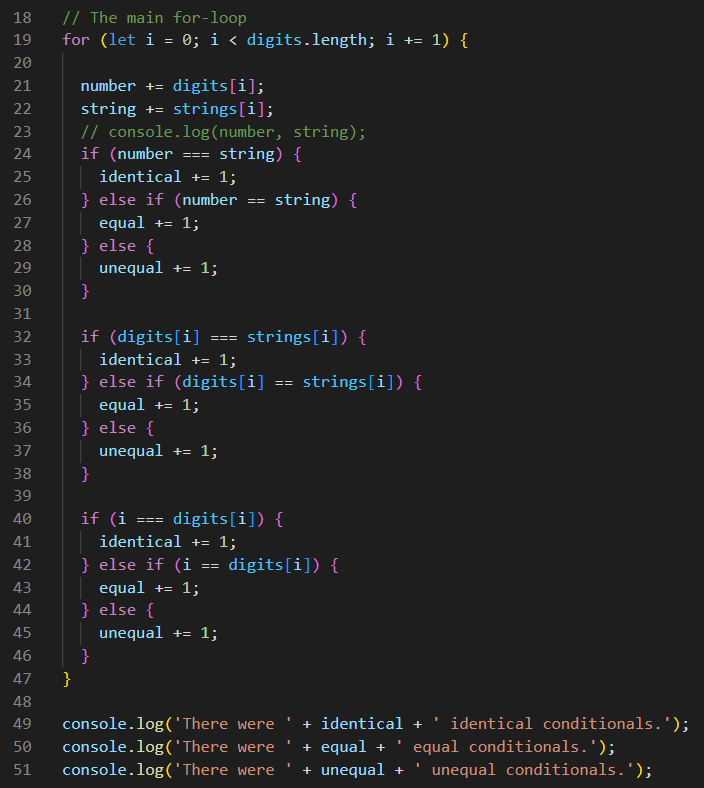

And it's the three if-else statements inside the for-loop that we need to focus on next. The first if-else happens on lines 24 through 30. The second if-else happens on lines 32 through 38. And the third if-else happens on lines 40 through 46. All three of these if-else statements have one thing in common in that, each one is testing three different conditionals through each iteration of the for-loop. The first conditional is testing to see if the two values being compared are identical; and if so, it increments the identical variable. The second conditional is testing to see if the two values being compared are equal; and if so, it increments the equal variable. And if neither of these conditions are true, then the else statement increments the unequal variable. To summarize, the for-loop will loop 10 times, and each if-statement will find one conditional that is true; and when it does, it will add one point to the corresponding variable. When the for-loop completes, there will be a total of 30 true conditionals, and the final score will be revealed in the console, thanks to lines 49 through 51. And the final score you get should match the one shown above on the right. See if you can figure out how each one of these conditionals was evaluated. And if you need extra help, use your console.log to gather clues. If you uncomment line 23, the console will reveal a whole list of clues. Try it! But don't overlook the reassignment of global variables that happens on lines 21 and 22.
"Wait a minute!" you must be screaming after uncommenting line 23, "How in the world could there possibly be ten identical matches when comparing these two numbers and strings?" That's a great question! We are impressed that you just thought of it. The answer is because on line 40, we are comparing the variable i to digits[i]. And if you look at that array, you will quickly see that it is an identical sequence of the very same numbers. Tricky, eh?
Extra Credit
Completing Deep Dive Test 3 successfully was a huge step in the right direction! And if you feel up to another challenge, we have one for you. If all of your code in Deep Dive Test 3 works perfectly, then we suggest that you don't do anything to change that. Instead of modifying that project further, how about if you just make a copy of that project folder and rename it Extra Credit? Then, you can open that folder in VS Code without destroying the Deep Dive Test 3 that actually works.

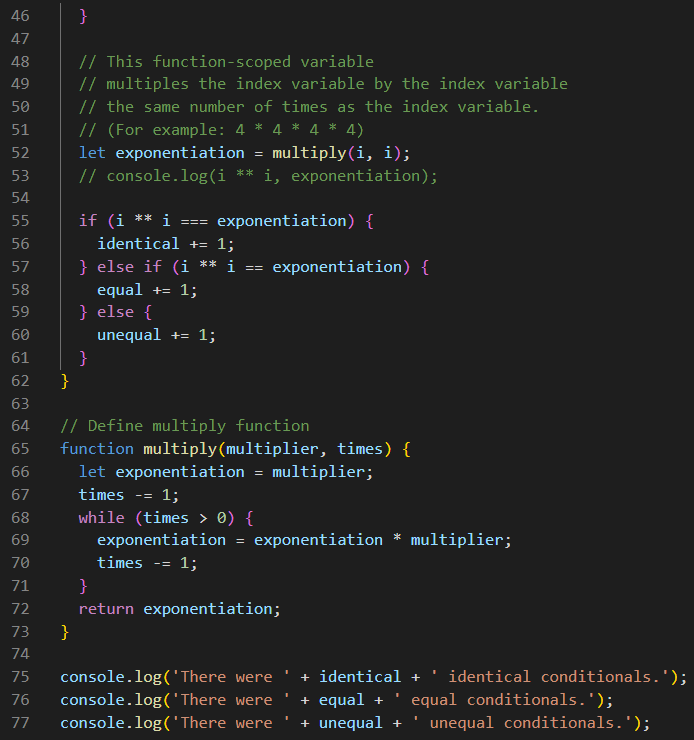
Now let's look at the code below. We will do this in two steps. See where the purple curly bracket ends on line 46 in Deep Dive Test 3? There is also a yellow curly bracket on line 47 which marks the end of the for-loop that began on line 19. Since we don't want to disturb any of that code, in this Extra Credit project, we will simply add a bunch of blank lines between those two curly brackets, because we are going to add lines 47 through 61 as shown below, and that will push that closing yellow curly bracket all the way down to line 62. All of those comments in green help to explain why we are doing this. Essentially what we are doing here is adding another if-else statement on lines 55 through 61, but the data for that if-else is returned to the variable called exponentiation on line 52 from the multiply function that we will be writing on lines 64 through 73. That function contains a while-loop and this a perfect example of the reason why we would use a while-loop in this function. If you look at what is happening here, we are sending two parameters to that multiply function: the multiplier and the number of times we will multiply it by itself. But the most interesting part is that we are simply sending it the index variable twice for each iteration of the for-loop. The comment on line 51 explains it well! It we send it the number 4, it will multiply itself 4 times, and then return that value from line 72. And if any part of this seems confusing to you, then simply uncomment line 53 and watch what happens in the console. This new if-else statement will add 10 more conditional results to the final score which now resides on lines 75, 76, and 77. And the results should match what is shown above on the right. Can you explain how these new 10 conditionals changed the final score?
Manipulating the DOM
Now that we have a basic understanding of the JavaScript language, we can begin to use this language as intended. Yes, the console is a great tool for debugging our code, and for outputting data to help us understand what our code is doing, but we want to make JavaScript interact with our static web pages that were written in HTML and CSS, and in that way they will become dynamic.
The DOM has several methods for doing this, but we've found that the least confusing ones are the easiest to learn and use. For our purposes, we will mostly be using the getElementById and the querySelector methods of the DOM. At the risk of sounding repetitive, please remember that methods are actually functions that are built into objects. And since the DOM is a static object that we create with HTML and CSS, its built-in methods are the tools that we use to interact with the DOM. And once again, this is best illustrated through an example project. You know the drill. You can begin by downloading this Dominator project. When you have it open in VS Code, we can begin.
Yes, it's rather shocking when you first open the project with Live Server. But that is because we have four lines of code in the index.html file commented out. The only CSS code that is running is in the redback.css file. We used this old trick back in the Plane Geometry project in Part 5 of our CSS Coding Course. If we set the background-color of html to red, then we will know instantly if there is any of our regular CSS code that is not covering every single pixel of our web page.
So now that the initial shock of that red screen has worn off, please go ahead and uncomment lines 9 and 18 in our index.html file, and then take another look. Wow! You could say we used VISINE® to get the red out. What an amazing change 35 lines of CSS can make, eh? But take a close look at the CSS code in this style.css file. There's nothing special in this CSS code. You've probably already seen all of it before.
Now, let's comment out lines 9 and 18 again, and take another cringing look. Yeah, the red tide is obviously back. But now we'd like to ask you to uncomment lines lines 19 and 22, and then take another look. Wait! What happened here? Well what happened here is that we manipulated the CSS and HTML code using JavaScript code. Let's take a look at those 35 lines of JavaScript code in the script.js file to see what is happening here. But we must also look at lines 16 through 20 of our index.html file as well.

The real magic happens on lines 6 through 9 in our script.js file below, where we created 4 global const variables. On line 6, we declared a variable called container, and then we assigned it to the querySelector method of the document object, which connects the style property of the div with a class called container on line 16 of our index.html file as shown above. When using the querySelector method, you must specify that you are referencing a class by preceding the name of the class with a . or you must specify that you are referencing an id by preceding the name of the id with a #. Otherwise, querySelector assumes that you are referencing the name of an element tag. On line 7 below, we are referencing the style property of the h1 tag on line 17 of index.html.
On line 8 below, we doing something different. Rather than using the querySelector method, we are using the getElementById method of the document object, which does not require a # preceding the name of the id, and that is because JavaScript already knows that we are getting the element by its id, which can easily be found on line 19 of the index.html file. On line 9 below, we didn't need to use either method because the document object knows that it only has one body. Once you understand how these four variables tie into the HTML document, you are ready to move on.
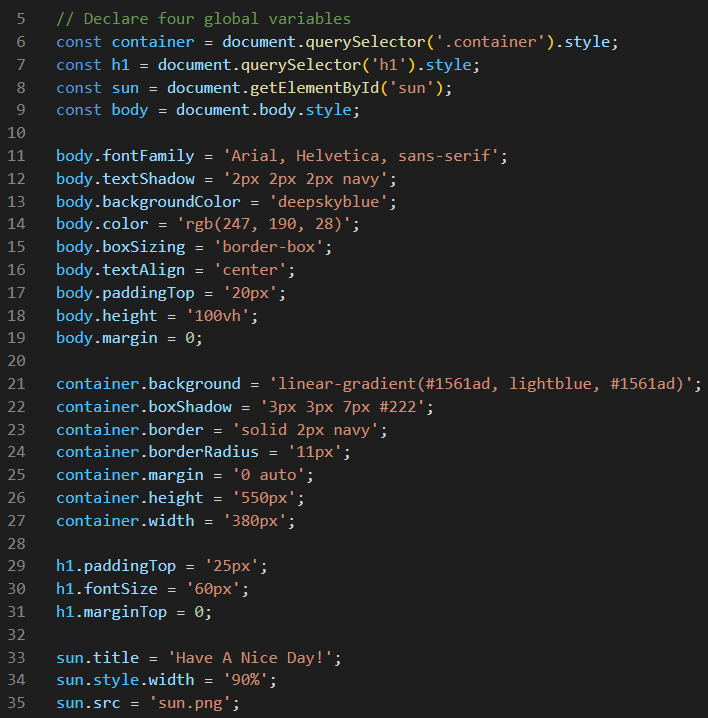
Now that we have made with these connections between the HTML code and the JavaScript variables, the rest of the JavaScript code is relatively easy to understand. These 35 lines of JavaScript code in the script.js file were purposely arranged in the same order as similar lines in the 35 lines of CSS code in the style.css file. If you closely compare the code in these two files, you will see the relationships between the two. The biggest differences are in the basic syntax used. In CSS, we use a selector to group our various CSS properties and their values. In JavaScript, we replace the selector with an identifying variable and one of its properties. Then, we assign the appropriate value(s) to the property of that element-identifying variable. All of the code on the right side of the assignment operator is pretty much identical to the way it appears in the style.css file, although they are usually enclosed in single-quotes.
However, on the left side of the assignment operator, we notice that the kebab-cased properties in CSS must be converted to camelCased properties in JavaScript. For instance, the font-family property in CSS becomes the fontFamily property in JavaScript. It's actually the same property, but JavaScript sees hyphens as subtraction operators, so we must do it JavaScript's way if we want to obtain favorable results. And just look at those results! Whether we do the styling through the style.css file or through the script.js file, the results are identical.
And that is true as long as we are using JavaScript to manipulate the CSS styles of the document. CSS was never designed to change the actual content of the HTML document. CSS can only change the style of it. If we want JavaScript to change the HTML content of the document, we must do something entirely different. Now let's look at lines 33 and 35 of the script.js file, and compare those lines to lines 18 and 19 in the index.html file. We must use line 18 if we are planning to see the sun while using the style.css file to do our styling. But we can use line 19 instead if we are planning to see the sun while using the script.js file because it is able to change both the HTML content and the CSS styling at the same time. And just for the record, src and title are attributes of the img element, while width is a CSS property, so its value can be changed either by line 34 of the style.css file, or by line 34 of the script.js file. In absolutely brutal technical terms, the style property of the sun id attribute of the img element is a property of the HTMLElement object. It's a live object that allows us to modify the CSS styles of an element programmatically. But when we access sun.style, we are gettting a CSSStyleDeclaration object, which represents the element's CSS styles. This nomenclature can be tricky to understand. And although the HTMLElement and the CSSStyleDeclaration objects are merely invisible concepts to us, knowing the differences between objects, elements, and properties can be very helpful to us in the long run.
Pause & Reflect
OK, it's time to get out of the water, dry off, and reflect on everything we've learned so far. It's amazing how much we covered, especially during the deep dive. But let's a take a few minutes to do a quick review before we get into anything else that is new to us.
After a quick introduction to JavaScript, we learned that there are three different ways to invoke JavaScript, just as there are three different ways to invoke CSS from HTML. And we witnessed our first events that we triggered through mouse actions. Then, we learned about alerts and prompts. Although both are very simple ways to interact with the user through inputs and outputs, these quick-and-dirty functions are built into JavaScript, so they are the easiest to learn about. But we also learned that, of the six primitive data types, we could get an empty string data type, if the user failed to offer any input through the prompt by clicking the OK button. And we could get a null data type, if the user decided to Cancel the prompt, rather than clicking the OK button.
And that opened the door wide enough that we could jump into the sandbox to learn about arithmetic operators, assignment operators, and the six primitive data types, as well as a quick introduction to object data types, which have both properties and methods. Then, we learned about comparison operators and logical operators. With all this new information, we could finally start doing arithmetic. And we could also output our answers to the console through the console.log() function, which is one of the most important parts of Chrome Dev Tools. But before we jumped out of the sandbox entirely, we learned that we could also output those same answers to the HTML document through the document.write() function as well.
Armed with this wealth of JavaScript knowledge, we embarked on a deep dive adventure! And after brief discussions on comments, syntax, and whitespace, we learned about the four types of case formats used in all programming languages. Then, we learned a quick history of JavaScript, and who is in charge of establishing its standards. And we offered you some good reference resources, in case we ever failed to explain any subject as thoroughly as was required.
Then the deep dive suddenly became more serious. We had to learn a ton of new terms. Without them, we would have no chance of learning about variables and functions, which are two of the main components required to write scripts using the JavaScript programming language. When learning about variables, we had to learned the mechanics of declaration, initialization, and assignment. And we had to learn the three keywords that made those mechanics possible. Then, it was imperative that we learn about variable scope, mutability, and hoisting before we could start talking about functions and blocks. Afterwards, we used four example projects to explain how to use the four most common types of blocks: for-loops, while-loops, if-else-statements, and switch-case statements. We saw how to use function calls to invoke function execution. And we saw our first example of how to use an event listener to see if the web page was loaded before we began executing any of our JavaScript code.
Having survived the deep dive, we took three or four tests to make sure we retained what we learned, because there certainly was a lot to learn. And we ended by explaining what it means to manipulate the DOM. In essence, we learned that we can basically write almost all of our HTML and CSS code through JavaScript, and that's why it is the most powerful web development language of all: at least, on the front-end client-side, that is.
Three Functions
Let's do a few more projects before we move on to the next part of this course. To preview the next project, you can simply click here. Notice what happens when you hover your mouse over each one of the three buttons. Besides changing the border color of the button, it also produces a title that explains its purpose. Now click on each one of the buttons to see what it does. The message each button produces has a lifespan of only 5 seconds (or 5000 milliseconds to be exact) before it disappears. Notice that the all three buttons are disabled during the 5-second timeout. Oh sure, the border changes color when you mouseover the button, but it does not call the function that would invoke sending a new message and starting a new timeout until the current timeout is complete. We think you will find that this project is both fun and informative. There is a lot to learn here, but its lessons will prove to be valuable to you further on down the road.
Even though you have seen several functions already, and you basically know how they work, this project will show you three different kinds of functions, and how each one can be triggered by a click event. This project will also show you how to create event listeners as well, and even how to use the built-in JavaScript function called setTimeout, and we will also see how we can disable buttons and enable them after a timeout. There are a few other gems in here as well, including how to replace a complicated for-loop with an array and a forEach loop. So go ahead and download, unzip, and open in VS Code the Three Functions project. And when you have that project open in VS Code and launched with Live Server, we can begin.
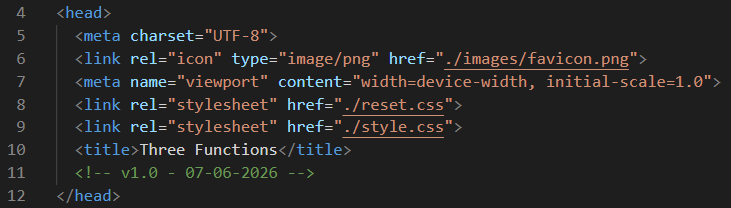
We seldom look at the document <head> these days, but for this project, we will make an exception. You are used to seeing us define folders and files without the ./ before the name of the files and/or folders. For instance, "images/favicon.png" simply means, find the images folder, and the favicon.png file will be found inside that folder. But on line 6, "./images/favicon.png" means start in this home folder, and then find the images folder, and the favicon.png file will be found inside that folder. It's a subtle difference. Most of the projects we are doing here are small enough that this is not necessary, but it is good to get into the habit of specifying the path relationship to the home folder, so that you will know what that means when you begin to build larger projects.
We also wanted you to notice that on line 8, we are loading our favorite CSS Reset file before we load our regular stylesheet. Feel free to look at that file to see what it does, but its main purpose is to provide some basic CSS rules that will make the rest of our CSS code much easier to write.
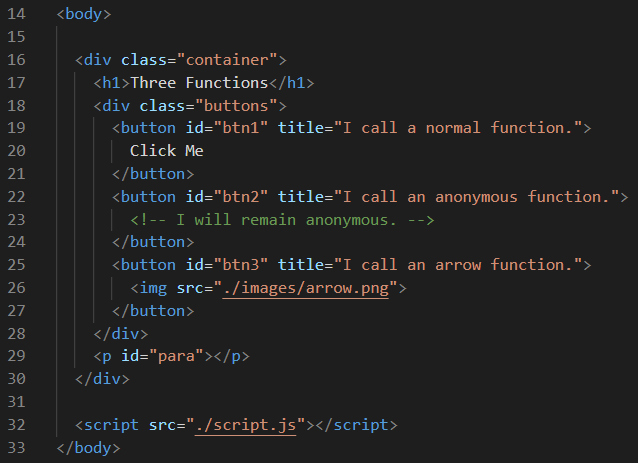
Now let's look at the document <body>. On line 16, we have a container div. Nothing new there. And we have an h1 element on line 17. On line 18, we have a div with a class named buttons, and as you can see, there are three buttons inside of that div, each with a unique id of btn1, btn2, or btn3. The title for each button is displayed when you mouseover each button. The buttons div ends on line 28. On line 29, we have an empty paragraph with an id of para. Otherwise, this is simple HTML code.
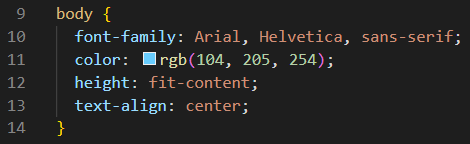
Since this is a JavaScript course, we usually try to avoid looking at CSS code, but there are a couple of sparkling gems here to see. One of them is on line 12 above. Since the width of the document body defaults to 100%, we sometime struggle to calculate the height of the document body. The modern way to solve that issue is by using fit-content which expands and contracts with the amount of content you add to your web page.
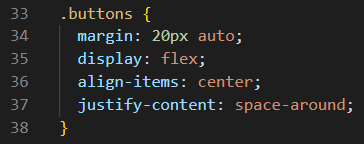
For the buttons container div, we used your basic garden-variety flexbox, but notice just how well space-around works with this three-button layout for justify-content on line 37. Oftentimes the best code is the simplest code.
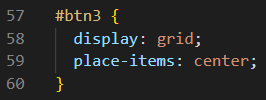
The last bit of CSS code we want you to look at is the code we used for perfectly centering the arrow image on top of the #btn3 button. We find that using grid can be extremely complicated, especially for beginners, so we avoid talking about it. But grid definitely has its place. When using flex, you are positioning items either horizontally in rows, or vertically in columns. However, grid allows us to positioning items both horizontally and vertically at the same time. Remember these two lines of code anytime you need to center an element perfectly in the middle of another element.
Now let's look at some JavaScript code. The first thing we did here was to declare all of our global variables at the top of our file. Since these vraiables never change in value, we declared them as const variables. Also, notice how we placed the three button variables on lines 8, 9, and 10 inside of an array object named btns on line 12. We will see the reason why we did that momentarily. But now let's jump down to the bottom of this script file.
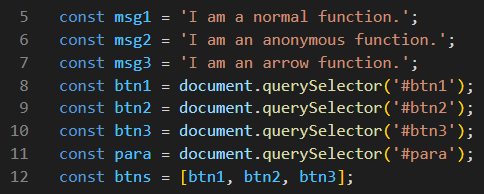
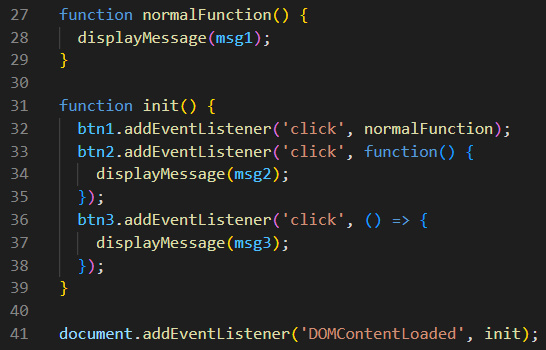
On line 41, we are waiting until all of the content in the DOM is loaded before we call our initialization function called init on lines 31 through 39. And this is where the magic begins.
On line 32, we are adding a click event listener that will call normalFunction when the btn1 button is clicked. And normalFunction is just that: a normal function like those that you've already seen many times before. And normalFunction is on lines 27 through 29. It is very simple. It calls the displayMessage function and passes msg1 as a parameter to that function as well.
On line 33, we have an anonynmous function. It is called that because it is nameless. After the function keyword we have the two () parentheses to denote that this is indeed a function, and since it has no name, we are forced to call this function named displayMessage(msg2); directly from inside the btn2.addEventListener declaration. This is both elegant and effective.
On line 36, we have an arrow function. Although it is similar to the anonynmous function, it differs in that we don't bother to use the function keyword at all. Instead, we place the two () parentheses first to denote that this is indeed a function, followed by the arrow that we signify with =>. Otherwise it works the same way as an anonynmous function.
Now let's look ath the displayMessage(message) function.
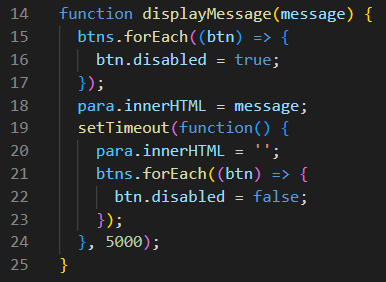
On line 14, we see that the parameter we send to this function in named message. Whether we are passing it msg1, msg2, or msg3 as a parameter, the function really doesn't care. To the function, it will always be called message.
Line 15 is exciting because we are using that array named btns that we created on line 12, and we are using the forEach method to iterate through all three of the buttons in that array. This is a much simpler way than using a for-loop that requires an index variable, and the three parts of a for-loop header: initialization, condition, and update. But before we wade too deep into the nuts and bolts of a forEach method, let's look at what this code is doing for us.
Although forEach is a method of an array, it works the same way as the arrow function we saw previously. Perhaps the only difference is that we are using a parameter arbitrarily named btn to iterate through each of the three buttons in thr btns array. So lines 15 through 17 simply disable all three buttons, so that line 18 can display the message we sent this function as a parameter. But we only want the message to be displayed for 5 seconds (or 5000 milliseconds), and we don't want the three buttons to allow click events while this message is displayed. So on lines 19 through 24, we are creating a setTimeout. And guess what? This setTimeout works just like the anonymous function we saw earlier. The only difference is that it waits and does not execute the code inside the function until the 5000 milliseconds on line 24 expires. After those 5 seconds pass, it will first remove the message, and then enable click events in the three button once again. Oh look! Lines 21 through 23 are very much like the forEach method on lines 15 through 17 in that, they work like an arrow function, but this time they enable rather than disable the three buttons.
String Concatenation
That last project was a great learning experience, but you might have found it challenging because of the new concepts. This next project will be much easier. In this project, we will learn five different ways to do string concatenation. And in doing so, we will introduce you to template literals if we haven't done that already. You might also see template literals described as template strings, but they the same thing using different names, just as bell peppers and green peppers are the very same vegetable. Click here to preview this project. Then please download, unzip, and open this project in VS Code and we will begin.
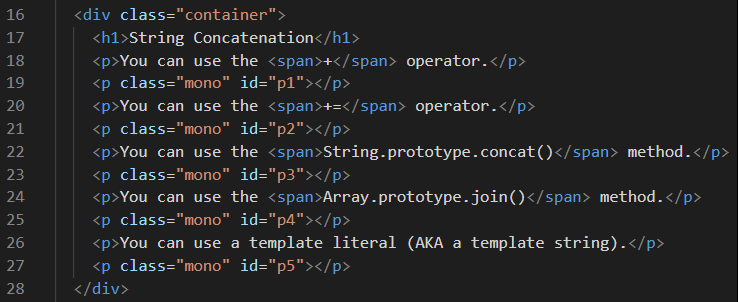
The HTML code shown below is so easy to understand that we will not bother to explain it to you. If you are interested in any of the CSS code, then please feel free to investigate it on your own.
The JavaScript code shown below is what we really want to focus on. Even though this is more of an informational web page than an interactive one, we populated our HTML elements using JavaScript, so let's see how this works.
Lines 5 through 11 are all const variable declarations and assignments. However, on line 12 we have a global let variable named names 😀 that declares and initializes an empty array. It appears that we will be assigning values to it later. On Line 13, we declare a let variable with a similar name without assigning a value to it either.
Are you ready to concatenate? Oh good! Because on line 15, we are concatenating our firstName to an empty space, and then concatenating that to our lastName, and then assigning all of it to our name variable. On line 16, we are displaying the name variable in our p1 paragraph. This is a plain vanilla example of string concatenation.
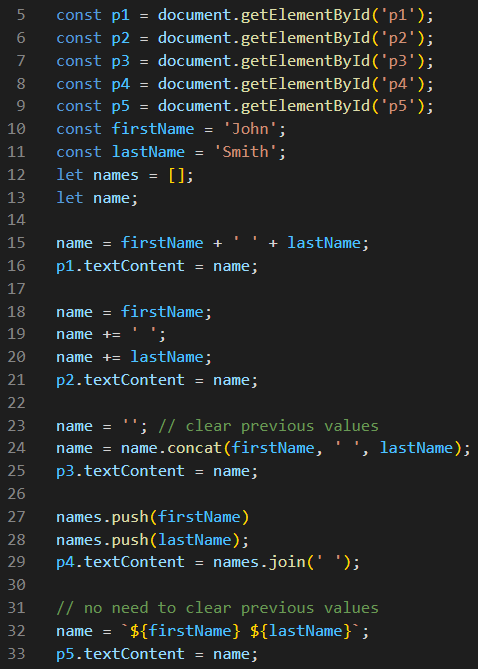
On line 18, we are reassigning the value of name to just the firstName. And on line 19, we are using the += operator to concatenate that to an empty space. And on line 20, we are using the += operator to concatenate that to lastName. On line 21, we are displaying the name variable in our p2 paragraph. This is our second example of string concatenation.
For our third exmaple, we have to first clear the name variable by assigning it to an empty string, and that is what is happening on line 23. Because on line 24, we are going to use the String concat method. On line 25, we displaying the name variable in our p3 paragraph.
On lines 27 and 28, we are pushing the firstName and the lastName in our empty array. And then on line 29, we are using the Array join method to join these two values in our array together, using a space to separate them. On the same line, we are also displaying the name variable in our p4 paragraph.
Finally we get to our fifth example! On line 32 we are assigning a template literal to the name variable. The syntax for a template literal is a little tricky. It must start and end with backticks. And in case you can't find them, the backtick key is the key just below the Escape key on your keyboard. Something else that makes template literals unique is that we don't need operators like + or += to concatenate our text. Any regular old text can simply be typed anywhere inside of the backticks, but variables need to be placed inside of two curly-brackets, and preceded by a dollar sign, like ${myVariableName}.
What was that? You want to know why we are using textContent here instead of innerHTML? That's a great question and we are so pleased that you asked it. You should use textContent instead of innerHTML when you are working exclusively with plain text rather than with HTML markup. Yes, it is true that you've seen us use innerHTML almost exclusively in the past, and either one would work in this case. But textContent won't allow you to embed other HTML tags, inline styling, or special character codes inside the string you intend to use with it. And it is faster and more secure than innerHTML. There is also a long discussion we could have here on Cross-Site Scripting (XSS), which should never be confused with CSS, but Wikipedia can explain it better in their article. But for the sake of brevity, we will only say that XSS is a hacker trick, and that innerHTML allows XSS hacks to occur, while textContent does not. For that reason alone, textContent should be the preferred way to display plain text over innerHTML, whenever that way is possible.
Fun With Numbers
Now we are going to throw all of those XSS security concerns out the window, and have some real Fun With Numbers using only innerHTML to display our text outputs. To see what we are talking about, simply click here. When we finally get into this project code, you will see that we are only using one line of code to display text. But since almost all of the lines of text we are displaying has HTML tags and special character codes embedded in them, we must use innerHTML and template literals to display each string of text.
This is the point where we ask you to grab the Fun With Numbers project code. And when you are ready, we can look at the code together.
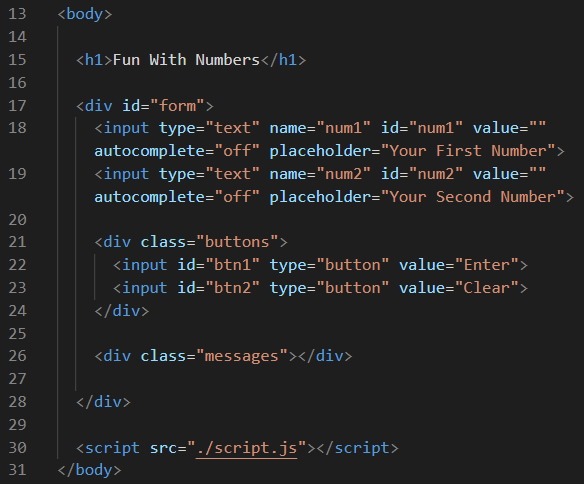
The HTML document body code as shown above is actually pretty simple. There is one container div and it was given an id named form. On lines 18 and 19 are two <input type="text"> elements, and each one of these has 5 properties. In later lessons we will explore forms and input element types. But for now, the most important properties are the two ids of num1 and num2. But we might as well explain the others. The value of each input starts out as an empty string. The autocomplete property is very handy because it prevents the input from suggesting previously entered values. And the placeholder property is similarly helpful because it displays what kind of data it is expecting users to enter there. The alternative to placeholder text is adding a label element for each input, and that takes up a lot more space on our web page.
We have also placed both of our <input type="button"> elements inside of a div named buttons. These input elements work the same way as our regular old eponymous <button> elements. And as usual, the most important parts of each are the two ids of btn1 and btn2. On line 26, we have an empty div named messages. The purpose of that div is obvious.
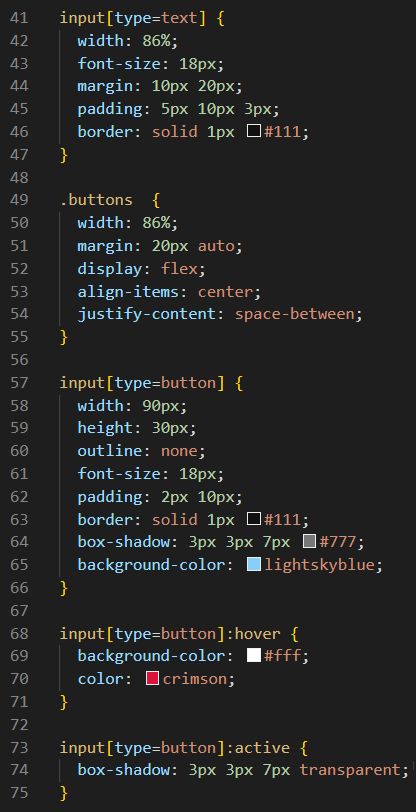
There isn't much new in the CSS code for this project. But since you may have never seen many input elements before, we have included the code displayed above for you to view. The button code should look familiar. It's the same thing only different. The property names might have changed, but the values that we are assigning to them are still basically the same, including those values for the hover and active pseudo-classes as well. After all, buttons are buttons, right?
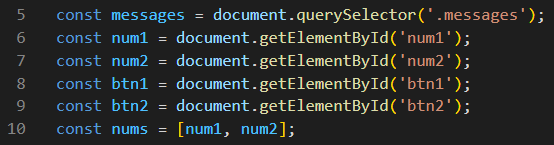
But now it's time to look at the script file. At the top of the script file, we declare all of our global variables. These are basically the locations of elements so they are declared with the const keyword. It is interesting that on line 10, an array named nums is declared to hold num1 and num2. It must have seemed like a good idea at the time, but that array object is never used. And it doesn't use enough memory to cause any problems, but it's interesting that it exists.
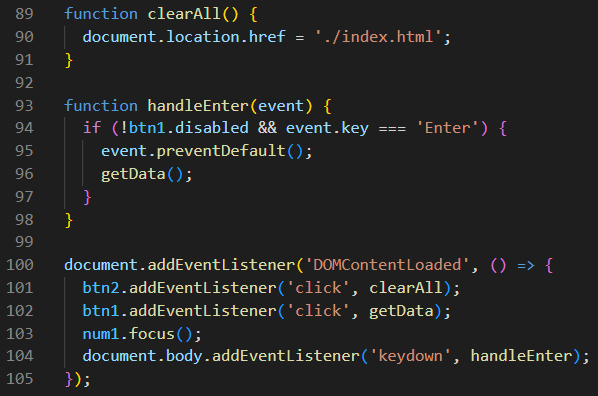
Now let's jump down to the bottom of the script file. By now, line 100 is beginning to look familiar to you. And guess what? It launches an arrow function as soon as the DOM is load. So on line 101, we add a click event listener for btn2 that launches the clearAll function on lines 89 though 91. Since btn2 is the Clear button, it makes perfect sense that on line 90, we simply reload the web page.
On line line 102, we add a click event listener for btn1 that launches the getData function when that button is clicked. Since btn1 is the Enter button, that makes logical sense as well. Line 103 puts the focus on the num1 input box, and all that means is that the cursor now rests inside that input box, so it is now ready for the user to begin typing the first number. Line 104 adds a keydown event listener that calls the handleEnter function on lines 93 through 98. You've probably seen this done before. So if btn1 is not disabled (and it ever is here), and the keydown was the Enter key, then it calls the getData function in the very same way that it would if the Enter button was clicked. Well-designed, intuitive interfaces do favors like these for their users. And since all roads lead to the getData function from here, let's look at that function next.
This is a huge function that really does a lot. Of course, the very first thing it does is that it checks to make sure that num1 and num2 are both valid numbers. If either one of them is not, then line 43 alerts the user, and line 44 returns from this function to await better user input. We will look at how well the isValidNumber function works later.
Once the function has valid data, it can continue code execution on line 46. Lines 46 through 49 might seem a little confusing to you. This has everything to do with that fact that an input type="text" element gives you a string of text rather than an actual number. But we aren't concatenating string variables here. Instead, we are performing arithmetic operations on them. So on lines 46 and 47 we are creating two block-scoped const variables that will convert the text in num1 and num2 to number data types and then store them as val1 and val2. And interestingly enough, lines 48 and 49 are redundant since the values of num1 and num2 are never used again. Apparently, the programmer could no longer tolerate seeing those two variables as string variables. 😀 But let's move on.
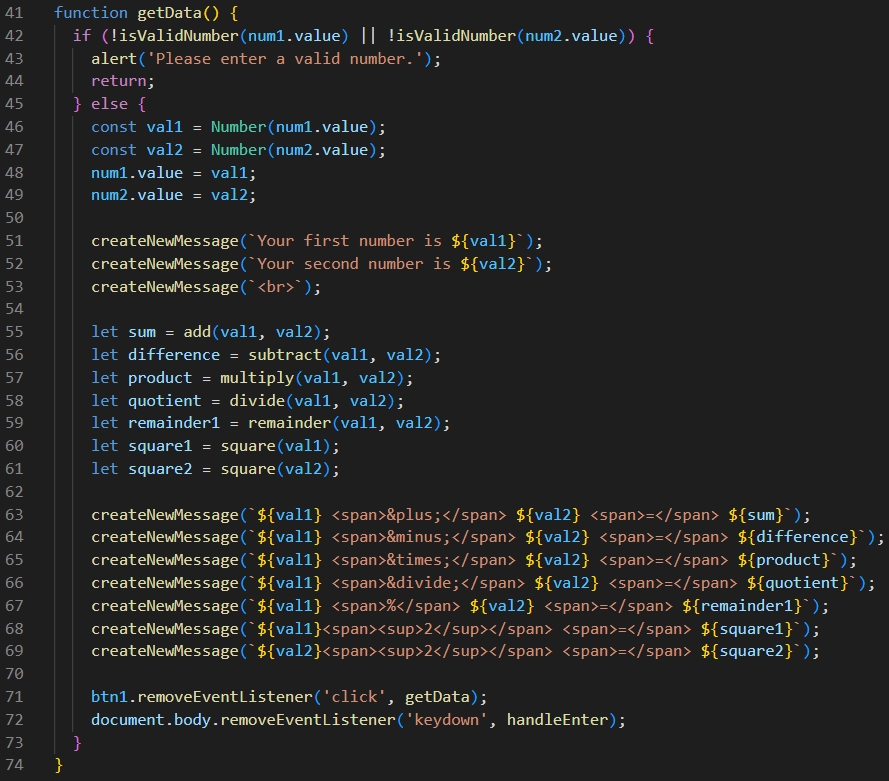
The code gets more interesting on line 51. We will look at the createNewMessage function later, but it is easy to see what it does for us. It sends us two messages that tell us of what the values were of the two numbers we typed, and then it prints a blank line. Notice that all of the messages we are sending to the createNewMessage function are template literals.
Lines 55 through 61 create let variables by sending val1 and val2 as parameters to six different functions that perform arithmetic operations. The names of those functions and variables seem obvious enough that we won't bore you by describing each and every one of them. And we will look at those six functions later. But we just noticed that this programmer made yet another boo-boo. Once again, it is a small and inconsequential mistake, but all seven let variable declarations on lines 55 through 61 should have been declared as const variables because their values never change. If fact, every variable in this script should have been declared as a const.
On lines 63 through 69 we are taking the results of those six (or actually seven) arithmetic operations, and creating seven more template literals that we are passing as parameters to the createNewMessage function. Look at the CSS code for the styling of all those span elements. On line 71, we remove the btn1 click event listener and the keydown event listener because all work here is now completed.
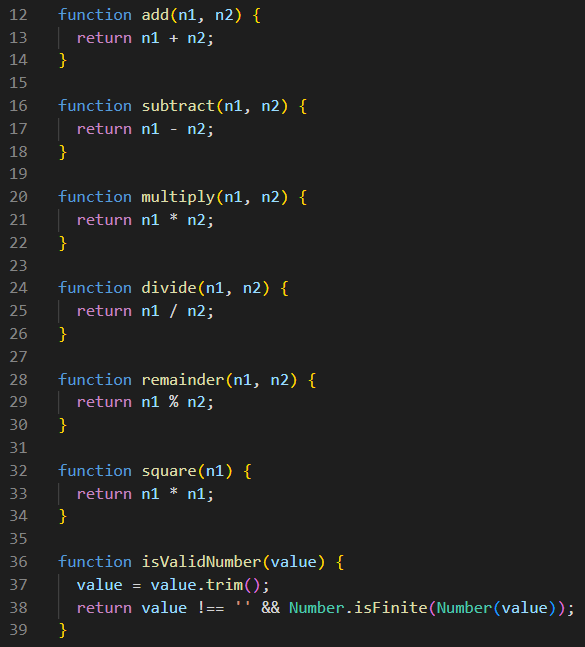
In the code shown above, we can see how those six aritmetic operation functions work. And then on line 36, we can see how the isValidNumber function works. Remember that we are sending the string values of num1.value and num2.value to that function from line 42. On line 37, we are using the string trim method to remove any leading or trailing spaces from the string that we sent it. If the string has none to remove, that's fine too. On line 38, we are checking for two possible conditions: the string cannot be an empty string, and the string must be a finite number after it is converted to a number. If both of these conditions are met, then the isValidNumber function returns a value of true. Otherwise, it returns a value of false.
And just FYI, the Number.isFinite() method is the modern way to check the validity of any number. if it encounters the values of Infinity, -Infinity, NaN, or null, it returns false.
Now, let's look at the createNewMessage function that is displayed below. On line 77, we are creating a paragraph element and then assigning it to a const variable named para. Yes, it is entirely possible to create HTML elements through JavaScript. And then on line 78, we are placing the template literal this function received as a parameter into para using its innerHTML property. As mentioned earlier, we must use innerHTML because of the HTML tags and special characters that are in almost all of these message strings. Then on line 79, the para paragraph is appended to the messages div, so that it appears on our web page.
And so, the createNewMessage function will be called ten times in all from the getData function, and that is what creates all of the Fun With Numbers that appear on our web page.
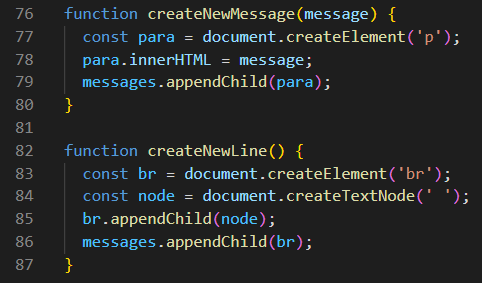
Hey! Guess what we just found? This programmer made yet another boo-boo. The function named createNewLine on lines 82 through 87 never gets called. It actually does not hurt anything here, but it should have been removed once the original programmer determined that it was not needed. And we think we know why it is here. On line 53, this code appears there: createNewMessage(`<br>`);. So we think that it was decided that this line break could be more easily accomplished through the createNewMessage function. And then after they did that, they forgot to remove the createNewLine function that was only being called from one line of code. Anyway, that's what we think. Again, the amount of memory it consumes is minimal, so it has no detrimental impacts. But the fact remains that it should not be there.
That last thing we'd like you to look into is a separate but similar JavaScript file named script1.js. And the easy way to see what it does is to change the src on line 30 of index.html to script1.js. So what happens now when you run this script? It rounds off all of the answers for each arithmetic operation to only two decimal places. And this can be useful when you are working with monetary currencies. We want to know that the cost of the item we are purchasing is $319.49, but we don't want that price displayed as $319.4913833848197, right? And that is where this rounding method comes in handy.
But in this example, we also wanted to take this one step further by using a ternary operator to allow us to show even dollar amounts without showing any decimal places as well. In that case, a price of $50.00 would be displayed as $50. And that may not always be the best option if your program is crunching numbers for accountants all day long. But it does give us a chance to illustrate the beauty of the ternary operator that we skipped over quickly during our deep dive exercises.
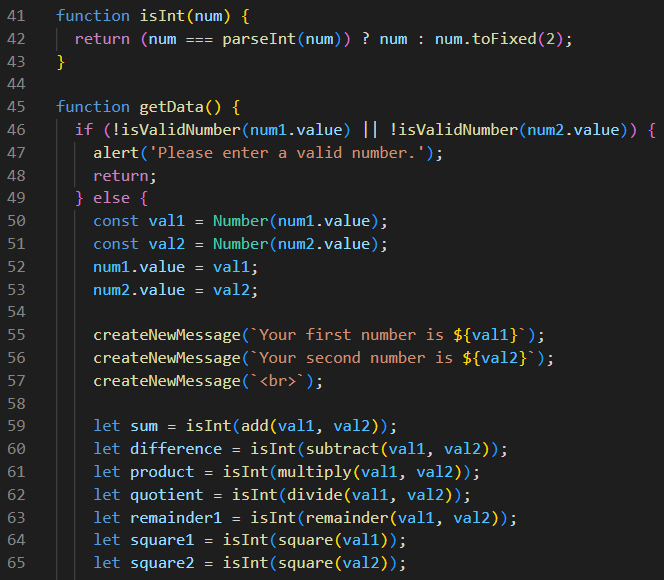
Look at the code above. Notice that on lines 59 through 65, we are sending the results from each of our calls to our arithmetic operation functions through another function named isInt after each calculation is complete. The isInt function is checking to see if the result of each calculation is an integer or not. And if it is an integer, it returns an integer. But in the event that it is not an integer, it returns a floating-point number that is rounded off to the nearest two decimal places. You can see this function above on lines 41 through 43, but the real magic happens on only one line of code on line 42.
The syntax of a ternary operator might look confusing at first, but let us dig into it a little deeper to show you its beauty. Through the image displayed below, you can see how the isInt function would look if we were performing this same operation using an if-else-statement instead of a ternary operator. Either way, the result that is returned is the same, but by using a ternary operator, we effectively reduce 5 lines of code down to only 1 line of code. So the syntax is very simple. The first part that is enclosed in parentheses is the if, and the second part after the ? is the result if the first part is true, and the third part after the : is the result if the first part is false. You could think of this third part as the else. Bottom line: the condition tested in the first part determines which result will be returned.
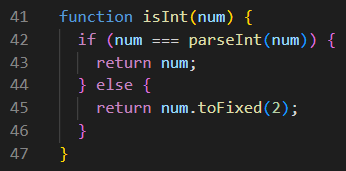
Did we completely neglect to tell you about the toFixed(2) method? Yes, we did. The excitement of talking about ternary operators was simply too much for us. The toFixed() method is actually very simple to explain. It rounds any floating-point number down to a fixed number of decimal places. We chose toFixed(2) because it works best with monetary currencies. But in reality, that fixed number could be any number you like, even 0, especially if you are rounding a floating-point number up or down to the nearest integer.
Challenge
We found several coding issues in this project, and we want to challenge you to fix all of them. We found nine lines of code that are not used at all. And we found seven let declarations that should have been const declarations instead. These issues exist in both script files. And it is up to you to fix all of these issues. Please be sure to test the code after you edit it. Will you accept our challenge?
More About Comparison Operators
Were you able to complete the challenge above? It actually wasn't too difficult. You had to remove code that was not used at all. And you had to change seven let declarations to const declarations. And you had to fix those issues in two different script files. Lastly, You had to test the project afterwards to make sure that you didn't break anything, regardless of which script file was linked from index.html. When you are satisfied that you completed the challenge successfully, then we have another short project before we reveal one of those deep secrets of the JavaScript universe than only real JavaScript programmers know about. OK?
So here we are, ready for the next project called The Value of Flag. Please download, unzip, and open this project code. When the project is open in VS Code, we will begin.
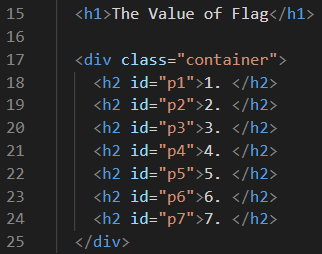
And as you can see, the HTML code below is extremely simple. It appears that the programmer initially had seven paragraphs instead of seven h2 elements from the ids of p1 through p7. And the CSS code is so simple that we won't bother to show it here. Now let's jump down into the script file.
There is nothing new in lines 5 through 11. Making explicit references to the elements in your HTML file is always considered to be best practice. This script file would work just fine without them. These days smart web browsers are often very forgiving to dumb programmers. What? You don't believe us? Well then, comment out lines 5 through 11, and then run the program again. See? It works! And look in the console for errors. There are none! But we don't want the web browser to think that it is smarter than us. Or worse, we don't want other programmers to think that we write sloppy code. So we will always include explicit references to the elements in our HTML code. But we regress. This wasn't even supposed to be the main point of this lesson. Let's jump down to the comments on lines 13 through 17.
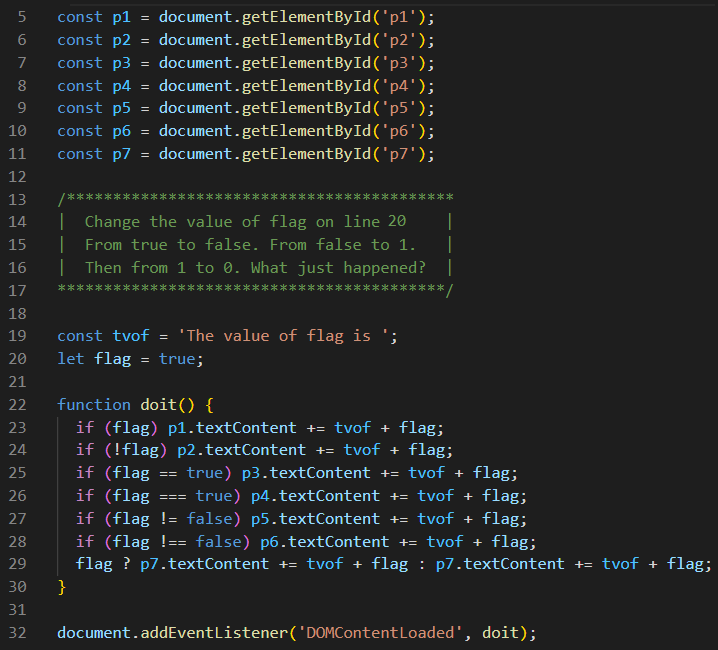
We are going to run this script four times. The first time we run it, the value of the variable named flag on line 20 will have the value of true. Then, we will change the value of flag to false, and run the program again. For our third test, we will change the value of flag to 1, and run the program again. And for the fourth and final test, we will change the value of flag to 0, and run the program one last time. And each time we run this script we will get different observable results. And there is a lot to learn here from such a simple script.
Now let's look at function doit on lines 22 through 30. Did you know that if-statements do not require curly brackets if there is only one true condition, and as long as there is no else-statement to add to it? So you see that lines 23 through 28 can each fit on one line for that reason. And we can see that if there is a true condition, then we simply concatenate the tvof string to the number that is already there, plus the value of flag. However, if there is no true condition, then nothing gets concatenated to the number.
You might also see that we are using the not logical operator here on line 24 as well. It is pretty simple to understand. If there is a ! before the variable name, it negates the value, meaning that it is checking to see whether the value is false rather than true. The other comparison operators we are using here should be easy enough to understand at this point. One final note: on line 29, we are beginning to see why the ternary operator was invented. Having an if-statement on one line only was certainly cool, but if an else was required, then curly brackets and several more lines of code were needed as well. The ternary operator replaces the if and the else, and still only requires one line of code. And regardless of whether the condition under test is true or false, we always get a result.
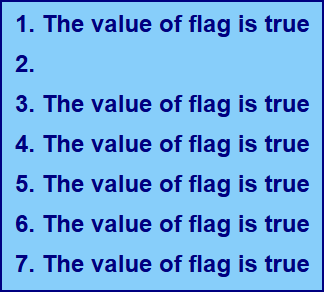
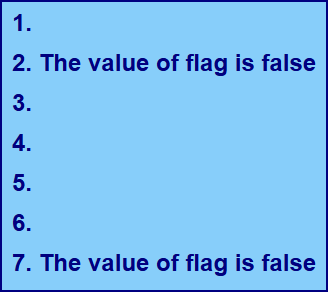
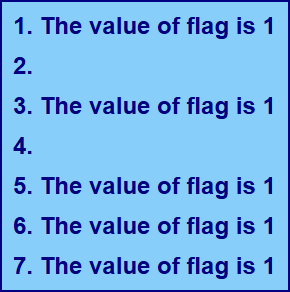
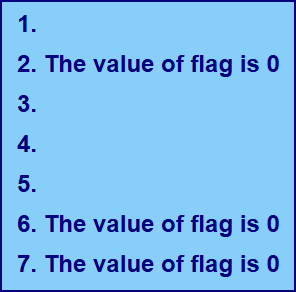
Now let's look at the results of running these four tests. For the first test, flag = true, and we are probably expecting what we see in the first block below. In all cases, we get a predictable output. When we run the second test, we also get a get a predictable output as shown in the second block below. And that is because flag = false is only true on line 24. And of course, we always get an output from our ternary operator on line 29.
However in the next two tests, the results might surprise you, because instead of evaluating boolean values, we are evaluating number values. That makes sense to a certain degree because 1 can also be interpreted as true in some cases, and 0 can be interpreted as false. So let's look at the results of the third test where we are defining flag = 1. And we get predictable results similar to the first test, except from line 26. Line 26 is looking for a value that is identical to true, and numbers are not the same as booleans, so line 26 does not evaluate to true. Line 25 finds that they are equal, but that's not the same thing as being identical. Lastly, the results of the fourth test seem to match the second test, except for line 28. And that is because line 28 finds that 0 is not identical to false. Line 27 finds that they are equal, but that's not the same thing as being identical.
Now, we could do more tests here as well. How about using string variables with values of "true" and "false"? Can you predict what the results of those tests would be? And what about other primitive data types? What if we tried comparing null and undefined data types as well? The bottom line here is that the results are difficult to predict. This loosely-typed language we call JavaScript can be a real Beauty. And at times, it can be a Beast. The TypeScript preprocessor was invented for programmers who normally prefer strongly-typed languages. For them, JavaScript will always be a Beast. But they don't know the deep secrets of the JavaScript universe.
How about if we let Dorey explain it to us is a few very simple charts. Click on the first three buttons at the top of his JavaScript Equality Table. Notice just how convoluted the == chart is when compared to the === chart. And if you scroll down to the bottom of these charts, you will learn the Moral of the story. This knowledge is probably all we'll ever need to know. Of course, this is far too simple for some, so they will need to learn and use TypeScript while they verbosely lament about how JavaScript is the worst coding language in the world. But now that we know this deep secret of the JavaScript universe, we don't need to follow them into oblivion. Instead, we will remember to always use 3 equal signs, unless we have a good reason to use only 2. And if we are ever in doubt, we can always refer to Dorey's Charts.
Final Exam
Before we move on to the next part, we want you take a test. No, it won't be as long and involved as the Deep Dive Tests we took earlier. But we have already learned a lot about array objects and template literals, so this little test will help you figure out how to extract items from an array and how to display them as part of a template literal (or template string). These two skills are something that you will use a lot in the future, so it is time to prove your skills. To view the test before we begin, you can click here. When you are ready to begin taking your Final Exam, you can download the Final Exam project zip file from here. Good luck!