JavaScript Coding Course
JS 101
Part 7. Interacting With Users
Forms and Inputs
The main reason why forms have not been discussed until now is because the data received from forms is usually processed by a web server, not by your local computer. If this was a course that was teaching full-stack web development, then we would be spending a lot more time talking about forms. Online websites take the user input from forms, and then processes it on the web server using languages like PHP, Node.js, or Python. In this course, we are not working with servers, so all of our user input will be processed on the client-side using JavaScript. Nevertheless, it is important to learn about forms because you will eventually and undoubtedly see them again in the future.
In reality, a form is basically just a different kind of div. But when used properly, a form includes two additional attributes: the action and the method. The action defines the URL (or link) to the destination where the form data should be sent for processing. The method can be one of two different definitions: either GET or POST.
And before we go much further, we need an example project to explain what we are talking about here. So now you need to download the source code for this project. You know the drill. When you get it unzipped, opened in VS Code, and launched using Live Server, we can begin.
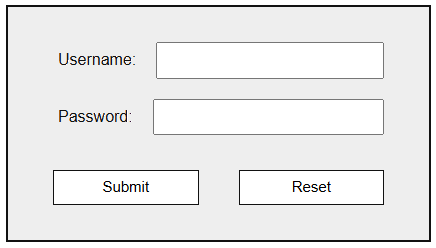
Yes, this appears to be a very simple form, and it certainly looks a lot like many other forms we've seen in the past. However, it does have four different types of input elements. And that is one of the features of this project that we will be looking at very closely. And those four input elements are listed below in order as follows:
- <input type="text">
- <input type="password">
- <input type="submit">
- <input type="reset">
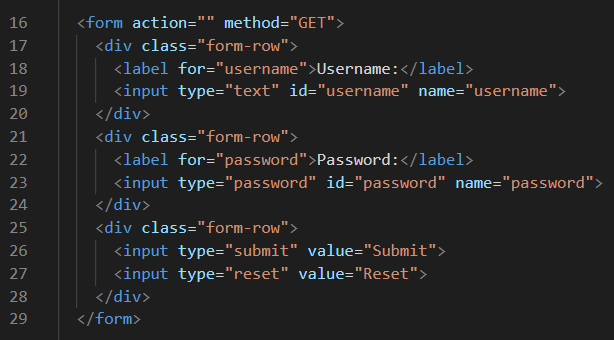
And we can see them displayed below in the actual HTML code on lines 19, 23, 26, and 27. Of course there is much more to see here. The opening form tag is on line 16, and it includes the two attributes we mentioned earlier. The action attribute is empty here, but there would be URL there on a real form. And the method attribute is defined here as GET. We will see how that works in a moment. This form has an interesting layout using three divs with a class of form-row. And you will notice here that we are using two label tags: one on line 18, and one on line 22. Notice that each label has a for attribute that tells it which element the label is for. And in both cases, it is for the element that has the same id and name as the label's for. The bottom form-row holds the two input elements that we would normally regard as buttons, but notice that, like all other input elements, they do not require closing tags. So it is the value attribute that appears on the top of each of these pseudo-buttons. The closing form tag appears on line 29. And please feel free to look at the style.css stylesheet for this project to see how we styled all of these elements. There is a lot happening here in these 14 lines of HTML code. Next up, we should see how this form works!
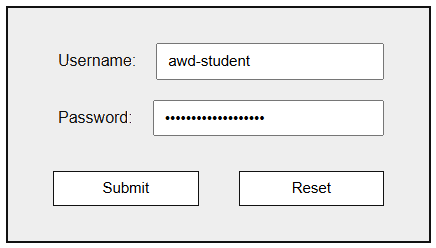
Now it is time to actually work with the form. Since there is no action attribute, we can enter any username and password that we like. Notice that the username input is of type text. So that means that whatever we type in that box will appear as text. But that is not the case with the next box, which is an input of type password. When we type our password into this box, a series of dots appear, so that anyone looking over our shoulder will not learn our password. And that's the beauty of that input type.
But before we actually click on the Submit input, let's pretend that we made a mistake. And thanks to the Reset input, it only requires one click to clear both of the above input boxes. How convenient is that? So now, let's retype our username and password, only this time, we will click on the Submit input. And afterwards, we need to look at the browser's address bar.


The image on the left at the top is how the address bar looked before we clicked the Submit input. And the image on the left below it is how the address bar looked after we clicked the Submit input. See any differences? Do you have any idea what password this user typed?
What you are witnessing here is the behavior of a form's GET method. If we had a real URL listed as an action, supposedly the browser window would be redirected to a web server so that it could process this login attempt as being either successful or unsuccessful. But what would happen if the web server was down for some reason? Would the address bar still reveal the user's password for all to see? That's a good question, for which we have no valid answer! Perhaps a full-stack web developer could explain what happens on the back-end when such a travesty occurs. We just don't know.
However, we could venture a guess that the GET method is probably the wrong method to use in this instance. Perhaps the POST method should be used instead... for security reasons. Does that make sense?
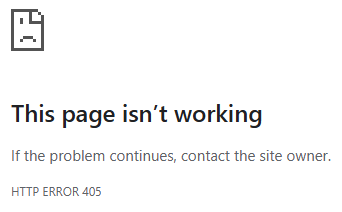
We have a couple more things to try before we move on from this project. So now, let's modify our code. Let's change the method from GET to POST on line 16. And then, let's do this exercise all over again.
Well, the Reset input worked as expected, but when we clicked on Submit, we got an HTTP ERROR 405. And the image on the right is a good picture of what that looks like.
Now, we have one more test to perform before we move on. Let's change just two lines of code. Let's change line 16 to <div id="div">. And let's also change line 29 to </div>, which is of course a closing div tag. And this effectively changes this section of HTML code completely: from a form to a regular old div with an id of div. And if you look at the style.css file, you will see that this div and the form share the same CSS styling rules.
So now, if we perform these same tests all over again, what is the result? If you found that nothing really happened, there is a good reason for that. Oh sure, the new div allowed you to type in the username and password, but the Reset input no longer cleared the input boxes, and the Submit input did not send the information to the address bar, nor did it produce a 405 error. And that is because only HTML knows how to handle a form. Once this HTML code became part of a div and was no longer a form, then HTML could no longer help us. In fact, the Reset and Submit input types only work if they are inside of a form. If you wanted them to use a div instead of a form, then you would need to convert these two input elements to buttons, and then write some JavaScript code to make them work. If you look at the current script.js file right now, you will find that it is indeed an empty file.
So while some inputs work with JavaScript, other inputs simply do not, as we just saw. The bottom line here is that forms depend on HTML (not JavaScript) to make them work. Here is the URL to the complete W3Schools Forms Reference.
So why do we use forms at all then? The answer has everything to do with network security. Let's say that you are buying items online, and you must enter your credit card information. That information will be encrypted on your computer (the front-end client-side) before it travels over the Internet to the web server (the back-end server-side) where the data is then decrypted and processed. After the data is processed, the server then encrypts a secure return message, and sends it back to you, which your computer decrypts, and that message either tells you that your transaction was successful, or that your purchase was denied. It goes without saying that all parties concerned place network security as their highest priority anytime that online money transfers are involved. And you could make a similar case for the security of online account usernames and passwords as well. Anyway, it's finally time to move on, and to leave the subject of using online forms behind.
Using Inputs With JavaScript
So now let's learn all about how to use input tags and elements with JavaScript. So far, we have seen countless examples of how to send output data to a web page, but we've seen very few examples of how to get input data from the user. Yes, we did see how to get input from a JavaScript prompt, but that was way too simple to actually be useful. And we saw many button examples in the CSS Coding Course.
From here on out, some of our JavaScript examples will use inputs placed inside of divs rather than inputs placed inside of forms. Many of these inputs work exactly the same way whether they are processed on the client-side or on the server-side. However, a form is actually designed to work with a server, so HTML will attempt to process the inputs differently than JavaScript would. And since HTML handles the submit and reset input types, we will only use those types of inputs inside of forms. If we are going to be using divs rather than forms, then programmable buttons will probably be used instead.
But there is also an input element and tag of the button type as well. And this type of input actually plays nice with JavaScript, unlike the input of the submit and reset types that we saw earlier in the previous lesson on forms. There are actually many different types of input elements and tags, and we will learn about the most common ones now. But for a much more complete look at just the input tags and elements, you should visit this W3Schools Inputs Reference for more information.
Fun With Buttons 2
Let's jump into another project now that is similar to one we saw in Part 5 of our CSS Coding Course called Fun With Buttons (which you can download and review again here, if you like). But we will be using an updated version of that project called Fun With Buttons 2 so that you can see the differences between a true button, and an input of the button type, and how that differs from an anchor tag disguised as a button. Knowing the differences between these three different tags and elements is important. This project has a lot of descriptive text already added to it, plus a ton of comments as well, so we will let you examine the code in that project on your own. However, if you will like to preview this project without downloading the source code, then simply click here.
Mandalorian Login
If you found the My Form project too basic and somewhat boring, then we hope you will find this next project a lot more exciting. Similarly, this project is all about logging in with a username and a password. However, we use divs with buttons, instead of forms with submit and reset input elements. We are also identifying the two inputs using placeholders instead of labels. Other differences include SVG icons that let you show and hide the password data field input type by toggling it from an input type="password" to an input type="text", and that allows you to reveal or hide the text that you are typing for your password: a feature that some users find helpful. This project also is composed of two HTML pages: the index.html login page, and the home.html welcome page. Each of these web pages has its own unique JavaScript file. The login.js file is linked to the index.html file, while the home.js file is linked to the home.html file, even though both HTML files share the same style.css stylesheet. Lastly, we are using sessionStorage to pass the username and password between the two web pages, and that is something else that we have not seen used until now.
So now, let's download this file, and then unzip, and open it in VS Code so that we can begin. However, to quickly preview this project first, you can simply click here.
Once you have the project open with Live Server, you can test it out as a user before looking at the underlying code. This program is more of a toy than a login script that you would use in real life, but we can learn from it just the same. This program requires that you enter a username — any username — because it only uses that username in its greeting. However, the password you enter must be 123: certainly the worst possible password in terms of security, but perfectly fine for a plaything. Of course, entering any other string of text in the password field (or none at all) will not allow you to login. Once you enter a username and a password, you can click on the little eyeball icon next to the password field to see how that works. And lastly, when you click on the Login button with a username and the correct password, this login page will redirect you to the home page which will greet you with the username you entered. And if you click the Logout button, it will forget your username, and then redirect you back to the login page. To simulate how a real server login would work, we are storing the username entered in something called sessionStorage which allows your local computer to pass that data to another web page where it can be retrieved. However, we erase that data in sessionStorage when we logout. And we will learn how that is done when we look at the JavaScript code.
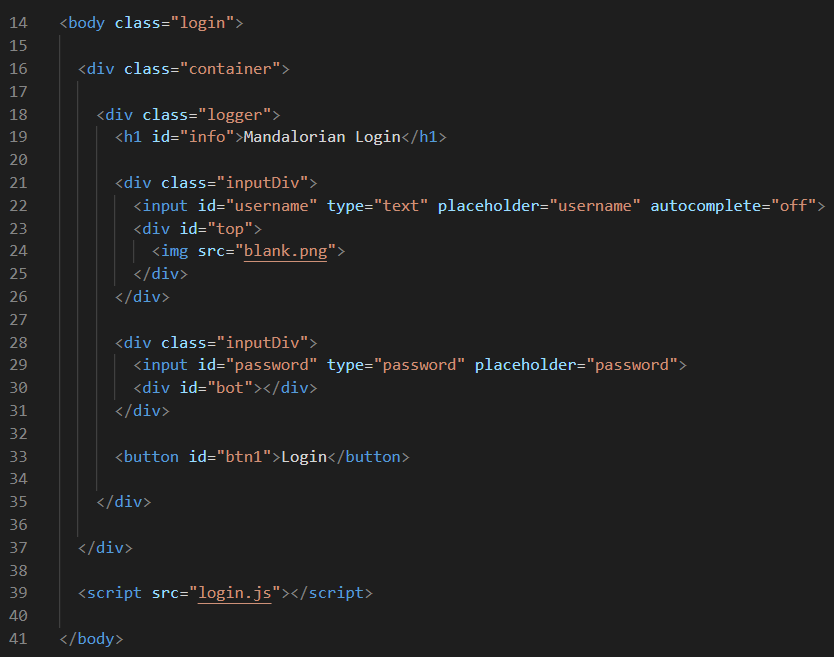
But first, let's look at the HTML code in the index.html file, which is the first code that the browser loads, and that we are calling the login page. Notice that the HTML document body starts on line 14 and ends on line 41. And notice that we assigned class="login" to our opening <body> tag. Why? Because both of these web pages are using the same style.css stylesheet, and this classname tells the browser which styles to use for this web page only, including this background image. On top of that background image, we have placed a simple container div, and nested inside of that div is another div with the classname of logger. The important parts of this web page are inside of the logger div.
On line 19, we have an h1 with an id of info. We will use this h1 to display other messages here as well. Next, we have two nested divs with classnames of inputDiv. Each of these divs has two other items nested inside of them: an input element, and another div. The input element in the top inputDiv is an input type="text" with an id and placeholder of username just to clearly define the purpose of this element. We also specified autocomplete="off" because we don't want it to suggest data that was previously entered to the user logging in. The second element nested inside of the top inputDiv is a div with an id of top. This div contains an image named blank.png, which is a transparent image with a pixel size of 25 x 25. We are only using this to balance the spacing with the inputDiv on the bottom.
Speaking of which, the inputDiv on the bottom similarly contains two elements. It contains an input type="password" and an empty div with an id of bot (short for bottom). The bot div will contain a clickable SVG eyeball icon with a pixel size of 25 x 25. And when the user clicks on the icon, it will toggle the input on and off from input type="password" to an input type="text" and that will allow the user to see what text they typed in that password field. We are certain that you've seen something like this used elsewhere on the Internet.
The last element inside the logger div is a plain only button with an id of btn1. The text on top of that button says Login which clearly defines its purpose to anyone visiting this web page. And please feel free to look at the CSS stylesheet on your own.
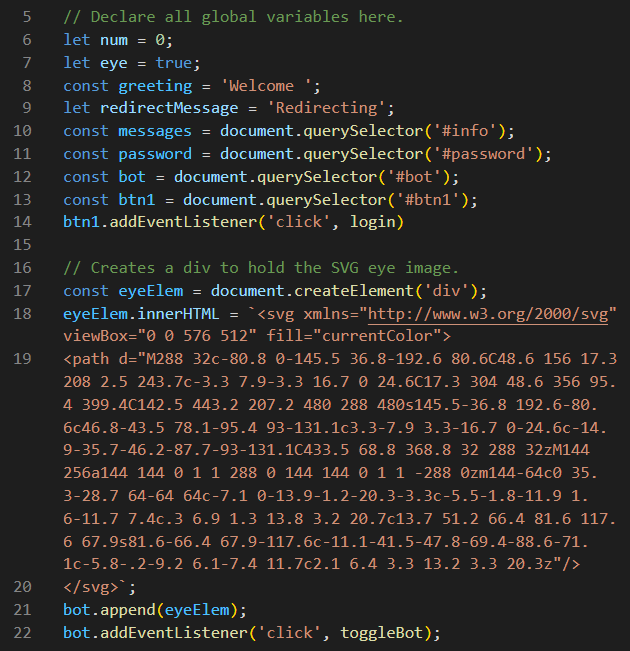
Now let's look at the login.js JavaScript file that is linked to this index.html web page. Most of this JavaScript code is very well-commented for your convenience, excpet for this section of global variables. The variable named num is going to count a number of dots and seconds. We will see it in action later. The variable named eye is a simple boolean to keep track of the SVG eyeball icon. The string variables called greeting and redirectMessage are simple starter texts that we will use later.
On line 10, it starts to get interesting. Remember that #info is the id of the h1 at the top of the logger div. And we know the two locations of #password and #bot from our earlier HTML discussions. And of course #btn1 is the Login button. So this is the perfect place to add a click event listener for that button. And what happens when that button is clicked? Yes, you are correct! It calls the login function.
On line 17, the code begins to get really interesting because we are creating an HTML element called eyeElem directly from JavaScript. Then on line 18, we are inserting the code for a scalable vector graphics (SVG) image inside of that eyeElem div.
A Quick SVG Crash Course
Remember that vector images differ from raster images in that they are drawn rather than displayed as a bitmap of pixels. That means that SVG images can basically be expanded or contracted to any size without losing image quality or clarity. Something else to know about SVG images is that they are encoded using eXtensible Markup Language (XML) instead of HTML, a markup language you know much better. But let's take a closer look at all of this orange text enclosed in backticks, shall we?
Notice that it starts with an opening <svg> tag on line 18, and ends with a closing </svg> tag on line 20. But the opening svg tag has some more information included with it. It says that it uses the year 2000 specification for XML namespace as defined by the World Wide Web Consortium. How nice! It also has a viewBox that starts at the XY coordinates (0, 0) and extends to (576, 512), which must be the size of the image (576 x 512 ) if you don't expand or contract it. And it also says fill="currentColor", which is navy, thanks to our CSS stylesheet. The orange text on line 19, between the opening and closing svg tags, defines the path used to draw this image, and that code is far too cryptic for mere mortal humans like us to understand, so let's move on.
What's that? You have one more quick question? Why are we inserting this XML code into our HTML document instead of using a simple <img id="eye" src="eye.svg"> element? That's a great question! Would you believe it has everything to do with that one fill="currentColor" property in the opening svg tag? Yes, that's right! In order for SVG images to appear in any color that we specified through our CSS code, they must be inserted into our HTML document this way, and they must have that fill="currentColor" property in the opening svg tag. OK? So thanks for that great question! Now we can move on.
The very last thing we do on lines 21 and 22 above is this: we append this eyeElem div to the bot div we declared and assigned much earlier. And then, we also add a click event listener to it that calls the toggleBot function, that is illustrated below.
Do you remember that we declared a boolean variable called eye earlier, and that we assigned it a default value of true? Fun fact: we could have simply written line 26 as ... if (eye) { ... because the boolean named eye evaluates to true if it is indeed true. And if it is true, then we simply insert the SVG image of the eye with a slash through it (lines 27 through 29), and then on line 30, we change the type of the input to text so that we can see what text was typed, and then on line 31, we assign false to the eye variable.
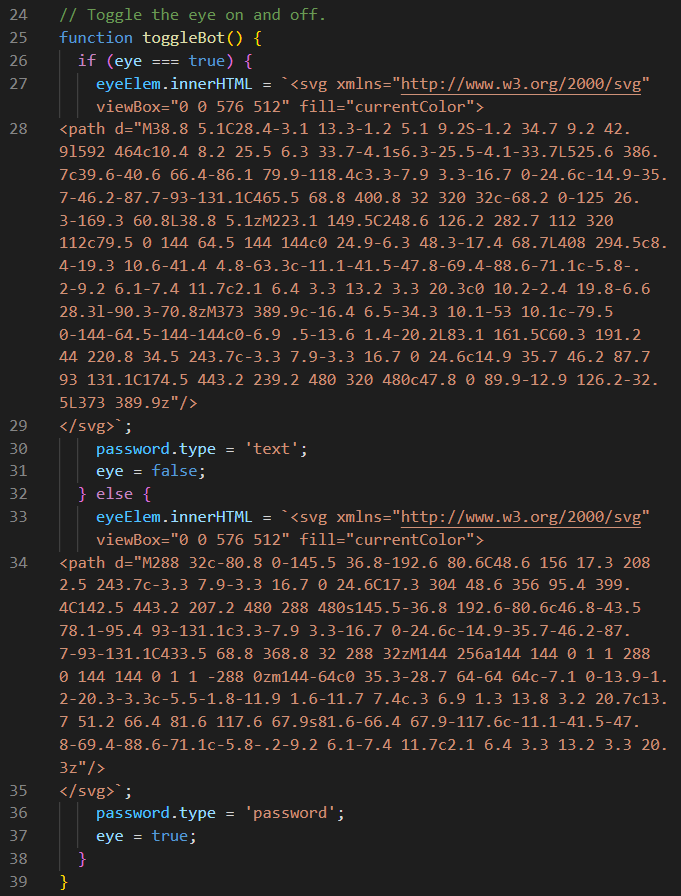
However, we do just the opposite of that on lines 33 through 37 above if the value of the eye variable is false. We simply insert the SVG image of the eye without a slash through it, and change the type of the input to password so that we can hide the text that was typed. And lastly, we assign true to the eye variable. That looks like a lot of code, but it is actually quite simple if you analyze it line-by-line.
Now let's jump to the bottom of this script file to see what happens then the HTML page first loads. On line 99, we see that it immediately calls the init function that exists on line 91. The first task this initialization function performs on line 93 is to set any username data that was previously stored in sessionStorage to an empty string. Then on lines 95 and 96, it places a blinking cursor inside the username data field in anticipation of the user's need to type in their username. That is what the .focus() method does. A form that was built by professionals will always include a feature like this. And if you've ever found yourself entering your name on a form, and then you looked up to see that your keystrokes were going into the dreaded bit bucket rather than into the name data field of the form, then you know how annoying it can be when a form loses its focus.
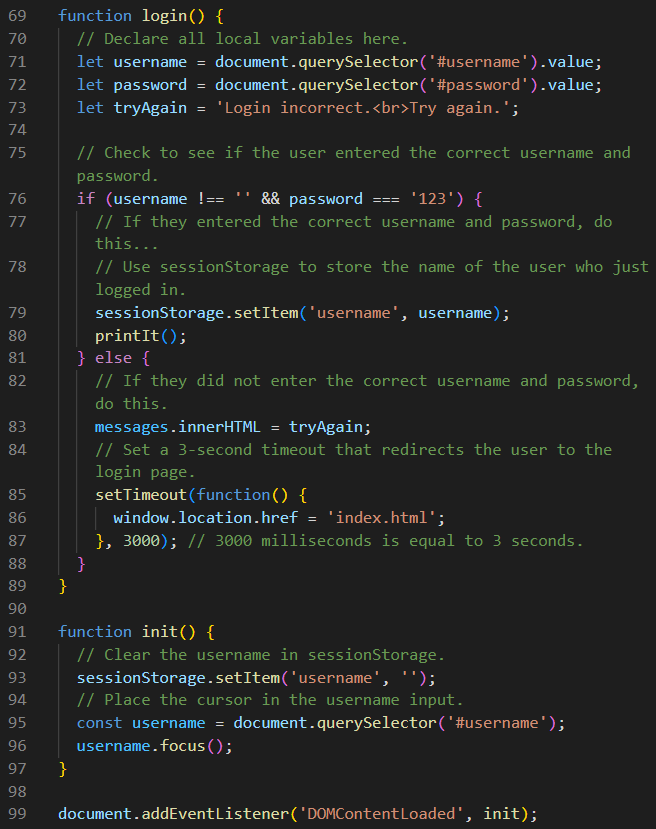
Let's look at the login function below on lines 69 through 89, while remembering that we've already added a click event listener to the Login button on line 14 after we declared all of our global variables. So that button is ready and waiting to be clicked. And when it is clicked, code execution begins on line 71, where the value of the username is stored in memory, and on line 72, where the value of the password is stored in memory, and on line 73, where the tryAgain error message is stored in memory, just in case something goes wrong with line 71 and/or line 72.
And then on line 76, we use an if-statement to make sure that the username is not an empty string, and that the password is indeed 123. And if both of these statements are true, then on line 79, we store the username string by that variable name in sessionStorage to be retrieved later, after we are redirected to the home page. And on line 80, we call the printIt function, which we will look at in a moment.
But what happens if one or both of those username and password statements are false? Well, on line 83, we display our tryAgain message on the #messages h1 element at the top of the web page. And then on lines 85 through 87, we set a three-second timeout that simply reloads the index.html web page after those three seconds expire.
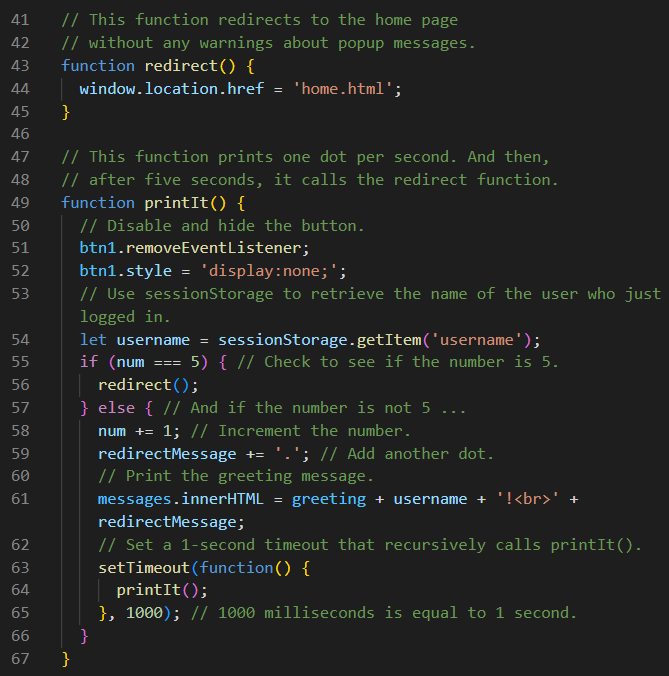
Now we can make better sense out of this printIt function that we mentioned earlier. You can find it below on lines 49 through 67. Remember that the printIt function happens after it is determined that a successful login has occurred. So on lines 51 and 52, we remove the click event listener from the Login button, and we hide that button as well. Then on line 54, we grab the username that is stored in sessionStorage. On line 55, we check to see if that global variable we called num is equal to 5. Since it is not, code resumes on line 58 where we increment num by 1, and then on line 59, we add a dot to our redirectMessage. Line 61 prints both a greeting message for the user, and the redirectMessage. Lines 63 through 65 set a one-second timeout that recalls the printIt function, where it checks the value of num all over again. The fifth time that printIt runs, the value of num will be 5, so it will call the redirect function from line 56. The redirect function simply redirects the browser to load the home page, and that happens on line 44.
This might sound like a jumble of convoluted code, but the printIt function basically just prints that "Redirecting"> string with one dot after the word for each of the five one-second timeouts, before it redirects you to the home page. Read the comments in the code. They are quite helpful.
The Home Page
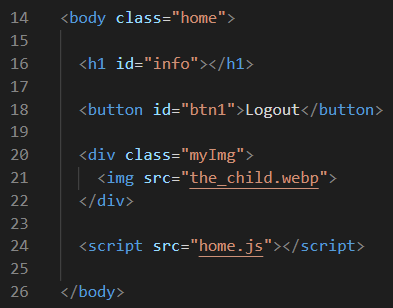
The home page is pretty simple. Take a look at the HTML code below. This is the document body of the home.html page. We gave the opening <body> tag a classname of home so that it could be styled differently than the way we styled the index.html page. And since we are using two different HTML pages in this project that share the same CSS stylesheet, we can use duplicate ids like #info and #btn1 because these ids are unique to each HTML document. The only thing that changes with #btn1 is the legend on the button. On this web page, it says Logout instead of Login. But the JavaScript code we use for this web page must be unique, so we have linked this page to the script called home.js.
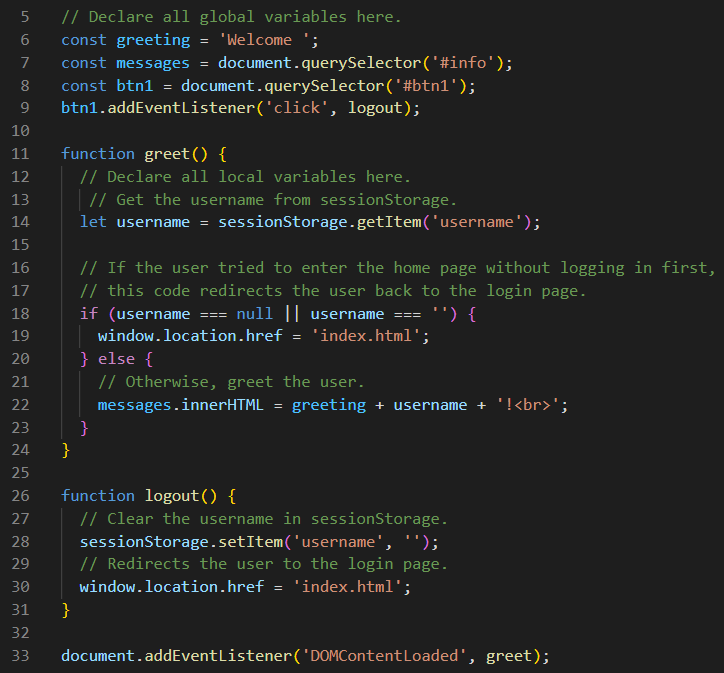
So what happens as soon as the DOM content loads for home.html? From line 33 below, see that it immediately calls the greet function, and that function happens on lines 11 though 24. On line 14, we retrieve the username string stored in sessionStorage. And then on line 22, we concatenate the global variable named greeting with the username and we display it in the #info h1 element. But there is a catch! If the user tries to display the home.html page without getting input from the index.html page first, then this page will redirect to the index.html anyway. And that is the security check that is happening on lines 18 and 19. The last thing you need to know here is that clicking on the Logout button redirects the user back to the index.html page, after it clears the username string variable from sessionStorage, as per the logout function on line 26 through 31.
Our Form
Did you enjoy these other JavaScript projects? Let's hope so. All learning exercises don't have to be boring. But sometimes, the most important learning exercises can be. And hopefully that will not be the case with this next project because there is a lot we can learn from this project called Our Form. Please take your time with this project, and learn all you can with it. This form is impressive in the number of different types of inputs it uses. It also uses HTML select and option tags. And it will give you a quick introduction to regular expressions, sometimes abbreviated as RegExp or regex, as well. That's all coming up in this very next project.
Once you have the project downloaded, upzipped, opened in VS Code, and launched using Live Server, we can begin.
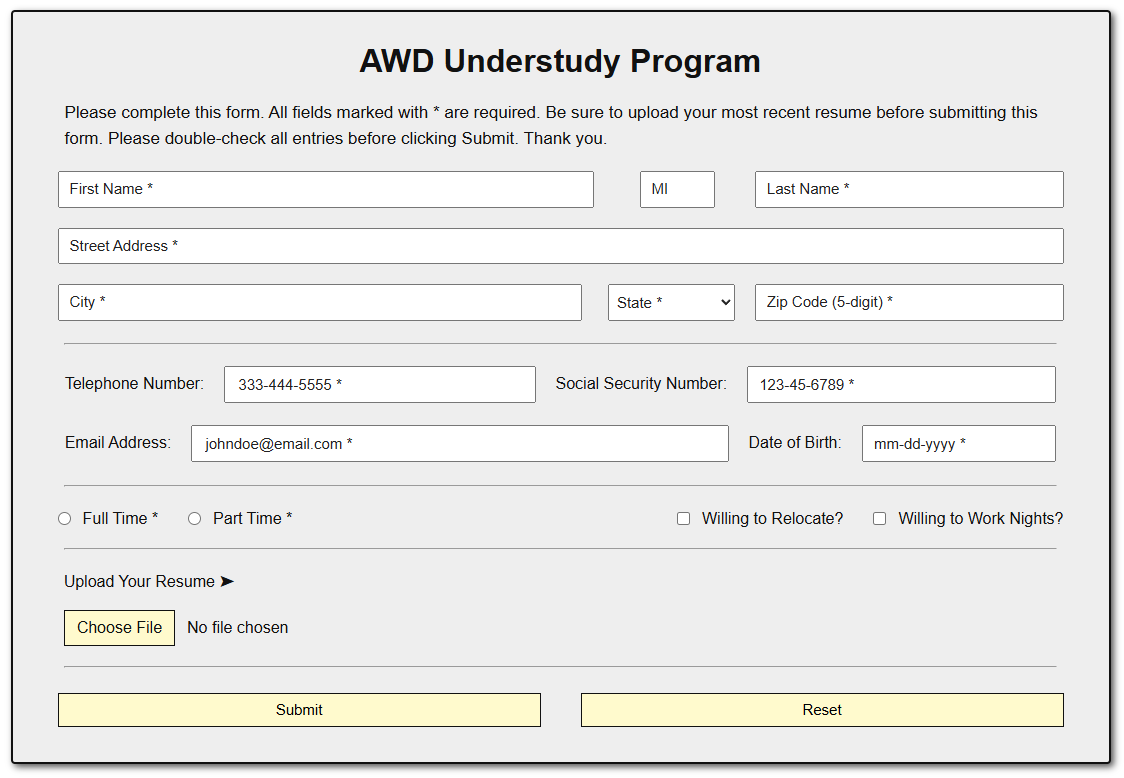
Before we dive deep into the code, let's look at this form, and each of its input elements. We have all filled out similar forms online. On the first line, we have fields where we must enter our First Name, Middle Initial (optional), and our Last Name. On the second line, we must enter our Street Address. On the third line, we must enter our City, State, and 5-digit Zip Code. In the next section, we need to enter some of our personal data: our Telephone Number, Social Security Number, Email Address, and Date of Birth. On the next line, we are asked whether we are applying for Full Time or Part Time work, and whether we are Willing to Relocate and/or whether we are Willing to Work Nights. Then, there is a linked Choose File button that allows us to upload a copy of our resume. And just like on the first form we saw, there are Submit and Reset input tags for us to use as well.
As mentioned previously, there are many different types of inputs on this form. And there are several more types of input tags here that we have not fully discussed yet. There are:
- 8 <input type="text"> tags.
- 1 <input type="tel"> tag.
- 1 <input type="email"> tag.
- 2 <input type="radio"> tags.
- 2 <input type="checkbox"> tags.
- 1 <input type="file"> tag.
- 1 <input type="submit"> tag.
- 1 <input type="reset"> tag.
- 1 <input type="hidden"> tag.
- 1 <select"> tag.
- 53 <option> tags.
If you look at the code for this project, you will find that the tags listed above are not listed in perfect order. And that is because the State field in this form is represented by a <select"> tag with 53 <option> tags, that a user can select from a pulldown menu. Although this is not technically a type of input element, you often find them used on forms. In this case, the form allows the user to select one of the 50 state abbreviations (plus DC, PR, and VI).
Other input tags we have not previously discussed include the <input type="tel"> and <input type="email"> tags. The beauty of the Email input tag is that, much like the Submit and Reset inputs, HTML checks to make sure that it is a bonafide email address whenever it finds this tag in a form. That means that it must have a @ in the middle, no spaces, and a dot-suffix (like .com) at the end of it.
Two more input tags you often see on forms are <input type="radio"> tags and <input type="checkbox"> tags. One can easily distinguish between them because radio tags (or sometimes called radio buttons) appear as little circles, while checkbox tags appear as little squares. And they differ functionally from each other in that a user can only select one of the radio buttons, regardless of how many are listed in a radio button grouping. On the other hand, a user can select as many or as few of the checkboxes in a grouping, and that included all of them, or none of them as well.
Next, we should discuss the <input type="file"> tag, which allows a user to upload a file (like their personal resume) through the form. In our case, it cannot be uploaded to a server. But as you will see later, the form can receive the file and process it using JavaScript. And we will discuss this in greater detail in the near future.
Since you've already seen us use the <input type="text"> tag, the <input type="submit"> tag, and the <input type="reset"> tag previously, we will not discuss them further here. However, many of these 8 text input elements employ regular expressions to check their validity, and we will learn the basics of regex later as well.
Lastly, you might have noticed that we employ one <input type="hidden"> tag here. And you might be wondering what possible good can come from an input tag that is hidden. Well, believe it or not, this tag serves a very useful purpose in that it records the exact date and time that the user submits this form. And we will see how that is done when we get a little deeper into the code.
Using Our Form
Now let's use this form as intended. To do that, we will enter data into this form. But before we do that, let's click the Submit button right now before we enter any data. And what is the result?
Yes, the form was designed to behave this way. In red text, it announced that errors were detected in 12 named fields. And clicking on the Reset button doesn't make that go away. Why? Because all of the data fields on the form are blank and have no erroneous data entered that needs to be erased. So the errors will remain until each of the 12 required fields (marked with a * ) contain valid data. OK, fair enough.
So now, let's begin entering data into this form, one field at a time, to see how it is processed. You can begin anywhere you like, but why not start at the top? Enter a First Name and then click the Submit button to see if that error goes away. Since the MI (middle initial) is optional, you could either enter a space there, or any letter. Next, enter a Last Name, which is the second required field. After you click the Submit button, there should only be 10 named fields that the form is complaining about.
This form only does minimal error-checking, because it assumes that anyone who is applying for a job will be on their best behavior. However in real life, all forms need to be 100% hacker-proofed. Anyway, feel free to enter a Street Address and the City. Then, use the pulldown to select a State. And lastly, enter a 5-digit Zip Code. Or feel free to enter something other than a 5-digit Zip Code. As we will see later, a regular expression is checking to make sure that only a 5-digit Zip Code is entered. Once again, click the Submit button, and then there should only be 6 named fields that need to be validated.
Once you have entered valid data for the top section, the next 4 data enties should be easy. Once again, we are using regular expressions to make sure that each of these four fields has the correct number of digits, with the required dashes properly placed in each of them as well. So go ahead and enter valid data for the Telephone Number, the Social Security Number, the Email Address, and the Date of Birth, and then click the Submit button. If you did everything right, there should only be 2 error messages left.
As explained earlier, this form requires that you check one of the two radio buttons, so either click on Full Time or Part Time. The two checkboxes are completely optional. And now, when you click the Submit, one last error message remains.
Please feel free to download this phony resume, and then you can use it for the purposes of uploaded a resume file to this form. After you upload the resume file, and then click the Submit button, there should be no more errors. And your form should look something like this:
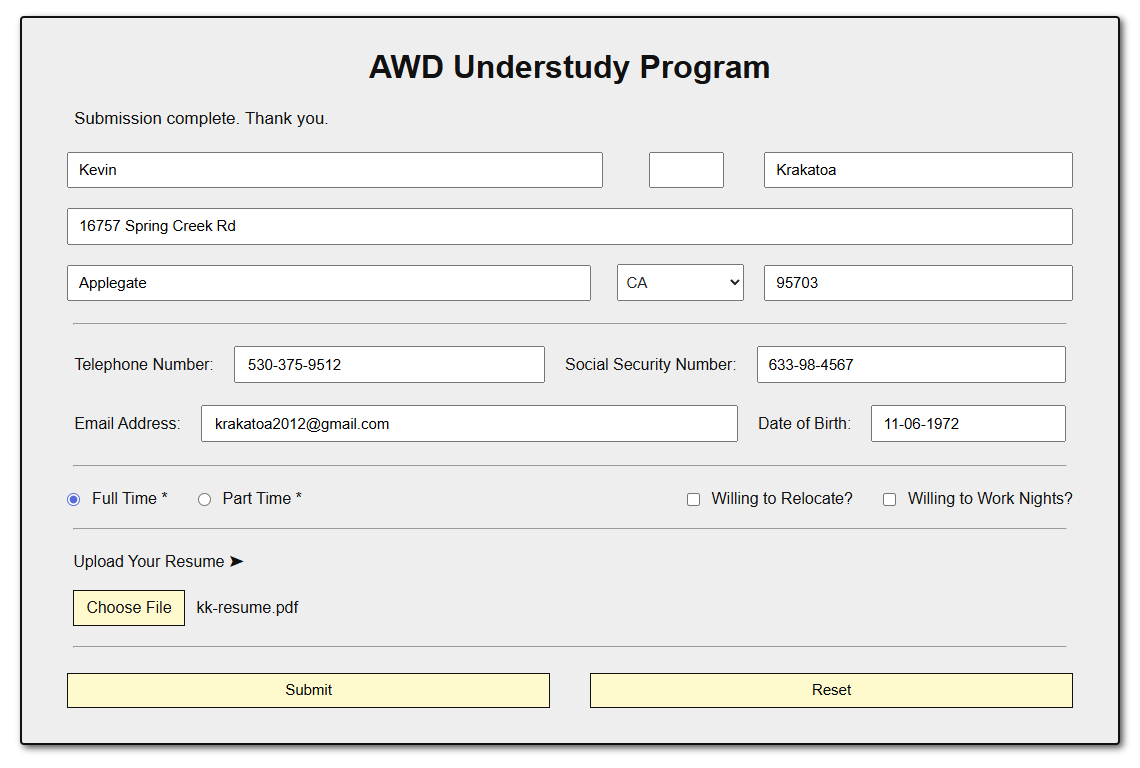
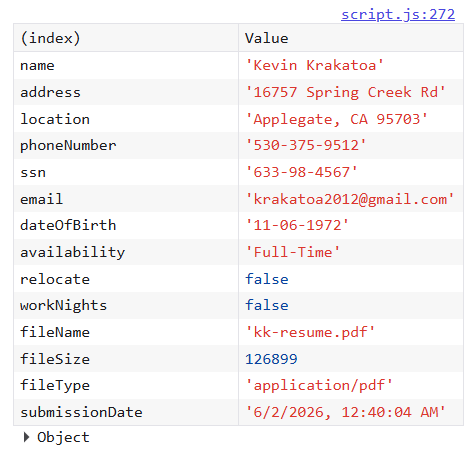
Oh but wait! There's more! If you right-click somewhere next to the form, and then select Inspect, then the Dev Tools console will open. And when it does, click on the Console tab at the top, and you will be able to see all of the data that the form collected. It should closely resemble the data that was entered in the form.
This is not your normal console.log message that we have seen previously. This is a console.table message. Notice the word just below the table. It tells us that this data type of an Object. Ah yes! Object data types were briefly mentioned back when we discussed Primitive data types. And what makes this data an object? It is the complexity of the data as it is presented here. Notice that the column on the left is labeled as (index) and the column on the right is labeled as Value. This type of object is often referred to as a key-value pair in that, a list of variable names are the keys indexed on the left, while the values for each of those key variable names are listed on the right.
And notice that the values listed on the right are all made up of only three different primitive data types: strings, numbers, and booleans.
The HTML Code
It probably goes without saying that this is a very complicated project. Trying to understand the HTML, CSS, and JavaScript code here could be long separate lessons. And we want to encourage you to look into this code as deeply as you like. While every aspect of each line of code may not be easy to understand, remember that we have online references on W3Schools and MDN that we can use to help us understand anything that is not perfectly understandable to us. That said, let's look at some HTML code here.
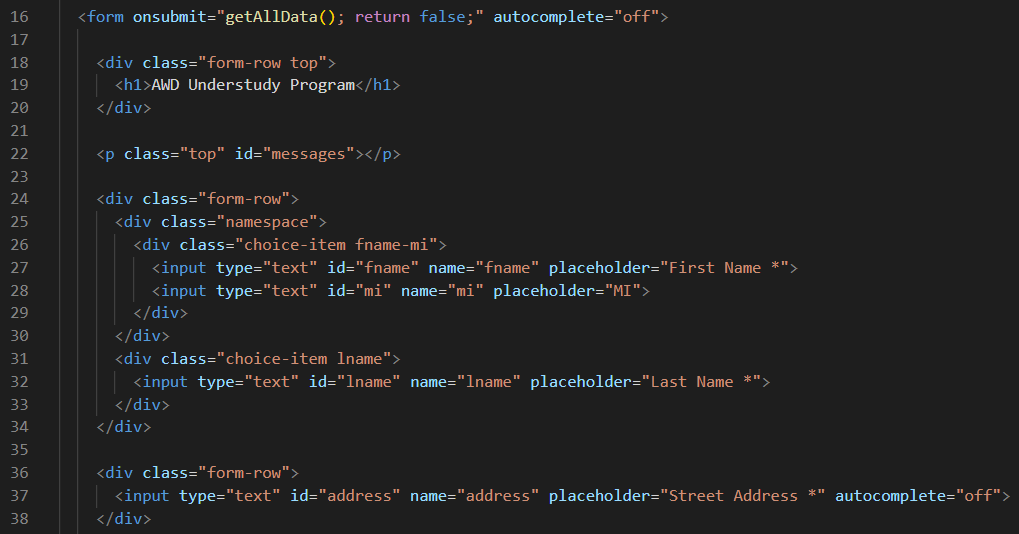
Notice that our opening form tag begins on line 16. But this opening form tag is different than the one we saw on the My Form project. Here we are not using the standard action and method attributes because he have no intention of sending this form data to a server at this point. Instead, we are going to analyze it locally using a JavaScript function called getAllData() that is triggered by an onsubmit event that happens when we click on the Submit button. The rest of that line of code is telling JavaScript not to return anything back to the form, and to turn autocomplete off. The autocomplete attribute is an interesting animal. When autocomplete is turned on, HTML looks for data that was previously entered and tries to insert it into the same fields on the form where it was entered originally. For our testing purposes, that attribute should be turned off.
Now, as you look down the page of code, you will find many divs with a class of form-row. When we look at the CSS, we will see how that div helps us to format each row of data on our form, hence its name. One other lesson we could teach here is on mobile-responsiveness. This form is very mobile-friendly and it should look good on any device from a huge 4K monitor to a tiny 320px wide mobile phone. You can try to resize the width of your browser window while looking at this form to see how well it responds to smaller and larger screens. The nested divs inside of each form-row help make that possible when we have more than one data field in one form-row. For instance, the first form-row has three data field in it for the fname, mi, and lname. And it is the namespace and choice-item divs that help us break these field off into separate column rows for smaller screen sizes. One last thing to mention here is that we do not see any label elements here. In the My Form project, we had a label for the username, and a label for the password. Instead of using labels here that take up a lot of space, we are using placeholder text. Notice that placeholder text shows us inside of each data field what it expects us to type there. And at the very first keystroke we type in each data field, the placeholder text disappears. At other places in this form, we use both labels and placeholder text.
We are not going to show you lines 44 through 99 because it would take up too much space on this web page. However, you should look at those lines of code yourself because this is the code required for the State <select> tag and the 53 state abbreviation <option> tags. The way these elements and tags work together is actually quite intuitive. And using these tags eliminates the need for a lot of error checking later.
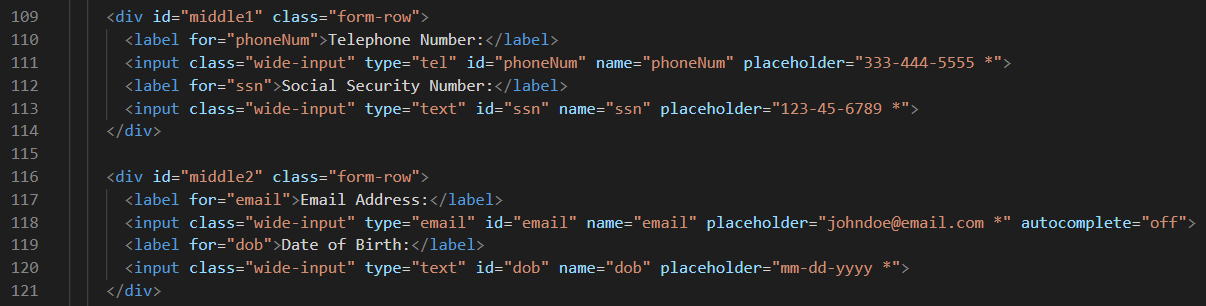
To improve your view of the HTML code in the illustration below, you can of course click on the image to zoom in. This middle section basically contains two form-rows that we identified with an id="middle1" and an id="middle2". Notice how we placed the Telephone Number and the Social Security Number inside of id="middle1" and the Email Address and the Date of Birth inside of id="middle2". Another point of interest for all four of these inputs is that each one has both a label and a placeholder. The label is there to basically identify each specific data field, and the placeholder helps define the proper format that the form is expecting for each field. For instance, the form is expecting the Date of Birth field to be entered as mm-dd-yyyy. Of course that means that entering 5-10-2000 will produce an error, while 05-10-2000 will not. And also, please notice that we are introducing you to two new input types here as well: <input type="tel"> and <input type="email">. Later on, we will explain how regex is used to validate all four of these data fields.
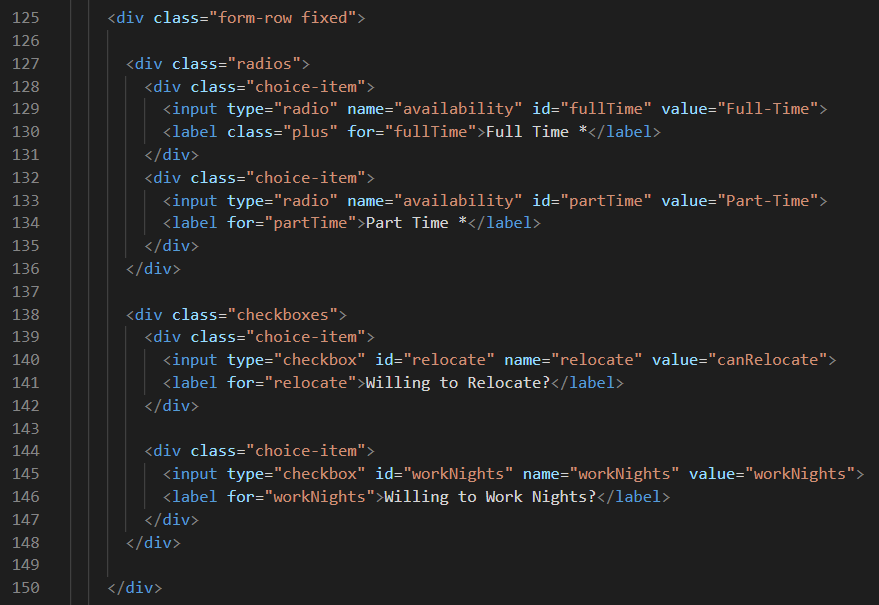
The section of HTML code below contains two elements of <input type="radio"> and two elements of <input type="checkbox">. We explained earlier the basic difference between these two types. The biggest functional difference is that radio tags allow only one element to be selected in each group. In our example, selecting one of them is required. However, other forms may not require radio tagselection. The checkbox tag differs in that users can select as many of them as they like, including all of them, or none of them. Requiring user selection for checkboxes is rare, simply because of their nature. Checkboxes by design are meant to be optional choices.
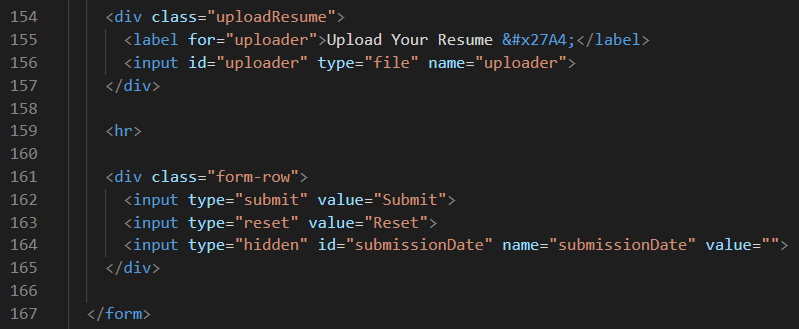
The last section of HTML code that we will look at is shown below. Here we are introducing two more new input types: the <input type="file"> and the <input type="hidden">. And in-between these two new input types are our old friends: the submit and reset input types. Since we already know how they work, we will talk about the two new types. Just like the submit and reset types, the file type resembles a button. And for that reason alone, we added some color to all three of these input types to make them stand out as clickable elements. Of course when you click on the Choose File input, a dialog box opens to help you locate the file you want to upload. And much like the submit and reset inputs, HTML is doing all the work here. No JavaScript code is required to make this work.
The last input we will discuss here is the <input type="hidden"> tag. And there is no real mystery involved in why this element is hidden. The reason is because it does not require any explicit input from the user to make it work, so there is nothing to see here. As you will see when we begin talking about the JavaScript code behind this form, there is code that records the exact date and time when the user submits this form, but only if no errors are found.
The CSS Code

There are almost 400 lines of CSS code in the style.css file for this project. And there is a lot you can learn from studing that code. However, this project is all about the form and its inputs, so we are not going to spend a lot of time on the CSS code. However, this project is very mobile-friendly, and that was only accomplished as a afterthought when we realized that many of the form-rows had more than one data field in them. And it was determined that the only way to make those elements work on smaller screens was to convert some of the rows into columns. This is one of those cases where flexbox can save the day.
About 150 lines of the CSS code for this project is dedicated to the media queries that make it mobile-responsive. Between flex-direction: column; and the flex value you assign to each element to change its overall width, you can make each input type on the form both readable and functional, regardless of the width of the screen size of the device that is used to display the form. The subject of media queries is covered in depth in our CSS Coding Course, so please find those lessons if you desire to learn more about mobile-responsiveness and media queries. In fact, this project is covered there as a prime example of what well-designed media queries can do for you.
The JavaScript Code
Finally we get to look at the JavaScript code for this project. So much of the subject of forms and their associated input types is tied to HTML code that we might forget how much of Our Form relies on JavaScript. But there are almost 300 lines of JavaScript code in this project, so let's stop wasting time, and dive right in. After all, isn't this course supposed to be all about JavaScript? Don't answer that question. You already know the answer.
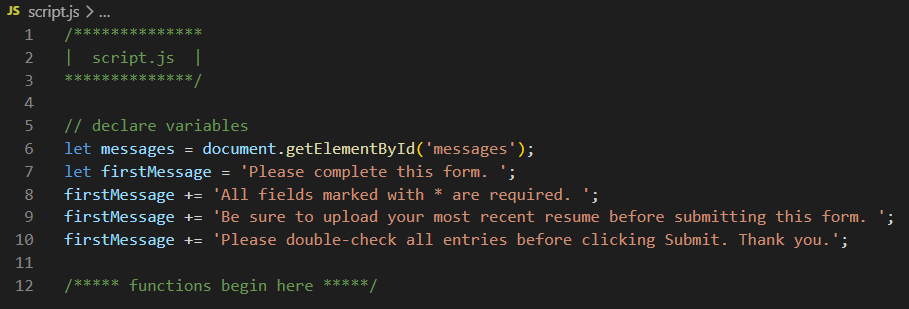
Let's start at the top of the script file. Most of the variables in this project will be scoped differently than globally. That's why there are only two variables defined at the top of this script file. And to be brutally honest, the let on line 6 should probably be a const because the physical location of #messages on this form never changes. But since let works here, we will ignore that and move on. The first message that will be displayed at the top of this form is aptly called firstMessage, so that is the string concatenation that happens on line 7 through 10. Since it is a long string, we chose to build it this way, rather than to have an incredibly long string of text on line 7. Beginning right after these two global variable declarations is a long section of 18 JavaScript functions. But for now, let's ignore these 18 functions, and jump to the very end of this script file.
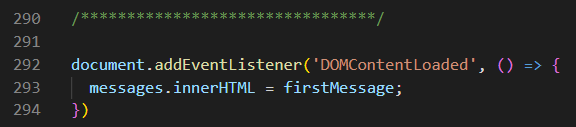
The type of event listener shown above should always be placed at the bottom of any long JavaScript file. Why? Because it waits until all of the content in the DOM is loaded into the web browser before it displays this first message. And to be perfectly honest, this is technically a nameless arrow function. That's what the () => is doing for us. It is starting a function and it is triggered by this event. Some authorities will try to tell you that you must include the word (event) => inside the parentheses. But our nameless arrow function isn't doing anything with that event once it happens, so we don't have to include it here. And if you want to get extremely technical, a semicolon should probably appear at the very end of of this nameless arrow function on line 294, as in }); However, some would argue that semicolons at the end of each line of JavaScript are completely optional, but we disagree. Nevertheless, that does seem to work here in this instance.
The getAllData() Function
Before we talk about the 17 short named functions, let's look at the 18th long named function that is named getAllData(). Once the DOM is loaded, and the first message appears at the top of the form, JavaScript is simply waiting for another event to occur before it does anything else.
"But wait!" you say. "There are no other event listeners in the JavaScript code here!" Yes, that much is true. But let's not forget that events can be triggered and functions can be called from HTML. After all, this is an HTML form, and it is waiting for somebody to click the Submit input. And the microsecond that this click event occurs, our form will call the getAllData() function. Remember that line 16 of our index.html file is
<form onsubmit="getAllData(); return false;" autocomplete="off">
That means that onsubmit is the triggering event that calls the getAllData() function. And I suppose we should also explain the rest of the code on this line. The return false; simply prevents the browser's default form submission behavior. And the autocomplete="off" tells the form to stop suggesting previously-entered data. For instance, suppose that you you misspelled your first name on your first try. Would you prefer that the form continually suggested that misspelling and tried to autofill it for you each time? You know the answer.
So now, let's take a closer look at this important function. It starts on line 161. And the first thing it does on lines 163 through 173 is to declare and assign eleven const variables that correspond to eleven named and identified elements on our HTML form. Of course we tried to pick names and ids that easily help to identify the purpose of each of these data fields.
Now that JavaScript knows where all of the form data can be found, it starts its validation phase. The fifteen let statements on lines 175 through 189 can send form data to 15 of our other 17 named functions, and each of those function calls is designed to return a value back to the let variable name that called the function. In most cases, the function will return a boolean value of true or false, but not always. We will see what data is returned from each one of these functions later. Then, on line 191, we create an empty array called errorLog, and that will lead us into the next block of code.
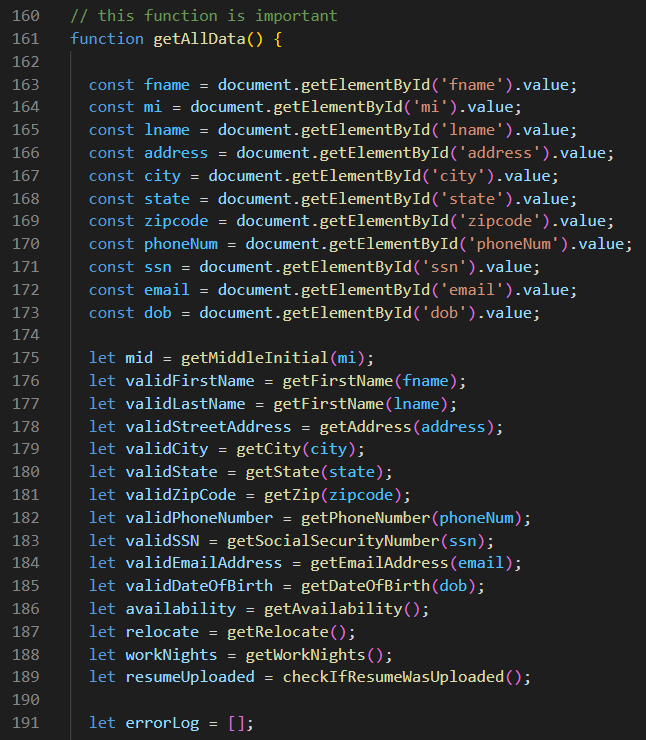
Now that we have collected validation data from 15 of our other 17 functions, we can begin processing the data that we received. Let's look at lines 193 through 207 below. On line 193, we declare and assign an empty string called name. Then, on line 194, we check to make sure that we have a valid first name and a valid last name. The data we get back from the two functions that check for that are basically ensuring that we do not have two empty strings on our form. So we check to see if validFirstName and validLastName are both true. And if so, we execute the code on lines 195 through 199, which uses a template literal to construct the name variable, to include the middle initial, if one exists. However, if either one or both of the variables named validFirstName and validLastName are false, then we execute the code on lines 201 to 206. These two if-statements will push either the string of First Name or the string of Last Name or both into the array called errorLog, which will later be displayed in the messages at the top of the form.
Lines 209 through 211 are much easier to explain. Basically if there is no street address entered on the form, then we push the string Street Address into the errorLog.
Much like the name variable that we dealt with above on lines 193 to 207, the loc variable defined on line 213 follows a similar process. If we have three valid data fields for City, State, and Zip Code, then we combine those three values using a template literal. Otherwise, if any or all three of these data fields are not valid, then we push each of the invalid ones into our errorLog. And we have just completed the validation of all the data in the first part of Our Form.
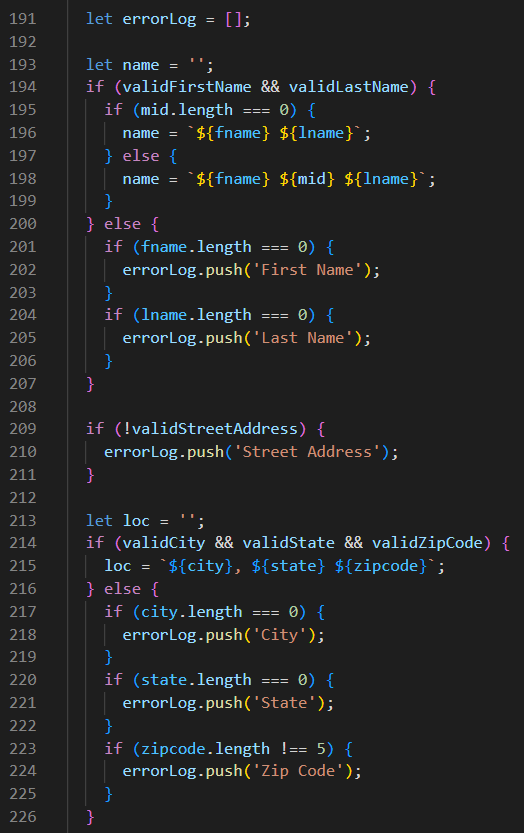
Pehaps you noticed on line 223 above that we are checking to see whether or not the length of zipcode is 5 characters in length. For the others, we only care whether they had any data at all. This is because we are now beginning to use regular expressions to validate our personal data. We will get deeper into that a little later.
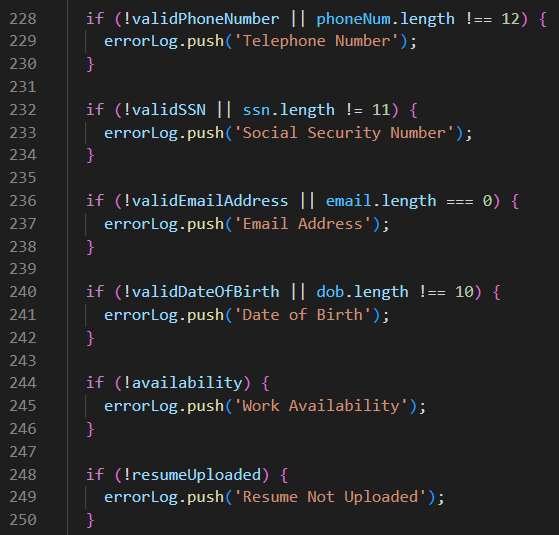
Notice that for the code on lines 228 through 242 below, we are checking for two values. We are checking to see if the value is false (meaning that it is an empty string) or if the length of the string is not of the specified length. And if that is the case, then we push it into the errorLog. And that in essence is now we deal with the Telephone Number, Social Security Number, Email Address, and Date of Birth.
That only leaves us two more pieces of data to validate. On lines 244 to 246, we are expecting the availability variable to return either a value of true or a value of false, depending on whether either of the two radio inputs were checked or not. If neither of them were checked, then we push Work Availability into the errorLog.
Similarly on lines 248 to 250, if a resume file was not uploaded, then we push Resume Not Uploaded into the errorLog.
Now that we have checked the validity of all required data fields in Our Form, we need to look at our errorLog. If it is empty, then it means that all of the data we collected from the form is valid, and we can execute the code on lines 253 through 274. On line 253, we collect three pieces of data about the resume file that was uploaded by calling the getResume() function. That function returns these three pieces of data: fileName, the fileSize, and the fileType. Then, on line 254, we call the getSubmissionDate() function which returns the exact date and time that the form was submitted. On lines 255 through 270, we create an array object that includes all of the relevant data that we've collected. And then on line 272, we console.table the dataLog for viewing. Of course if we were sending this data to a server, we would be doing something completely different. The last thing we do on line 274. is to print a nice thank you message at the top of the form to tell the user that this form was submitted successfully.
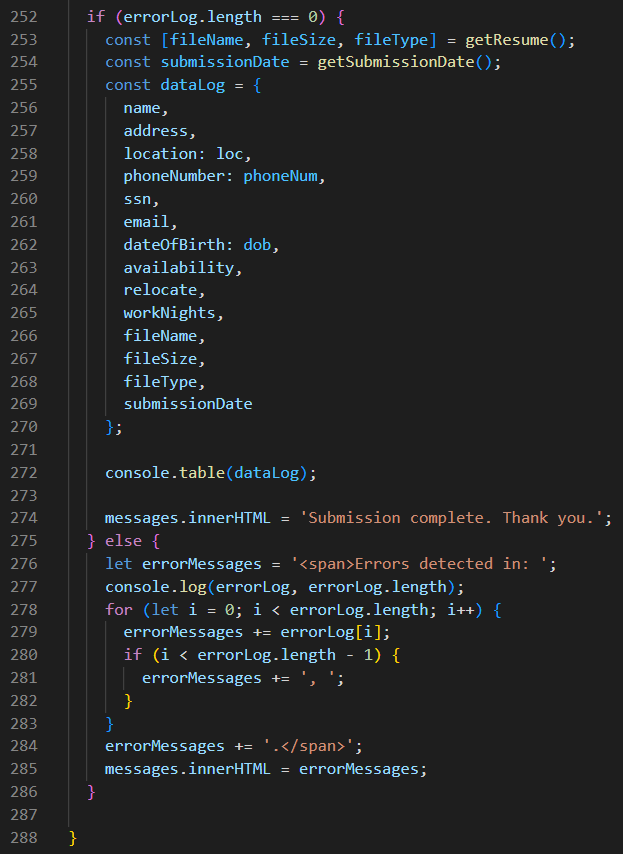
But what happens in the event that the errorLog is not empty? Then, we need to execute the code on lines 276 through 286. On line 275, we create a variable named errorMessages and we begin with an opening <span> tag. In our stylesheet for this project, we have define all span elements with the color: red; and since these are error messages to show the user where they went wrong, red seems like an appropriate color. The beginning of the red error message will then be Errors detected in: and then the error will be listed one-by-one in red text in the #messages paragraph as the top of the form. Notice that the programmer is placing a comma and a space after each item in the error message, until the last item is reached. Then a period and a closing </span> tag completes the errorMessages string variable.
Line 277 is a programmer's oops. The programmer must've been trying to figure out where to place the commas, the spaces, and the final period and closing span tag. But that's OK. The user who is filling out this form will never see it. 😀
The for-loop on line 278 iterates through the errorLog array object. The if-statement on line 280 decides when the comma and the space should be added between each item in the array. Line 284 completes the errorMessages string variable. And then on line 285, that string is displayed in the #messages paragraph at the top of Our Form.
The yellow curly-bracket on line 288 marks the end of the getAllData() function.
The Other 17 Functions
Now that we know the processes that are performed by the getAllData() function, we can look at the 17 smaller named functions to see what values these functions return. The very first of these is the getMiddleInitial() function. And we send the value from the mi input as a parameter to that function for processing. As we can see on line 15, the first thing that happens to that value is that we send it to the JavaScript built-in function called trim(), which is a handy little function that simply trims off the leading and trailing spaces from that string value, if they exist. On line 16, we check to see if it is an empty string. If it is, we do nothing, simply because specifying a middle initial is optional and not required. So on line 18, we return the empty string.
But if the value of mi was not an empty string, on line 20, we use only the first character of that string, just in case the user entered more than one character. And then on line 21, we convert that one character to uppercase, just in case it wasn't an uppercase letter already. And then we return that value on line 22 to the function that called it. It's actually quite convenient that JavaScript has these three built-in functions for us to use: trim(), charAt(), and toUpperCase().
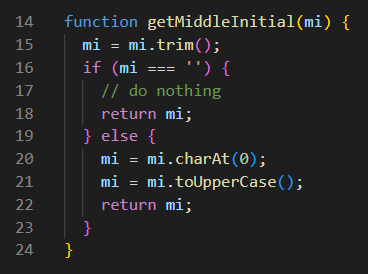
The next five functions are all basically the same, in that, we basically check to see if the value we sent to that function is an empty string or not. If it is an empty string, we return false, but if it is not an empty string we return true. For the fname and lname strings, we trim them first. But for address, city, and state, we don't trim them before checking to see if they are indeed empty strings.
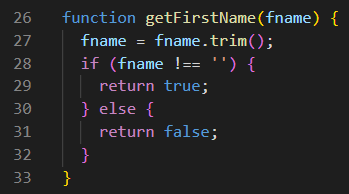
But our whole world changes when we start working with the 5-digit Zip Code and the Telephone Number.
Regular Expressions
There is a whole lot we could talk about when we breach the subject of Regular Expressions. An entire chapter could easily be devoted to regular expressions alone (which are often shortened to RegExp or regex). A regular expression is basically a sequence of characters used to identify matching patterns in a string of text. That definition doesn't sound very scary. But in actual practice, regular expressions can often contain some of the most cryptic and undecipherable code you've ever seen in your life. But they can also be extremely useful if you know how to write them and how to use them. And to fully illustrate this point, please take a quick look at this regex used to validate credit cards. Yes, this is obviously a cryptographer's worst nightmare! But it can not only detect whether a credit card number is valid or not, but it can also identify it as Visa, Master Card, American Express, Diners Club, or Discover.
We will not be deep diving in our own discussion of regular expressions. Our examples will introduce you to what they are, and how to use them, without the need for large doses of ibuprofen. So let's begin.
Let's take a look at the getZip() function on line 68 through 75 below. On line 68, we are sending the value of zip as a parameter to the getZip() function. And on line 69, we are declaring a const variable called regex and assigning it a value of /^\d{5}$/
Now, let's decode this regex one character at a time. The first character is a forward-slash, and the last character is also a forward-slash. Try to think of the forward-slash as you would a single-quote or double-quote enclosing a string variable. Essentially, these tell you where the regex begins and ends. The next character is a caret, and that tells us to begin our comparisons with the very first character we encounter. Think of the caret as a green light. The next-to-the-last character is a dollar-sign, and that tells us where to end our comparisons. Think of it as a red light. The third and fourth charcters combined are a back-slash followed by a lowercase d. Believe it or not, those two characters together mean match any digit in the range of 0 to 9. It might interest you to know that [0-9] would serve the same purpose as \d but that would require 5 characters instead of only 2. Following the \d, we have a number enclosed in curly brackets. Amazingly enough, {5} means for 5 characters only. So put it all together, and it says in its own cryptic way, accept any 5 digits here as a match.
Another important thing to know is that all regular expressions have a method called test(). So what do we know about methods? We know that a method is a function that is owned by an object. In our case, that object is a regular expression. Now let's look at line 70. Line 70 says that if zip is not an empty string and if zip passes the regex.test(), then return true on line 71. Otherwise, return false on line 73.
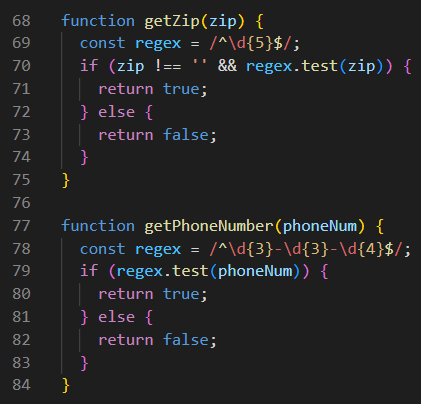
The Zip Code regex above is probably the easiest possible regular expression to understand. Now let's take a look at the Telephone Number regex on lines 77 though 84. This regex is similar. The only real differences is that it is looking for three digits, followed by a dash, followed by three more digits, followed by a dash, and then ending with four more digits. So 202-456-1414 would be considered a valid number when tested by this regex. However, (202) 456-1414 would not be. The placeholder text on the form displays the acceptable format for the Telephone Number. And it is the job of the user to know how to follow directions, and type in a valid Telephone Number.
Since the getSocialSecurityNumber() function and the getDateOfBirth() function are so similar to the other two regex examples above, we will not show them here. And since the input type="email" does its own error checking on a form through HTML, we won't be spending your time looking at the getEmailAddress() function either. That only leaves us six more functions to view and understand.
The Last 6 Functions
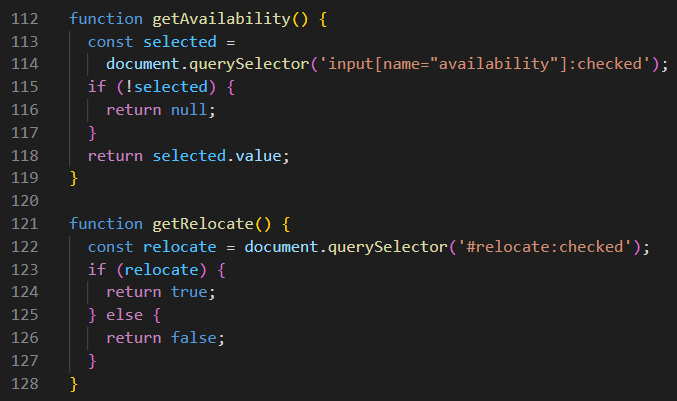
The getAvailability function is actually very simple to understand. This is a required field with only two radio buttons, and only one of these buttons is allowed to be checked. If neither of the two buttons are checked, then the function returns a value of null. Otherwise, it returns either Full-Time or Part-Time, depending on which one is checked.
The getRelocate function is even more simple to understand. This checkbox is not a required field. So if it is checked, it returns true. Otherwise, it returns false.
Although it is not shown here, the getWorkNights function is just as simple to understand. This checkbox is not a required field. So if it is checked, it returns true. Otherwise, it returns false. In other words, it works the same way as the getRelocate function.
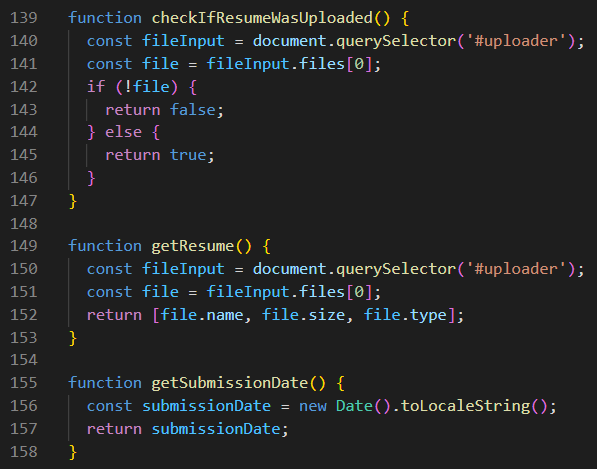
Now there were only 3 more functions to understand. If you recall, the checkIfResumeWasUploaded is the last function we run before we check to see if errorLog.length === 0. So if a file was uploaded, it returns true. Otherwise, it returns false.
The next thing that happens is that we check to make sure that errorLog.length === 0. It is not, then we need to display the remaining errors at the top of the form so that the user can correct them. However, when there are no more errors, we run the getResume function, and that returns the file.name, the file.size, and the file.type. Of course if this was a real online form, we would also be returning the actual file as well. And we will see how that works in a moment.
Now there is one last function to run: the getSubmissionDate function. And this function creates a new Date() object, and it also runs the toLocaleString() method to get the exact date and time in your time zone. Then, that value is returned as submissionDate.
Now the process is complete. We have collected all of the data from this user who just filled out Our Form. In our client-side, front-end JavaScript example, we simply print out all of this user's data using console.table(dataLog);.
But what would we do if this was a server-side, back-end example? For that, we would have to look at a different JavaScript file. And we just happen to have one ready. In this same Our Form project folder you will find a file called script1.js. But don't attempt to link it and run it unless you have a bonafide URL link to an actual online server. And even then, we don't guarantee this code to be 100% functional. However, you will at least get to see the basic code required for a fetch routine, and how a POST method would work with an online form.
This code is well-commented, and what makes script1.js different from script.js can be found inside the getResume function on line 153. As you can see, we are returning four items instead of just three to the line of code that called the function. That line of code is on line 255. You will also see a lot of new code on lines 274 through 290. On these lines, we create an object called formData, and we append not only the dataLog to it, but we also append the actual resume file that was uploaded. Then on lines 284 through 290, we have a standard fetch routine that employs the POST method. Of course you would have to replace <theLinkToYourServer> on line 274 with a real working server URL if you were actually trying to make this code work. But we wanted you to see this code so that you would have this knowledge just in case you eventually ever wanted to become a full-stack web developer. The rest of the code in this file is identical to the script.js file, including the console.table(dataLog); code.
The Textarea Element
We have already talked about lots of different types of input elements. And we have also discussed the select and option elements, which allow us to get input from the user, even though they are not technically considered to be input elements. Now we will introduce you to the textarea element which allows a user to type text as a way to input information that is not easily entered in any other way.
This project is called Submit Feedback, and it will give us an example of one way we can use the textarea element. And it will also show us other ways to get input using SVG images and JavaScript. This will be an excellent review of the material we covered earlier in A Quick SVG Crash Course. Plus, there are special CSS rules required to control the textarea element. And this project also has JavaScript code that provides good program flow controls as well. This Submit Feedback Project Code can be downloaded through the link provided, And when you have it unzipped and opened in VS Code, we will begin.
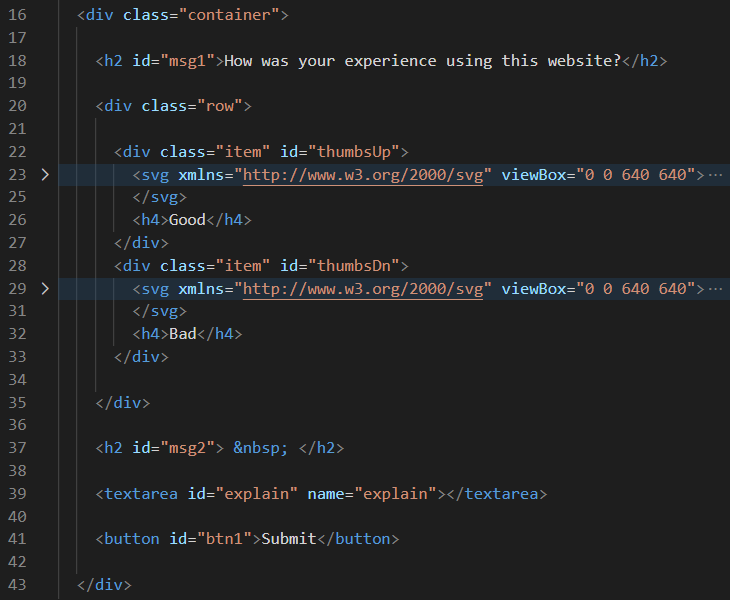
The HTML code shown below is easy to understand. There is container div, followed by an h2 with an id of msg1. Then, a row div comes next, with two item divs inside of it. We intentionally compressed the SVG code here to save space, but there is a thumbsUp image that is labeled as Good, and a thumbsDn image that is labeled as Bad inside the row. After that, we have another h2 with an id of msg2, followed by our textarea element, and a submit button before the end of the container.
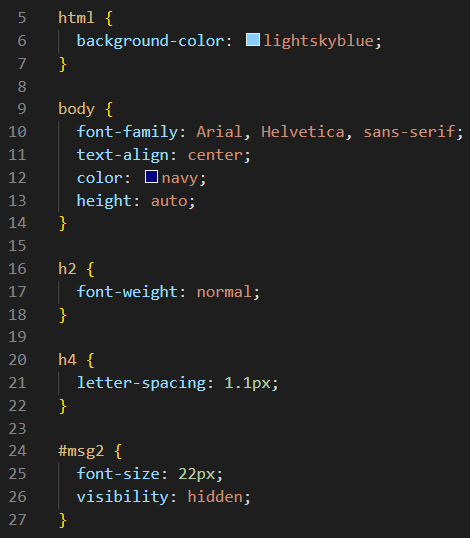
The CSS code is actually easy to understand as well. In this first block of code, the only thing that really stands out is on line 26, where we define the visibility property of the msg2 h2 as hidden. At some point, JavaScript will unveil that h2 to reveal a message there.
In the next block of code, we find CSS rules for the container div and the row div. The flexbox rules are somewhat interesting in that the container is a column, while the row is unmistakably a row by default, and by its very description.
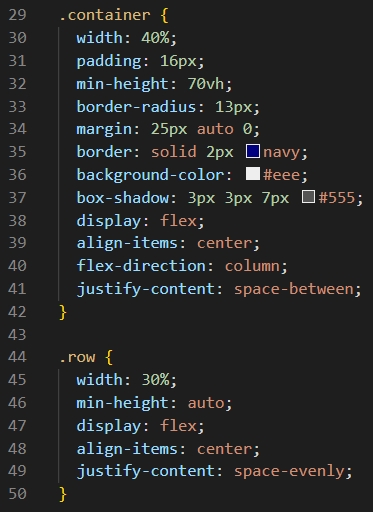
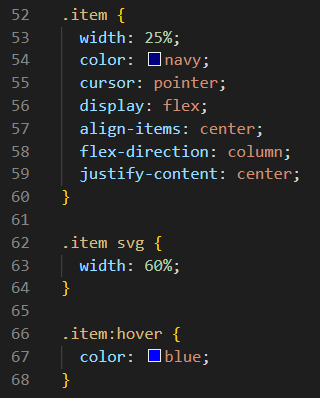
Speaking of interesting flexbox rules, notice that both item divs are also defined as columns, even through they are inside of a row. This means that the two SVG thumb images will be on top of the two h4 labels of Good and Bad.
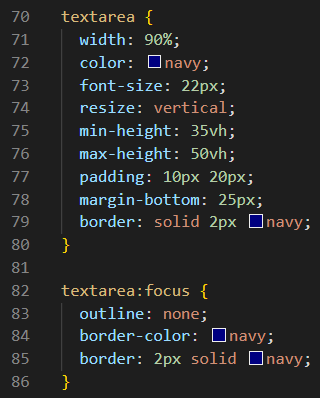
Finally we get to the star of the show: the textarea element! Three lines that should really stick out to you are lines 74, 75, and 76. Without line 74, the user would be able to resize this element both horizontally and vertically, even beyond the sides of its container. But since resize was defined as vertical, that means that it can only be resized in the vertical direction. And just FYI, resizing can be accomplished by clicking and dragging the two tiny diagonal bars in the lower-right corner of the textarea element. And since the resize property is assigned the value of vertical, this textarea element will stay confined to 90% of the width of the container. But thanks to line 75, it will start out at a min-height of 35vh. And if the user needs more space to type more text, then it can be expanded to a max-height of 50vh, thanks to the code on line 76. So before we move on, please try to resize this textarea that has the unique id of explain to see how this resizing feature works. You could also comment out lines 74, 75, and 76 just to see what a disaster looks like without these three lines of code.
There is a lot more to know about the textarea element. And to learn more about it, then please visit this web page. For instance, you will find that most web forms limit the amount of text that can be entered into a textarea element. And they do that by adding in the maxlength attribute to the tag in HTML, which is something that we did not do here.
The textarea:focus pseudo-class simply maintains the blue border when the textarea comes into focus. We will see how this works when we jump into the JavaScript code.
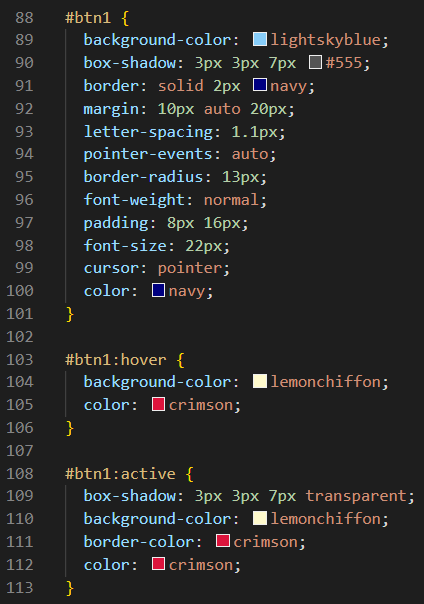
You have seen our classic button styling code many times before, so we won't bore you by explaining it to you all over again. But the code is here for you to look at anyway. Now let's dive into the JavaScript code.
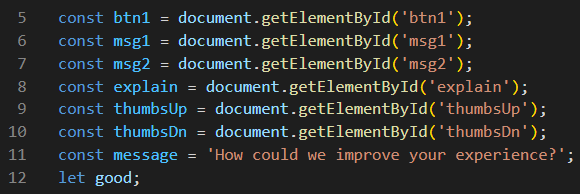
At the very top of our script.js file, we are doing what we would normally be doing by declaring a global const variable for any element with a unique id that we will be using later. However, the variable named good is a variable that might have different values assigned to it, so we chose to declare this one as a let. And since it initially has no value assigned to it, it will remain as an undefined data type until a boolean value is assigned to it later.
This arrow function needs no introduction. You've see us do something like this many times before. But just for the record, we are adding three click event listeners here. Each one will call a different function when clicked. So now, let's go ahead and look at those functions to see what they actually do.
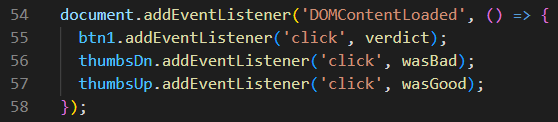
Oh yeah! The wasGood function is cool! When we click on the thumbsUp item, the first thing than happens is that we assign the boolean value of true to the variable named good. Then, we hide the thumbsDn item, and disable the ability to click on either of these items before we call the showMessage function. But the wasBad function is just as cool. When we click on the thumbsDn item, the first thing than happens is that we assign the boolean value of false to the variable named good. Then, we hide the thumbsUp item, and then we disable the ability to click on either of these items as well, before we call the showMessage function. Just as we can always do an addEventListener, we can also do a removeEventListener as well. Mom always taught us to pick up our toys when we were done playing with them, so that is essentially what we are doing here. Did you notice that clicking on ThumbsDn also paints the item crimson in color?
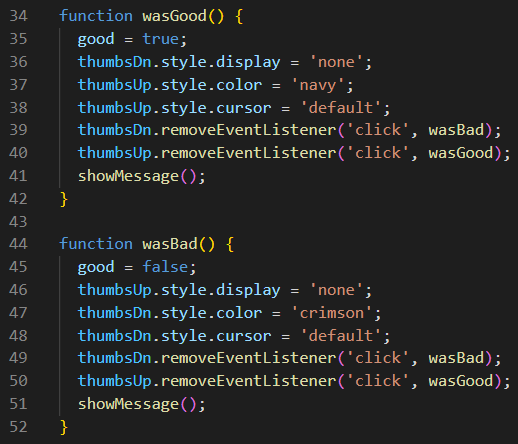
Now let's look at that showMessage function. It's pretty simple. It first assigns message to msg2, and then it changes its visibility to visible. The message asks the user, How could we improve your experience? And regardless of whether the user thought it was a Good or Bad experience, they are not required to type anything. Nevertheless, line 17 shifts the focus to the explain textarea, and the cursor blinks there allowing a user to type an answer, if they so desire.
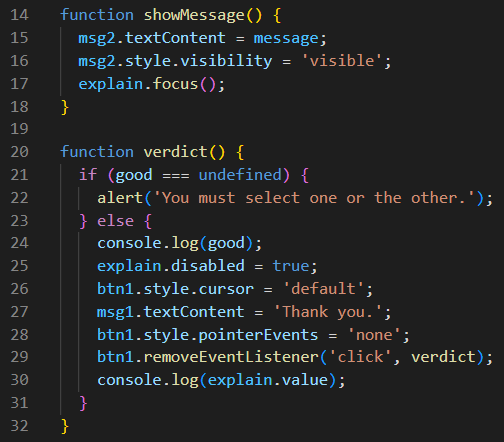
On line 20 above, we are in essence asking, Has the jury reached a verdict? Now please remember that this function is called by the click event listener we added in earlier. So on line 21, there is the beginning of an if-else statement. And the if is checking to see if the variable named good is still undefined. If it is, it means that the user did not click either of the two thumb items, and an alert pops up telling the user to pick one. After the user clicks one of the two items, the code continues to execute from the else on line 23. Now if this was a real form on a back-end server, the answers collected here would be added to a database. But we are simply going to log the answers to the console, starting with line 24. Then on line 25, we disable input to the explain textarea, print a Thank you message on msg1, disable and remove all button click and hover events, and lastly, we log the textarea text that was typed by user to the console, if there was any. And we are done.