JavaScript Coding Course
JS 101



Part 3b. Diving Down Much Deeper
Is This Your First Deep Dive?
You appear to be doing well, so perhaps you've delved into other much more murky subjects in your past. And that's a good thing! JavaScript is not a scary animal, even though some book publishers prefer to put drawings of rhinoceroses on the covers of their JavaScript books. But you look well, so let's continue to dive down even deeper.
Lots of New Terms
We have introduced you to some new concepts but with limited terminology. There are lots of new terms here to learn, but sometimes example code beats long explanations using words that mean nothing until you see them in action. Let's fix that problem right now by downloading and opening a new code project called JavaScript Information, and of course you know what to do with a zip file when you have one. This project has a barebones index.html file and a basically blank style.css file, but you must remember how we almost always had a blank script.js file when our focus was on learning HTML and CSS. But we know we are becoming jugglers when we can start juggling all three balls at once. So now, let's open up the code to this project w ith VS Code and start looking at the script.js file specifically.
Mercy! This script.js file appears to be about 50 lines of comments with less than 10 lines of actual JavaScript. And that was by design because we wanted you to read these comments as an aid to help you understand the actual code. The first of those comments mentions the JavaScript engine which is the integral part of your web browser than interprets and runs JavaScript code. Line 7 is a definition of an expression in code, even though we never really use that code in our program. Starting with line 11, we begin talking about variables because variables will be covered in depth in the next section of this lesson. The new terms you need to learn here are: keyword, identifier, assignment operator (learned previously), literal, and value. There are two variable declarations and assignments here on lines 12 and 18.
On line 20, we begin talking about functions, with actual function code on lines 21 through 23. Functions also use keywords and identifiers, but they also may or may not have parameters passed to them. And they may or may not return a value to the code that originally called the function. If fact, a function is an area of independent code that is separate from the other code in your script. And the code inside the function does not execute until a function call occurs somewhere else in your script file.
In this script, that function call happens on line 37. For some function calls, you only need the identifier followed by two empty paretheses, like myFunction();. Or, the function call may pass one or more parameters to the function, as in myFunction(dogs, cats);. And, for function calls that are expecting the called function to return a value, like this one on line 37 we need a keyword, a variable identifier, and an assignment operator followed by a function identifier that includes any parameters required by the function. Our line 37 function call looks like this: let sum = add(a, b);.
Lastly, we get output from line 48 of our script which logs our sum to the console, and we get output from line 49 of our script which writes our sum to the HTML document.
What Exactly is a Variable?
A variable is a named container or identifier that is used to store a data value. These values can consist of any primitive data type that we have previously learned about, or they can consist of any object data type as well. We have not actually learned about objects yet, but we will. Nevertheless, we use variables to reference these data values, which we can then manipulate, and sometimes change in various ways through the code in our JavaScript programs.
JavaScript Variable Naming Conventions
JavaScript variables must be named by following a few simple rules. Variable names can contain letters, digits, underscores, and dollar signs, but they must start with a letter or an underscore. Names are also case-sensitive, which means that ageGroup and agegroup are considered to be two separate and completely different variables. Also, please note that reserved words, such as JavaScript keywords like switch and case, cannot be used as variable names. We also highly recommended that you use descriptive names to improve code readability and to promote better understanding of what each variable was designed to represent. And you will find that camelCase is often a common naming convention, as was previously discussed. An example of a JavaScript variable named in camelCase is averageAge.
Variable Declaration, Initialization, and Assignment
Back when we were playing in the sandbox, we assigned values to variables, but we were never required to declare or initialize them prior to using them. That all changes when we start writing strict JavaScript code. Variable declaration, initialization, and assignment are three distinct processes that are often performed together, but each one serves a different purpose.
- Variable declaration merely establishes the existence of a variable. The term declaration means creating a named binding. In JavaScript, we declare variables using the three keywords of let, const, and var. For example, let x; declares a variable named x without actually assigning a value to it.
- Variable initialization occurs only once, when a value is assigned to an already declared variable. This code x = 10; initializes the previously declared variable called x with the value of 10. In JavaScript, variables are initialized with a default value of undefined if no value is assigned. And after a variable is initialized, it retains that value until it is reassigned.
- Variable assignment updates the value of a previously declared and initialized variable. It can also reassign a new value to an already existing variable. For example, x = 20; assigns a new value of 20 to the already existing variable named x that previously had a value of 10.
However in normal everyday practice, we sometimes accomplish all three of these processes at once. In the following example, let x = 20; we declare and initialize the variable named x while assigning a value of 20 to it at the very same time.
But we need to emphasize here that a const is a variable that cannot be changed later. That means that we cannot do the three distinct processes mentioned above separately. Anytime we are declaring a const, we must also initialize it and assign it a value at the same time. Therefore, const y2k = 2000; is a properly declared, initialized, and assigned const variable.
Three Keywords
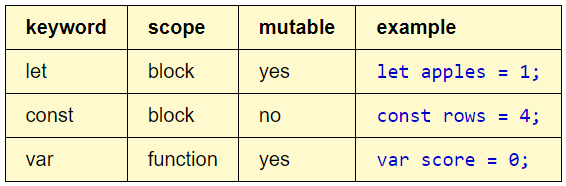
JavaScript offers us three keywords for declaring variables: let, const, and var. Before ES6, var was the only keyword you could use to declare a variable. And it still works perfectly fine in code that was written pre-ES6. And in fact, it must now coexist with the newer keywords of let and const to provide backward compatibility. Nevertheless, you may encounter heavy resistance from some programmers who claim that you should never use var under any circumstances! They mean well, so try to humor them. The reason they say that has everything to do with variable scope.
Variable Scope
In JavaScript, scope defines areas of code where a variable has visibility and accessibility. There are four types of scope: global scope, local scope, block scope, and function scope.

- Global Scope variables are declared outside of functions and blocks, and that means that they are visible and accessible by all of your code everywhere inside of your script file. Originally, global variables were only declared using the var keyword, but nowadays we declare global variables using both the let and const keywords as well.
- Function Scope (also known as Local Scope) variables are declared inside of functions, and that means that they only have visibility and accessibility inside of each specific function where they are declared. In the pre-ES5 world, there was no block scope, so the term local scope was used to describe variables that were declared inside of functions.
- Block Scope variables only have visibility and accessibility within each specific block where they were declared using the let or const keyword. Block scope is a new concept that was introduced with ES6.
Variable Mutability
Variable mutability refers to the ability to change the value of a variable after it has been assigned. By design, the let keyword and the var keyword declare variables that are mutable, but the const keyword does not. Once a variable is declared as a const, and is initialized and assigned a value. The value of that variable must remain constant and cannot be changed. And technically, const variables must be initialized and have values assigned to them when they are first declared. And we will talk more on that subject later. It's actually more complicated than that, but let's try to keep it simple for now.
Hoisting
This is a simple concept, but remember that the rules of scope and mutability always apply. And yet, you can think of hoisting like the act of clipping a flag to the rope on a flagpole, and then hoisting it up to the top. In JavaScript, the act is similar, except that the position of the hoisted code does not change locations in your code. What does change is whether or not a variable is visible and accessible to code that was placed before the variable was first declared. Hoisting can not occur on variables declared with the keywords of let and const. Attempting to do so will result in errors. Hoisting can only occur on variables declared with the keyword of var. But it is also important to recognize that hoisting can always occur with functions because they are independent blocks of code that can be accessed from anywhere in your code.
Functions & Blocks
"Well," you say, "that's all fine and good, but what is the actual difference between a function and a block?" And that's a valid point. It's hard to visualize things you've never really seen in practice, and have only heard described through a few abstract descriptions. And yet, we were briefly introduced to an example of a function in the JavaScript Information project. So next, we need to view some script files that easily illustrate these differences. We will see a function, a function call, and a block in the very next project.
The Scope Example Project
So now, let's download, unzip, and open this Scope Project, so that we can see examples of everything we just talked about above. And yes, that lovely web page won't really help us until we open up the console, and we also need to see the code in the script.js file at the same time.
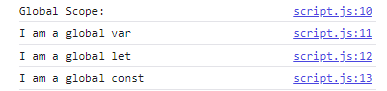
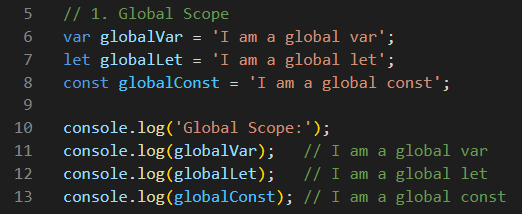
First, we should explore the three global scope variables on lines 5 through 13 in the script.js file as illustrated below. These lines of code will produce this output in the console as shown on the right. In this code on lines 6, 7, and 8, we are creating three variables using the keywords of var, let, and const. Then, we are outputting those string variables to the console on lines 10, 11, 12, and 13. Please remember that global variables are visible and accessible from anywhere in your script file, and since hoisting isn't possible with let, and const variables, it is strongly recommended as best practice to declare all global variables at the top of your script file.
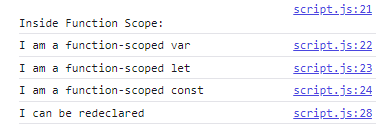
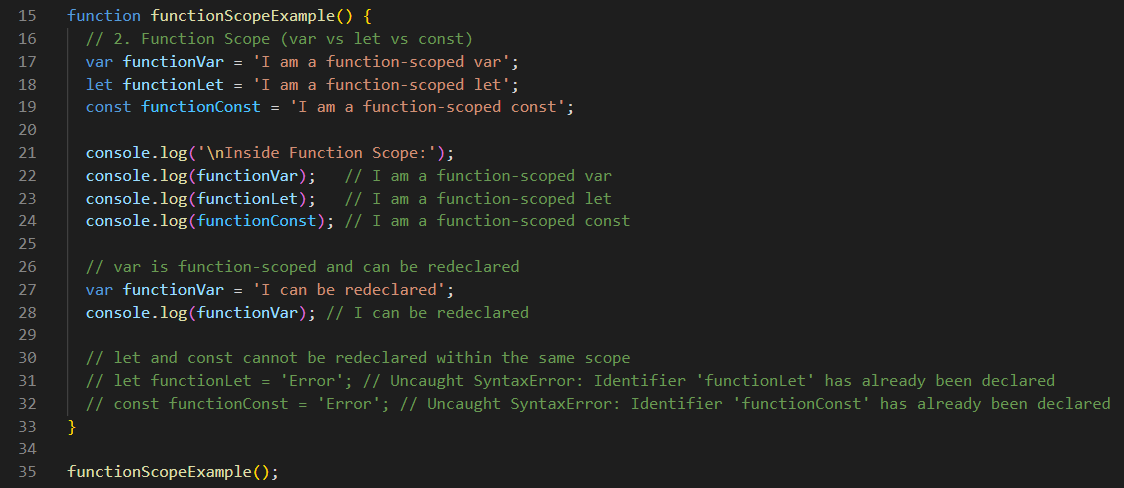
Next, we will explore a function as defined on lines 15 through 33 of the script.js file as illustrated below. We will also see the function call on line 35. A function will never execute if it is not called from outside of the actual function itself. And we will see three function scope variables that we are creating on lines 17, 18, and 19, using the keywords of var, let, and const. Lines 21 through 24 display the values of those variables in the console for us as illustrated on the right. And then on line 27, we are redeclaring our var variable, even though it was initially declared on line 17. A var is the only type of function-scoped variable that can be redeclared inside of the same function, and we can see the new value of that variable being output to the console on line 28. Going one step further, lines 31 and 32 are commented-out because those lines cause errors in the console if they are uncommented because let and const variables cannot be redeclared inside on the same function. As a side note, you might be interested to learn that the \n on line 21 creates a newline to add some vertical space before it prints the text Inside Function Scope: in the console.
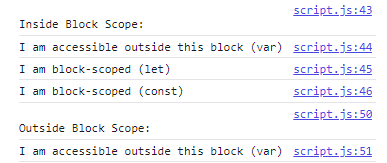
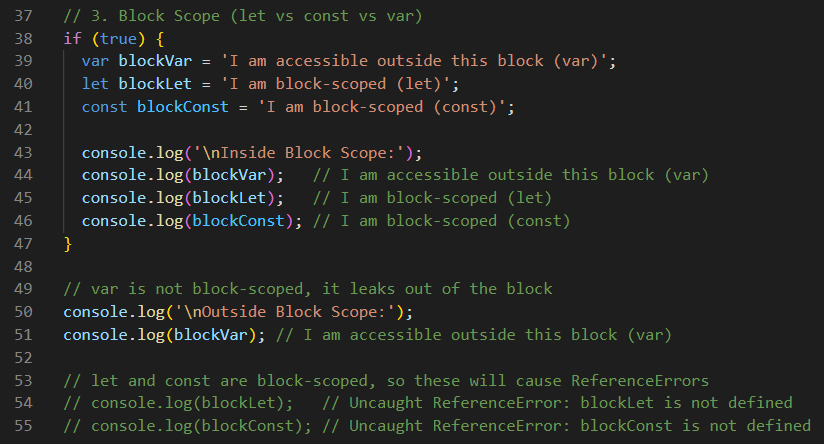
Now we get to explore a block as it pertains to block-scoped variables. There are about nine different types of blocks in JavaScript. This type of block is an if-statement that starts on line 38 and ends on line 47. Any code that appears between the opening curly bracket on line 38 and the closing curly bracket on line 47 is considered to be inside the block. And we can see that we similarly declared three block-scoped variables on lines 39, 40, and 41, using the keywords of var, let, and const. Lines 43 through 46 output the values of those variables to the console. Lines 49 through 55 are outside of the block so the var variable on line 51 is the only one that has scope outside of the block. But the let and const variables on lines 54 and 55 only have block scope and are therefore not visible and accessible outside of the block like the var variable which actually has global scope. Therefore, if you uncomment either line 54 or line 55, the console will complain to you with an Uncaught ReferenceError. That is JavaScript's way of telling you that these variables are undefined outside of the block where they were initially declared.
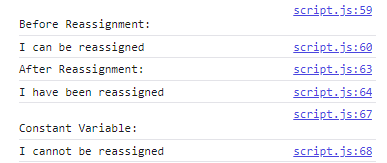
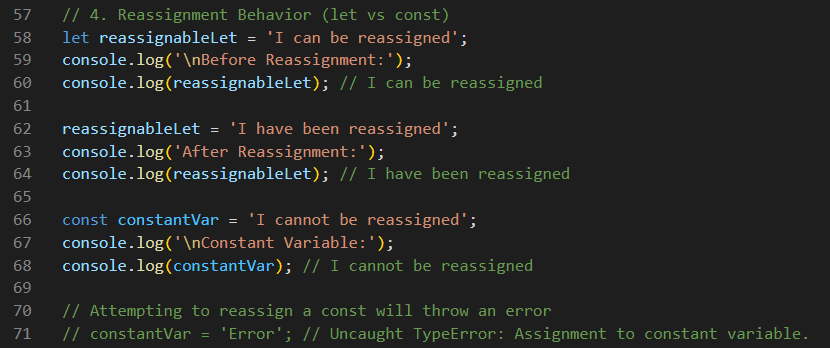
Lastly, we must talk about reassignment behavior. As we have learned from our block scope code, this only applies to let and const variables because var variables have global scope when declared inside of a block. Notice that we can declare and assign a value to our let variable on line 58. And then, line 60 outputs its value to the console. However, we can reassign a value to that variable on line 62, as long as we don't try to redeclare it. And then we can successfully output its new value on line 64. Now what happens when we try this same exercise with a const variable? We can declare it and assign a value to it on line 66, and we can display that value in the console thanks to line 68. But if we attempt to reassign a value to it, as was tried on line 71, then the console will complain with an error message because all const variables are supposed to remain constant throughout their lives as variables. And that has everything to do with variable mutability, as we learned when we first started talking about variables.
Blocks & Functions → More Example Projects
We hope you found this Scope Project to be useful. There is a lot to know about declaring, initializing, and assigning variables. And there is is much to learn about keywords, variable scope, mutability, and hoisting as well, and so we took the time and effort to cover these topics thoroughly.
We did see a couple examples of blocks and functions as well, but let's look at several more projects that will use different types of blocks. As stated earlier, there are about nine different types of blocks in JavaScript. And attempting to learn all nine of them at this point would seem a bit daunting, so let's just cover several of the more common control flow blocks including for-loops, while-loops, if-else statements, and switch-case blocks.
To begin this process, let's download, unzip, and open this Days of the Week project. And let's also download, unzip, and open this Months of the Year project. Neither of these projects have much in the way of index.html files, and they both have empty style.css stylesheet files. The main purpose here is to show you blocks in action, and to introduce you to object data types, including arrays. Both of these projects are similar, except that the Days of the Week project uses a for-loop block, and the Months of the Year project uses a while-loop block. Let's look at the code in the Days of the Week project first.
Days Of The Week → For-Loops
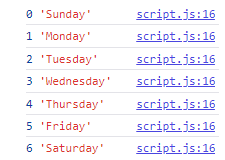
First of all, on lines 6 through 8, we are creating a global variable. However, this variable is of the object type which we only mentioned briefly back when we were talking about primitive data types. This particular object is called an array. An array is a special data structure that stores multiple values in a single variable. This array is a list of string variables that you should easily recognize as the days of the week. An important characteristic of arrays are that each element in the array is indexed, meaning that a number is assigned to the position of each element in the array. The first element in this array is the zeroeth (0th) element, even though the first day of the week is Sunday. We should always keep this offset in mind when working with arrays.
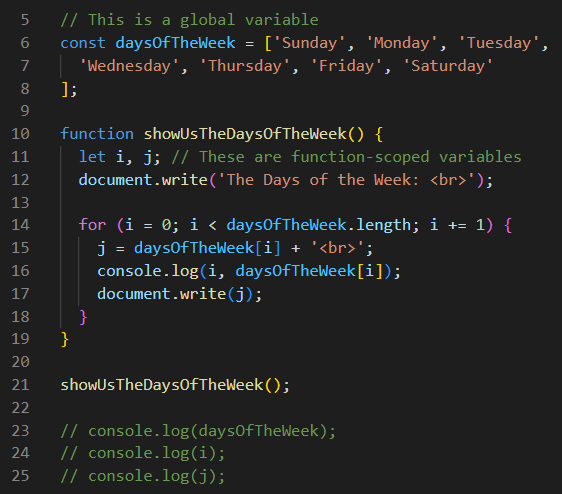
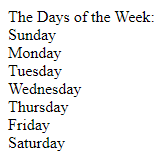
On lines 10 through 19 of our script, we have a function that we descriptively named in camelCase. And we declared two function-scoped variables on line 11 for use inside of this function. It is a common practice to designate i as the name of the variable used to keep track of array indexing, but in reality you could name this variable almost anything you like. Line 12 simply writes a title to the document body.
But on lines 14 through 18 is a block of code known as a for-loop. Our for-loop begins on line 14 with the for keyword. And the part of the for-loop between the parentheses is called the for-loop header or the for-loop control statement. You will notice that it has three parts separated by semicolons. The first part is for initialization as we assign a value of 0 to our index variable i. The second part of the for-loop header is for its condition. We want to loop through each element in our array here, so we stated our condition as i < daysOfTheWeek.length. One of the properties of an array is its length, so it is common practice to use this property anytime you want to loop through an array. Of course, we all know that there are only 7 days in the week, so we could have just stated i < 7, but what would we do if our array was an extremely long list of elements? Yes, we could take the time to count them all one-by-one, but why shouldn't we let the computer do that grunt work for us? Sometimes you will find that the length property of an array is your best friend. The third part of the for-loop header is for update. In our for-loop, we initialized it with an index of 0, then we updated it by adding 1 to it until it reached the condition of 7. At that point, the loop ends because our array only has a length of 7 elements in it, numbered 0 through 6. The block of code in this for-loop is actually the part between the two curly brackets: lines 15, 16, and 17. On lines 15 and 16, we index each element 7 times by the value of i which is enclosed in square brackets. And of course, the result is that the console.log shows the indexed position of each element in this array, while the HTML document shows the actual days of the week. And of course, this function would never run without the function call on line 21. And lines 23, 24, and 25 are commented out, but if you were to uncomment them one-by-one, you would find that the entire global-scoped array would output successfully to the console, but that the two function-scoped variables would cause errors instead. And by now, you should know the reason why, right? The answer is ... because function-scoped variables are not visible or accessible outside of the function. Right?
In summary, the basic syntax of a for-loop, and the three parts of a for-loop header are:
for (initialization; condition; update) {}
Months Of The Year → While-Loops
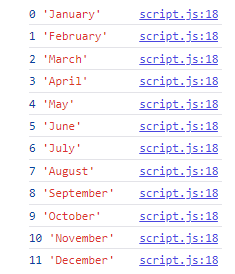
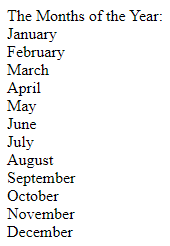
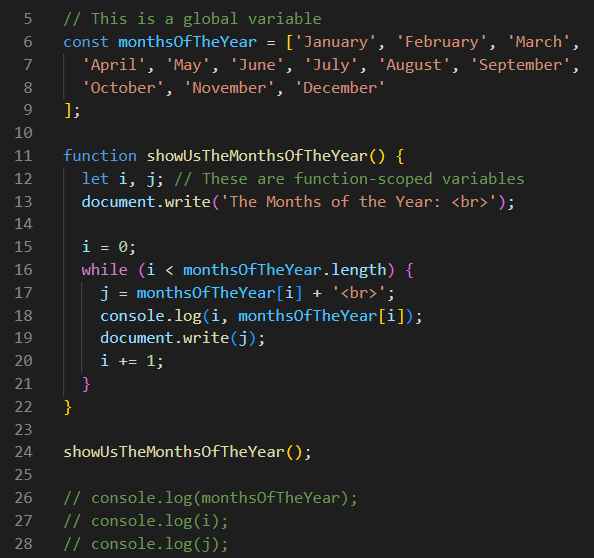
Now let's take a look at the code in the Months of the Year project. In similar fashion to the last project, we declared a global variable on lines 6 through 9. Since whitespace does not matter in JavaScript, we can cover several lines with a single variable declaration. And of course, we use a const keyword because the names of these months will never change. And on lines 11 through 22, we similarly wrote a function that we descriptively named in camelCase. On line 12, we declared two function-scoped variables. On line 13, we output our title to the document body. And then on line 15, we assigned a value of 0 to our index variable i, before our actual while-loop on lines 16 through 21.
This while-loop code might seem easier to understand than the for-loop code, but we are accomplishing the very same process as the for-loop, but in a slightly different way. Our while-loop begins on line 16 with the while keyword. But this time, only the condition is between the parentheses, as the initialization happens before the actual while-loop on line 15, and the update happens inside the while-loop on line 20. Just like in our for-loop example, the code loops through the array as indexed by the i variable until it reaches the length of the array which in this case is 12. To state it properly, we would say it loops while the condition is not met. The function is called from line 24. The rest of code closely resembles the code in the previous project.
The If-Else Statements Project
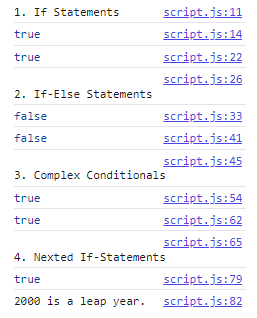
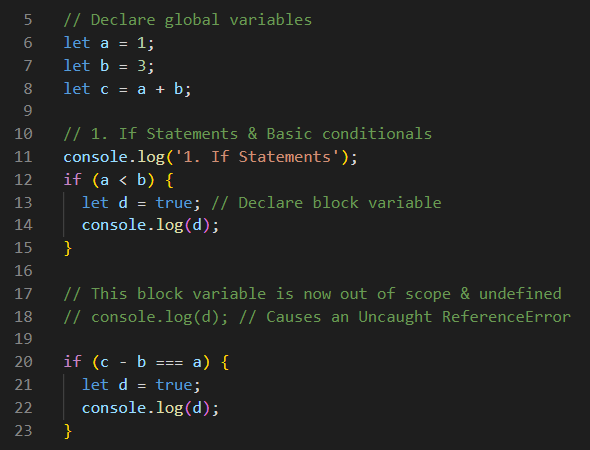
The blocks of code you will encounter and use most often in your code are conditionals that use comparison operators to make decisions based on the state of values in your code. To evaluate conditionals, we use if-statements and/or if-else statements. To see some examples, please download, unzip, and open this If-Statements project. As with other similar projects, we have minimal HTML and no CSS, so results of running the JavaScript code will require that you open the project with VS Code and also you must Inspect > Console. This time we did not bother to write to the document body. Also, please notice in the code below that we declared and assigned values to three variables on lines 6, 7, and 8. These variables will be used at various times throughout this script.
Our first if-statement appears on lines 12 through 15. It's a rather simple comparison because a is indeed < b. The block of this if-statement appears between the two curly brackets. We could have just wrote console.log(true); on line 13, but we wanted to declare a block variable instead, so that we could prove that it loses scope after the closing curly bracket on line 15. And that can be tested if you uncomment line 18. Our second if-statement happens on lines 20 through 23. The result of subtracting b from c is 1, and that certainly is identical to the value of variable a. That if-statement then evaluates to true, and that becomes the value of d on line 21, which is then sent to the console from line 22.
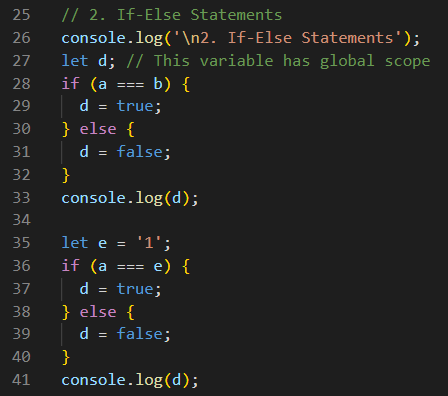
In the first section above, we saw two simple if-statements. If this second section, we will see two if-else statements. The beauty of an if-else statement is that something else happens in the event that the if conditional is not true. On line 28, there is no possible way that a is identical to b, because they are not even equal in value. That means that the value of the boolean variable d become false, and that is sent to the console on line 33. Then on line 35, we create the new global variable e as a string variable with the value of '1'. So now on line 36, we will compare the values of a with e to see if they are identical (===). Well, they are equal (==) in value (both are equal to 1), but they are completely different data types, so the if-statement on line 36 evaluates to false, which skips over line 37 to the else on line 38, which in turn allows the variable d to be assigned the value of false on line 39. And that is what the console receives from line 41.
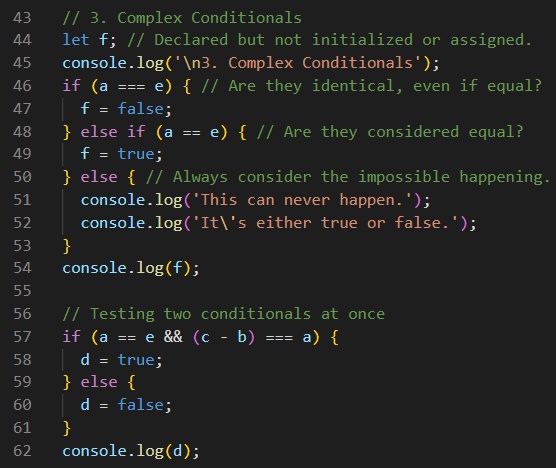
Now we should explore a couple of complex conditionals. To do this, we can chain our if to any number of else if blocks before reaching the else at the end, which would cover the case where all of the above conditions above it evaluated to false. But don't let this explanation discourage you. Conditional evaluations are often not as complex or as complicated as you might think.
Take for instance the previous example where the value of a was not identical (===) to the value of e, even though they were equal (==) in value, but were not of the same data types (i.e. — a is a number and e is a string). So let's look at this again. On line 44, we declare another global variable without assigning it a value. Then on line 46, we compare the two variables to see if they are identical. Since they are not, the code jumps to line 48 to see if the two variables are equal, which they of course are, so on line 49, we assign the boolean value of true, and that is then reported to the console on line 54. In the case of boolean-typed variables, there can only be two possible values: true or false. That means that the else portion of this example on lines 50 through 53 seems almost redundant. However, we recommend always including an else regardless of your expectations. What if your if-statement found that one of your variables was of the null or undefined data types? In that case, wouldn't it be nice to get an error message in the console rather than no message at all?
And in case you are wondering about that backslash \ in the message text on line 52, that is called an escape character, and we use it to tell JavaScript to ignore the next character in the string, which is an apostrophe '. Otherwise, JavaScript would interpret that character as a single-quote, which it would regard as the end of the string variable. And if that were to happen, then it wouldn't know how to handle rest of the text on that line, so it would throw an error to the console in protest. Welcome to Fun with JavaScript!
On line 57, we are comparing two conditionals at once. Hopefully you will remember that in JavaScript, we have the logical operators of && (for and), || (for or), and ! (for not). So the first part of that conditional is indeed true, and the second part is also true, so the if-statement evaluates to true, and the global variable d is assigned the value of true, which is sent to the console by line 62.
One final word on complex conditionals before we move on to nested if-statements: When your conditional complexity increases to long and involved if-statements with numerous else if blocks, it would probably be better to use switch-case statements, which we will learn about in the very next project called Days of the Month, which is next right after we learn about nested if-statements.
Sometimes it is necessary to use nesting with our if-statements. Nesting is the process of placing one if-statement inside of another if-statement. And nesting can occur multiple times. Plus, it is important to understand how nesting differs from the complex conditionals that we worked with above.
In the example below, we first declare two global variables. We declare leapYear on line 66, but we do not assign a value to it. By not assigning a value to leapYear, it receives the data type of undefined. Then on line 67, we declare the global variable year, and we assign a value of 2000 to it. Then, we have three nested if-statements after that. The first one starts on line 68 and ends on line 76. We know this because VS Code conveniently color codes its curly brackets in yellow. The second if-statement starts on line 70 and ends on line 75. Its curly brackets are purple in color. The third nested if starts on line 72 and ends on line 74, and its curly barkets are blue in color. No else is required, as we shall soon see.
Now let's evaluate the three conditionals for each of the three nested if-statements. Each one has conveniently color-coded parentheses to match its curly brackets. How cool is that? For our first if-statement on line 68, we are using our arithmetic remainder operator to find the remainder of the year after it is divided by 4. if that remainder is identical (===) to 0, then the conditional evaluates to true, the variable leapYear is assigned the value of true on line 69, and then code execution is passed to the next if-statement on line 70. However, if that first conditional were to evaluate to false, then JavaScript would not bother to look at the other two if-statements. However, in the case of the year 2000, it is true, so we pass code execution to line 70.
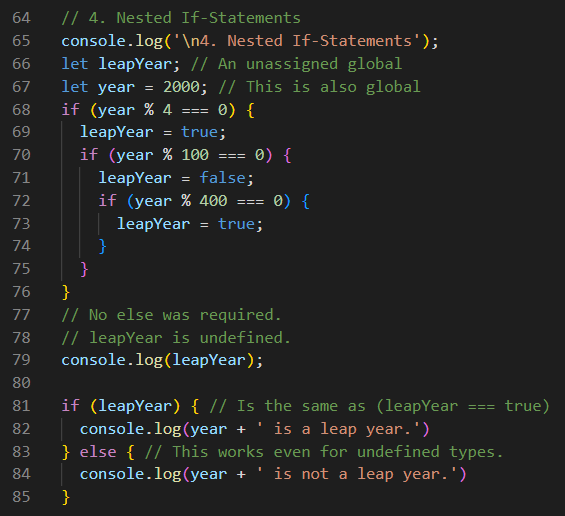
On line 70, we are checking to see if there is a remainder of 0 after the variable year is divided by 100. In the case of the year 2000, it is, so the variable leapYear is assigned the value of false on line 71, and then code execution is passed to the next if-statement on line 72. But once again, if this second conditional were to to evaluate to false, then JavaScript would not bother to look at the third if-statement on line 72. However, in the case of the year 2000, it is true, so we pass code execution to line 72.
On line 72, we are checking to see if there is a remainder of 0 after the variable year is divided by 400. In the case of the year 2000, it is, so the variable leapYear is assigned the value of true on line 73, and then code execution is complete. If this conditional were to to evaluate to false, then the value of leapYear would retain its previous value of false. But either way, we are done with these three nested if-statements.
On line 79, we report the findings of the three nested if-statements to the console. For the year 2000, it reports true. If the year was 1900, it would report false. If the year was 2024, it would report true. If the year was 2025, it would report undefined, because if the first conditional on line 68 evaluated as false, then it would ignore the other two nested in-statements. And since there is no else, the variable leapYear retains the undefined data type. Please feel free to change the value of year on line 67 to the values of 1900, 2024, and 2025 to test this out.
The last if-statement on lines 81 through 85 is much easier to understand. However, line 81 might seem a little tricky in that JavaScript looks at (leapYear) exactly like it would (leapYear === true), because if it was not true, code execution would jump to line 83 so that line 84 could let us know that we were not working with a leap year.
Days In Each Month → Switch-Case Statements
In this project, we will learn about switch-case statements which are often the preferred way to deal with complex conditionals, especially those with numerous values to consider. Switch-case statements are an excellent alternative to long and messy if-else statements. In some situations, a switch-case can simplify your code and improve its overall readability. So let's not waste any more time. Go ahead and download, unzip, and open this Days in each Month project.
After the projects we've already completed, some of this code will become repetitive. However, we are about to learn about a new object that has lots of exciting properties and methods. And that object is the Date object. And there is a lot to know about JavaScript Date objects, including their properties and their methods. But we are only going to scratch the surface of this topic. For an in-depth view, we strongly recommend a visit to the complete W3Schools JavaScript Date Reference.
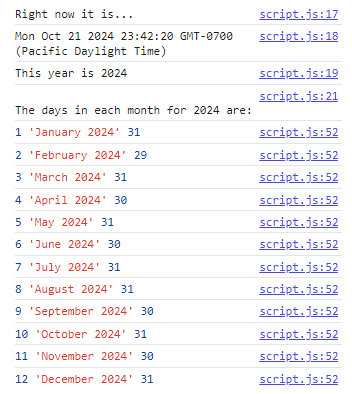
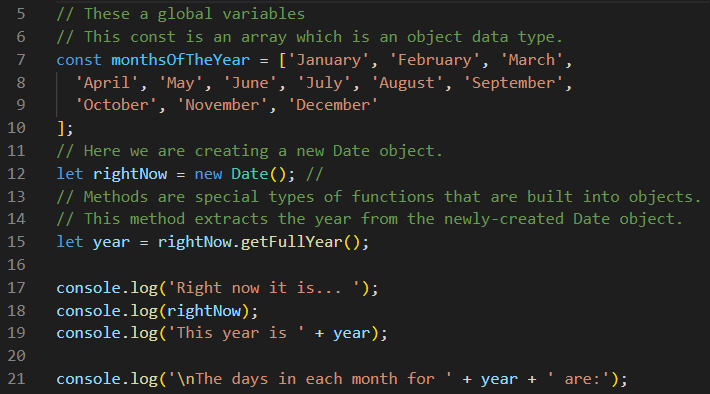
But for right now, let's take a look at line 12 of the script.js file. On that line, we are creating a new Date object named rightNow. And then on line 15, we are using the getFullYear() method on that object, and assigning the result to a global variable called year. On lines 17, 18, and 19, we are sending those results to the console. And just look at all the detailed information you get from the Date object when you create a new Date() object without specifying any additional parameters! It not only shows you the current date and time right down to the second, but it also can recognize your time zone, and whether you are on Standard Time or Daylight Time. Are you impressed? But for our purposes in this project, we are only interested in extrapolating the current year. Oh, and one more thing! This is a dynamic object, which means that your will get a completely different new Date() object each time you run this program! But let's move on.
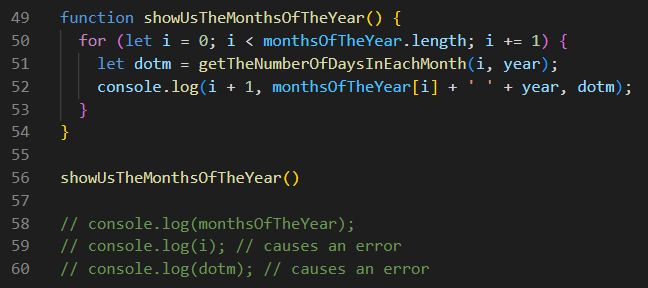
Now let's skip down to line 49 where we have created a function with a descriptive name in camelCase. And that function starts on line 49 but it ends on line 54. And the function call on line 56 gets the ball rolling, so to speak. And on lines 50 through 53, we have a for-loop. But look at what we did with the index variable i on line 50. We declared and assigned it inside the for-loop header, rather than declaring it separately. But the real magic happens on line 51, where we declare a variable called dotm and assign a value of... OK, here's something new! We are calling another function from inside of this for-loop, which is already inside of one function. And to that other function, we are passing two parameters to it: i the index variable; and the global variable year. So what happens here is that this loop will run 12 times, and it will get a value back from the other function which it will assign temporarily to the variable dotm, which gets used by line 52 before the loop runs again, giving dotm a new value. "And how does it do that?" you ask. Let's look at the function on lines 23 through 47 to find out.
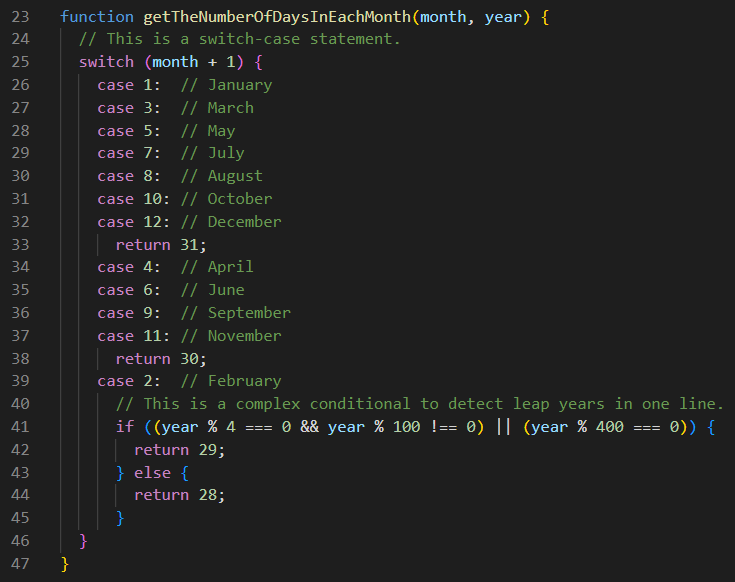
Ah! This function on line 23 receives two parameters from the function call on line 51 (12 times, in fact). We sent it parameters i and year. But this function only wants the values it sent, so it can call these values any name it wants. In the case of i, which will be a value of 0 through 11, it will call that value month, but it is completely happy with the variable named year.
However, the main reason why we are here to look at this project is to learn about switch-case statements, and we see that lines 25 through 46 are the actual switch block we seek. Can you imagine trying to do this with if-else statements? What this switch block does for us is it takes the case number (which refers to a month, and notice that we add 1 to it to get months 1 through 12), and then it returns a value, which is the number of days for each month. In fact, you can almost hear the nursery rhyme being recited as you look at this switch block. The only problem left to solve here in on lines 39 through 45, which is the case 2, or February. But thanks to the year parameter we passed to this function, we can determine in one line of code whether the year we passed to it is a leap year or not. If it is, then the nested if-else statement returns a value of 29. And if it is not a leap year, then it returns a value of 28. Please don't short-circuit your brain trying to analyze this amazing conditional on line 41. It works, and that's all we really need to know about it at this point.
The Dates Project → Putting It All Together
The Dates project is a little more complex than the other projects we looked at. But we now have a basic understanding of the four different kinds of blocks, and a basic understanding of functions, function calls, parameter passing, and the process for returning values from functions. And we know the scope of the variables we are creating, and we know how the various operators help us when we are constructing conditionals. Can you believe that we've covered so many topics in such a short period of time?
We will mostly skip over material we've previously covered because this project has several new concepts that we have not seen yet. This project will be your first introduction to manipulating the DOM, which should be very exciting since looking at our output through alerts, console.logs, and document.writes is not generally the preferred way to write great JavaScript code. So now let's download, unzip, and open this Dates project, where we will look at the HTML code in the document body of the index.html file first.
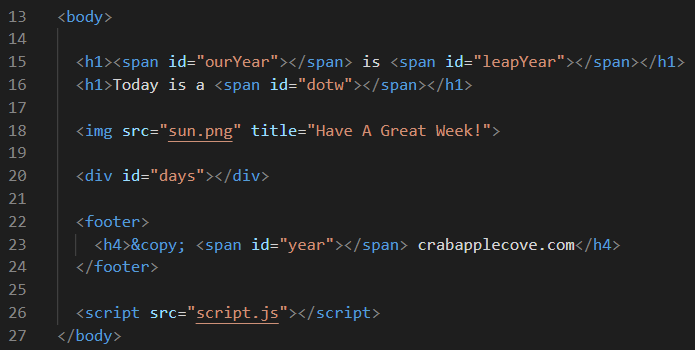
None of this HTML code should be too scary, and we won't even bother to look at the CSS code. But what we want to focus on right now are the five ids in this file. On line 15, there are two: ourYear and leapYear. On line 16, there is one called dotw. There is one on line 20 called days. And lastly, there is one on line 23 called year. Remember that an id is supposed to be unique and used only once on your web page. And we don't really care that four of these ids are inside of spans while only one of them is inside of a div.
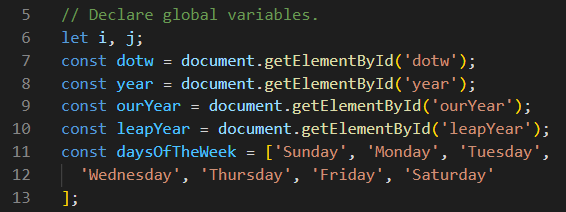
Now let's take a look at the global variables we are creating at the top of our script.js file. On lines 7 through 10 we are creating const variables with global scope called: dotw, year, ourYear, and leapYear. And it is by no accident that we are naming our JavaScript variables with names that are identical to the names of the ids we are linking together. JavaScript doesn't care that these names are the same. So why shouldn't we do it this way? But look at what is happening on the right side of the assignment operator.
Did you know that the HTML document is an object? No? Well, where do you suppose the name Document Object Model came from? And since that is such a mouthful of words, we generally just refer to it as the DOM. And as we learned from the Date object that we worked with previously, objects have properties and methods. In fact (and conveniently for us), one of those methods is called getElementById which requires the name of an id as a parameter. Using a method like this one allows us to manipulate the DOM and that allows us to makes our web pages dynamic and interactive. But let's move on.
This script file has large area of functions between the global variable assignments and the initialize function, and its function call below that. We might call those other functions helper functions because most of the heavy-lifting occurs in this initialize function. We could have called this function any name we liked, but since it runs first, and calls the other helper functions along the way, that seemed like a good name to us at the time.
"Wait! You can call functions from within other functions?" Of course! Where do you think babies come from? Let's look at line 96 below. We can get the value of rightNow by calling a function, and then assigning the value it returns to us to that variable name. On line 100, we do the same thing, but we send the variable rightNow as a parameter to the function we call, which returns a value that tells us which day of the week is today. Then on line 101, we write that value to the span on our web page that uses the same id as our variable name. And we do that by using the innerHTML property of dotw. The result is that the second line of our web page tells us which day of the week it is today. Something similar is happening on lines 105 and 106. And also on lines 110, 112, and on either line 114 or 116, depending on whether this year is a leap year, or not.
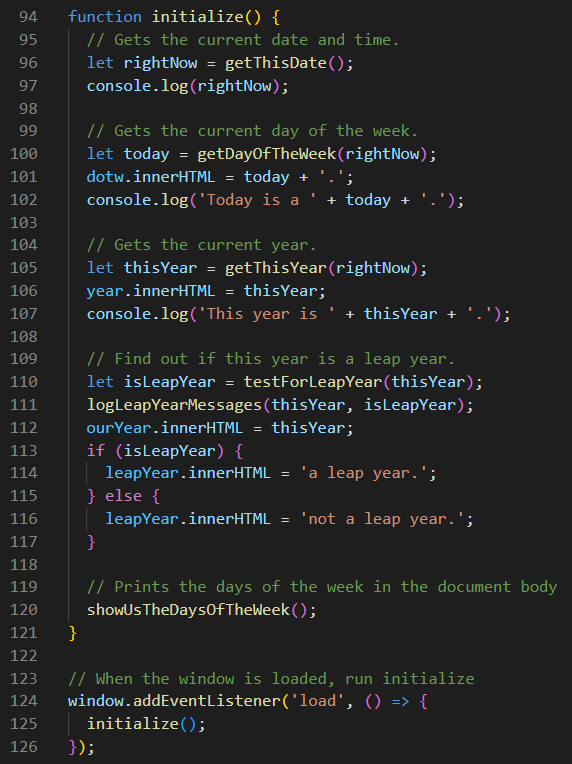
Lines 111 and 120 are calling functions that don't return values. In fact, the function we call from line 111 simply sends messages about leap year to the console, so it's not very interesting to us at this point. However, the function we call from line 120 tells a different story. The variable we create on line 82 is not global. It is a function-scoped variable that only has scope within this function. But more importantly, we are using a different method of the DOM than we used before. Instead of using the getElementById method, we are using the querySelector method, which is a little more versatile than the getElementById method that can only be used with ids. In sharp contrast, the querySelector method works with ids, class names, element names, and a whole variety of HTML nodes and CSS selectors. Of course, you will notice that we must specify the # in #days to tell our querySelector that we are using an id, but that is the only real difference here between the querySelector method and the getElementById method.
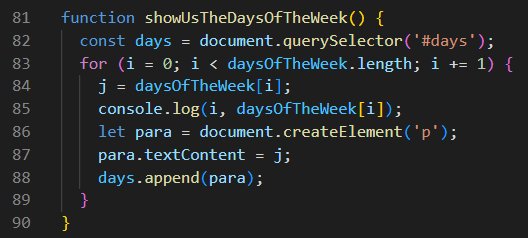
Another new concept we are learning today is on lines 86, 87, and 88 above. As we loop 7 times through our for-loop, we are creating 7 paragraph elements on line 86: one for each day of the week. We do that with the DOM's createElement method, and each of those 7 elements is temporarily assigned to the variable named para. Then on line 87, we add textContent to each para element in the form of the name of each day of the week. Then on line 88, each para is pushed out to the div with the id of days using the append method, before the next iteration of the for-loop, which occurs 7 times, until there are no more days of the week to output to that div in the document body.
Actually, it's pretty remarkable that JavaScript not only allows us to change elements in the DOM, but it also allows us to create new elements, and to put content inside of those elements. JavaScript also allows us to destroy or remove elements. And it allows us to change the CSS styling properties of almost any element in the document body as well. By now, you should be starting to realize the awesome power that JavaScript gives us, thanks to the DOM.

Our deep dive into JavaScript is nearly complete. In fact, it may not be safe to go much deeper. But before we slowly ascend back to the surface, we need to talk about the function call that invokes the initialize() function. And that is done on lines 124 through 126 at the very bottom of the script.js file.
Just as the document object has properties and methods, so does the window object. And one of its methods, the addEventListener method, allows us to do exactly as its name indicates: it allows us to add an event listener. Now the topic of event listeners is another one of those subjects that we could spend a lot of time on. But for now, let's just get a feel for what an event listener is and does, so we can move on. In barebones basic terms, an event listener waits and listens for an event to occur before it is triggered into action. What this particular event listener is listening for is a load event. In other words, it is waiting for the HTML document to load completely before triggering the initialize() function. And something else that is new and that we have never seen before is something called an arrow function, which is a nameless function, followed by a pair of parentheses (), and an arrow =>, plus an open curly bracket {, followed by the name of function we are calling, and then ending with a closing curly bracket }, a closing parenthesis ), and a semicolon ;.
We could also mention that JavaScript not only has a DOM or Document Object Model, but it also has a BOM or Browser Object Model, which is the top-level object in the web browser you use...
Oh my! Your face is starting to turn blue! The pressure can be incredibly intense at this depth. This deep dive has been an extremely ambitious endeavor on your part, and you were very brave to descend so deeply with us. But we think it would be best if we began our slow ascend back to the surface now. Thank you for deep diving with us. You are amazing!