JavaScript Coding Course
JS 101
Part 2. Playing In The Sandbox
Using JavaScript Without Writing Code

So far, we've only offered you a lot of talk about JavaScript. Isn't it about time that we jump right in and get our hands dirty? And in order to do that, we will use a sandbox. Sandboxes are not just for kids, you know! In software development and in beta testing, code is often placed in a protected area of the computer called a sandbox which allows programmers and testers to work with the code without the risk of taking the entire computer system and/or network down. Of course, there is very little danger of that happening with a language like JavaScript, which is essentially bulletproof since it has been in continuous use since 1995. Nevertheless we will act like professionals even when we play like children, OK? No objections? Fine!
Your sandbox awaits! You could open it directly from this web page, but let's instead download this Sandbox Project zip file to our JavaScript Coding Course folder inside your Documents folder where you can unzip the file, and then open it in VS Code. Alternatively, you could also just open it directly in a new browser tab from here. Either way, you can now simply follow the steps listed on the Sandbox Project web page to open the sandbox, which is more commonly referred to as Inspect > Console in Chrome DevTools.
One point that we failed to mention when we were explaining the differences between Java and JavaScript is that Java produces in your face error messages when it encounters code that it does not like! On the other hand, JavaScript offers a kinder, gentler way of dealing with the programmer: it basically ignores you for the most part. That is, it ignores you unless you bother to open the console to see what went wrong. In other words, without the ability to inspect the console, we would have no idea why our code did not work. As a JavaScript programmer, you will quickly learn that the console is your best friend.
But even when you are not writing JavaScript code, you can always open up the console and use it just as easily as the calculator app on your mobile phone. If you have now opened the console by following the instructions above, you are ready to start using JavaScript! In fact, you should be able to see a blinking cursor > at the top of the console. And if you type 3 + 4 there, and then press the enter key on your keyboard, it should tell you the sum of adding those two numbers together. Did you get a lucky 7 as the result? If the answer is yes, then you were successful in playing in your sandbox!
Cool! Let's Play!
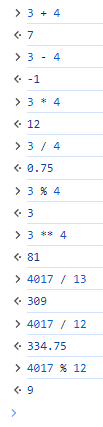
Go ahead and play in the sandbox! You can add numbers together by using the + sign, and you can subtract numbers by using the − sign. However, we use the * sign when multiplying numbers together, and of course, we always use the / sign when we are performing a division operation.
Arithmetic Operators
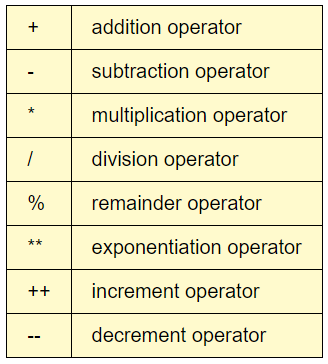
These four signs that we mentioned above: +, −, *, and / are called arithmetic operators in JavaScript because we use them to perform arithmetic operations. These operations actually need no further explanations, but there are several more to learn. The exponentiation operator is two ** signs. Exponentiation raises a base number to the power of the exponent. And the remainder operator is the % sign. Of course, the remainder is the result of a signed integer division operation that remains after the quotient is determined. The increment operator simply adds 1 to whatever integer you are incrementing. And The decrement operator simply subtracts 1 from whatever integer you are decrementing. And a table showing all eight arithmetic operators appears on the left.
Arithmetic Operation Precedence
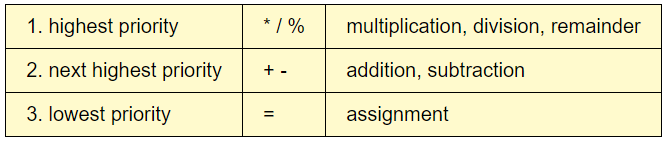
Even though arithmetic operators are also sometimes called binary operators, they are not actually the same thing. Binary operators arithmetically operate on only two different values. But in reality, several different arithmetic operations could be combined into one computation. And in that case, an order of precedence would normally happen from left to right. However, any such computation will happen using these prioritized rules of precedence as follows:
For instance, let's sandbox this calculation: 10 * 12 + 15 / 20 - 5 % 4
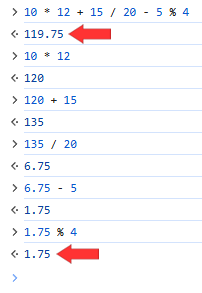
The highest priority is the multiplication operation on the left (10 * 12) which produces 120. The next highest priority is the division operation ( 15 / 20) which yields the quotient of 0.75. The next highest priority after that is the remainder operation (5 % 4) which gives up a remainder of 1. After that, the addition operation takes precedence which adds up two previous results (120 + 0.75) and that operation of course gives us a sum of 120.75. And lastly, we need to perform the subtraction operation of two previous calculations (120.75 - 1) which gives us the answer we sought which is 119.75. Try this in the console. It works!
Since JavaScript properly observes these rules of precedence, simply copying and pasting that calculation into the console gives us the correct answer. But what if we simply did each operation from left to right on our own while ignoring the order of precedence? Let's find out! 10 * 12 is still 120. But now let's type 120 + 15. The console gives us the answer of 135, as it should. Next, we type 135 / 20 and the answer it gives us is 6.75. Now we can type 6.75 - 5 and the answer is 1.75. The last arithmetic operation is then 1.75 % 4, and the remainder of that operation is of course 1.75.
Was that the correct answer? It was if you performed each of those five arithmetic operations as binary operators while ignoring the proper order of precedence. But that was not the correct answer if you performed these five arithmetic operations together, while allowing JavaScript to properly observe the prioritized rules of precedence. After all, the result of 1.75 is not even close to the correct answer of 119.75. And that is why knowing the prioritized Order of Precedence is of paramount importance.
The Assignment Operator
But wait! The Order of Precedence table above shows the = assignment operator as the lowest possible priority, and that wasn't one of the arithmetic operators we talked about. Yes, that much is true. It is the lowest priority but an assignment operator is not arithmetic in nature.
An assignment operator is used to assign a value to a variable. We briefly mentioned variables in Part 1, but never really explained what they were. The easiest way to explain this is by jumping back into the sandbox. Are we there yet?
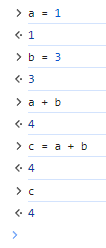
Let's create a variable called a and assign a value of 1 to it. We do that at the console prompt by typing a = 1 and then pressing the enter key. You just told JavaScript that the value of a is now 1. Now let's create a variable called b and assign a value of 3 to it. We do that at the console prompt by typing b = 3 and then pressing the enter key. You just told JavaScript that the value of b is now 3. Now if you type a at the console prompt, it prints out 1 to show that it remembered what you assigned to that variable. Likewise, if you type b at the console prompt, it prints out 3 to prove that JavaScript has an elephant's memory. And if you type a + b at the console prompt, it prints out 4 as you might have expected. But let's take that one step further and assign an arithmetic operation to a variable to see how that works. Let's type c = a + b at the console prompt and press enter. Were you shocked that it printed out 4? Now type c and press enter again, and notice that it once again prints out 4. JavaScript is actually smarter than your cat or dog. No joke!
And so, we just learned that the assignment operator is a very versatile operator indeed, even if it takes the lowest priority. And if you think about that for a second, it makes perfect sense. After all, you wouldn't want c = a + b to print out 1 before adding 3 more to it, would you? So using the assignment operator, we can assign numeric values to variables, and we can even assign mathematical formulas that consist entirely of other variables as well. Technically, these types of assignments are called expressions and we will dive deeper into that later. In fact, we will use assignment operators with all of the types of data that JavaScript supports. But before we get into that, let's take a look at primitive data types.
Primitive Types of Data
We mentioned in our introduction that JavaScript is considered to be a loosely-typed language, and that it is unlike other strongly-typed languages. However, that often makes variable assignments easier than in strongly-typed languages. In strongly-typed languages, you may have several different types of integers alone. In the C++ language, there are short ints (16-bits), ints (also 16-bits, or sometimes 32-bits), long ints (32-bits), and long long ints (64-bits) and that's just the integers. For floating-point numbers in C++, there are three types: floats, doubles, and long doubles.
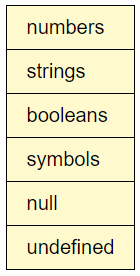
So count your blessings that you are learning JavaScript. In JavaScript, there is one primitive type called numbers that covers almost all numbers whether they are integers or floating-point numbers of any length from -9,007,199,254,740,991 to 0 to 9,007,199,254,740,991 (over 9 quadrillion). And there are ways to work with numbers larger than that, should the need ever arise. The bottom line is that working with numbers in JavaScript couldn't be much easier.
In fact, JavaScript only has six primitive types of data to work with, as listed in the table on the left. Of those six types, you will almost always be using the top three types listed: numbers, strings, and booleans. However it is necessary to learn about the null and undefined types as well. Ready to jump back into the sandbox?
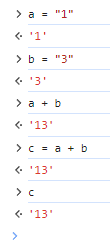
Well OK then! Let's repeat the sandbox exercise we tried above using numbers, only this time, let's assign strings to our variable names. Let's create a variable called a and assign a value of "1" to it, making sure to include the double-quotes. We do that at the console prompt by typing a = "1" and then pressing the enter key. You just told JavaScript that the value of a is now "1", a string value. Now let's create a variable called b and assign a value of "3" to it. We do that at the console prompt by typing b = "3" and then pressing the enter key. You just told JavaScript that the value of b now holds a string value of "3". Now if you type a at the console prompt, it prints out "1" to show that it remembered what you assigned to that variable. Likewise, if you type b at the console prompt, it prints out "3". And if you type a + b at the console prompt, it prints out "13" because we just concatenated two strings together, rather than adding two numbers together. Does that make sense? And we can take that one step further and assign an arithmetic operation to a variable to see how that works. Let's type c = a + b at the console prompt and press enter. Once again, it prints out "13". And if we type c and press enter again, it once again prints out "13". You could say that concatenation is addition using strings, but that would be technically false. Concatenation simply combines two strings into one string. Fun!
The difference between number types and string types is a simple lesson, right? Numbers are numeric in nature and strings are alphabetic in nature. Some teacher long ago taught you the difference between 1-2-3 and a-b-c, so we won't insult you by covering that ground all over again.
But let's take a quick moment to mention boolean types. Boolean algebra is a branch of mathematics that can get rather deep, but for our purposes, it can be explained very simply. A boolean can only have one of two possible values: it can either be true or it can be false. Since digital computers work with binary numbers as their base, booleans are their speciality. Every bit inside the computer is either a 1 or a 0. Every single switch inside the computer is either on or it is off. If it is 1 or on, then it is considered to be true. If it is 0 or off, it is considered to be false. Of course, these boolean values can change as a computer program runs, but they are extremely useful to us as programmers for obvious reasons as we shall soon see.
At some point in the future, we will need to discuss the null and undefined types, but let's save that discussion for another time. And we will eventually need to talk about the symbol types as well, but discussing that requires a working knowledge of object types of data.
Object Types of Data
This is a deep well to jump into after just barely scratching the surface of primitive types. For now, you need to know that object types exist, and that object types have properties, and also methods which can affect the properties of those objects. You've probably already heard of object-oriented programming (OOP), which uses objects, and these objects contain both data and code. Again, we'll revisit this later in the course. For now, just know that object types exist, and that they are not primitive types, although some objects like arrays consist of collections of primitive data types.
Comparison Operators
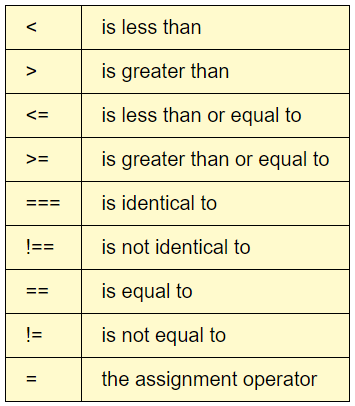
Believe it or not, it was important to talk about data types before discussing comparison operators. And the reasons why that is true has everything to do with boolean types of data, because the results of our comparisons are either true or false. But let's learn what comparison operators are before we jump into the sandbox, OK?
The table on the left offers clear definitinions to all nine comparison operators. Wait! There are only eight possible comparison operators. How did we get nine? Ah! We see why that happened. The one on the bottom is actually our old friend, the assignment operator. This wasn't a dirty trick we played on you. Instead, we wanted you to do a comparison (pun intended) between the === comparison operator, the == comparison operator, and the = assignment operator. A common problem we see quite often is somebody mistakenly trying to assign a value, when they actually needed to compare two values. It happens all the time. And while the top four comparison operators are actually self-explanatory, the bottom four (or five) are not, and can be quite confusing.
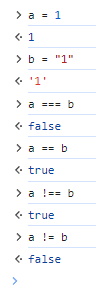
Once again, this can be best illustrated in the sandbox. When you get your sandbox ready, let's jump right in!
First, let's create a variable called a and assign a value of 1 to it. Now let's create a variable called b and assign a value of "1" to it. Notice that a was assigned a number value of 1, while b was assigned a string value of "1". Now, let's perform our first comparison by typing a === b. This is a test to see if both variables are identical. And as expected, the console tells us false, meaning that they are not identical. Next, let's perform our second comparison by typing a == b. This is a test to see if both variables are equal. Were you surprised by the result of true? Yes, they are not identical because they are two different data types, but the values are equal regardless of their data types. For this reason alone, you will generally try to make comparisons that test for identical variables. If you don't, you might become one of those programmers who has to learn TypeScript.
Of course, the !== operator produces just the opposite result of the === operator. And the != operator produces just the opposite result of the == operator. Feel free to test out all of the comparison operators in the sandbox to get a feel for how they all work. When we start to write real JavaScript code in our script files, this will prove to be incredibly valuable knowledge.
Logical Operators
We are almost done playing in the sandbox, but we hope you had fun here learning about using the assignment operator to assign values to variables. We also learned about the various primitive data types. And we also had tons of fun playing with arithmetic operators and comparison operators. And that's about as far as we can go in the sandbox, which is actually better know as the console in the professional web development world.
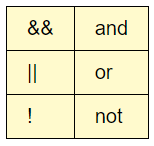
But before we leave this section and start writing real JavaScript code, we wanted to mention one more set of operators called logical operators. Logical operators are often used with comparison operators, and that makes it difficult to properly illustrate how they work in the console. For that reason, we will only mention these three logical operators before moving on to Doing Arithmetic. And we intentionally did not discuss bitwise and ternary operators here, because those are deep subjects for another time.
Doing Arithmetic
It was necessary to explain how an assignment operator works before breaching this subject, and we apologize for explaining these topics in this order. Nevertheless, please download, unzip, open in VS Code and run Doing Arithmetic to gain some insight into how we can use our increment and decrement operators, and at the same time we can learn how to shorten an arithmetic operation by combining an arithmetic operator with an assignment operator.
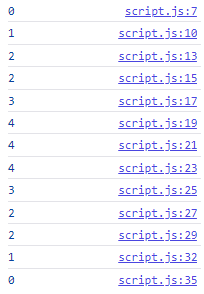
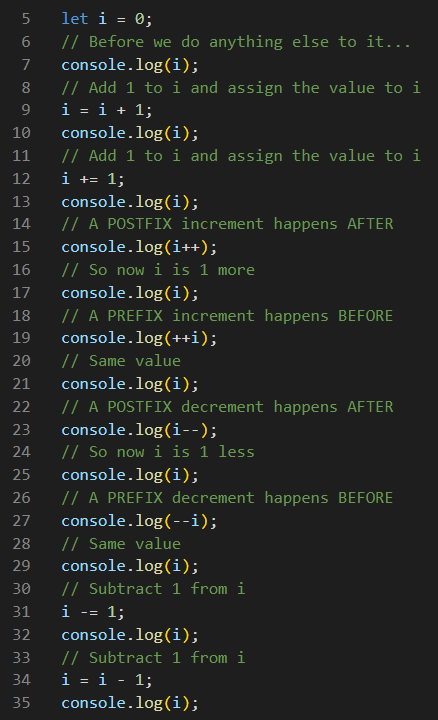
The results of running this script appear in the console as shown on the right. And the actual JavaScript code is listed below. The comments help to explain what each line is doing with this one simple variable called i that we are assigning a value of 0 on line 5. Notice that we have two ways of adding 1 to this variable on lines 9 and 12. For beginners, line 9 might be the easiest way to understand. But in reality, line 12 is the more preferred way among professionals. It means the same thing as line 9: "add 1 to i, and then assign the result to i". One last thing to know about combining arithmetic and assignment operators is that this works with other arithmetic operators as well. For instance, let a *= 5 will multiply the value of a by 5 and then assign the result to a.
The prefix and postfix ways of incrementing and decrementing variables may seem a little trickier to understand, but it is actually rather simple if you think about it. On line 15, we are incrementing the value of i, but we are doing it after we output its value to the console, as shown by the command on line 17. On line 19, we are incrementing the value of i, but we are doing it before we output its value to the console, and that's why we get the very same value for i from the command on line 21 as from line 19 for that reason. The rest of this code is doing the very same processes, but in the opposite order, and by using the decrement operator and the subtraction operator instead.
The Console Log
Even after we leave this section, we are not saying goodbye to the sandbox. Like we mentioned earlier, the console is a useful tool for debugging our code. We can use it to output data to the console for inspection, and we can use it to check variable values as we code. The console is also the only place where JavaScript displays its error messages. When our scripts fail to work, we can look in the console to see what happened, or what did not happen, as is sometimes the case.
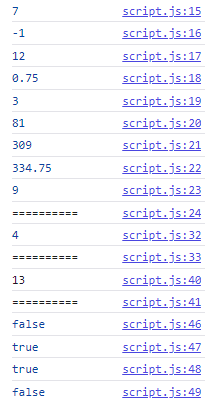
In fact, let's look at a project that uses an actual JavaScript file to perform all of the calculations we did a while ago manually. This script will then direct its output to the console using console.log messages. And when the script execution has completed, we can inspect the results in the console. You can download this Console Log project and then unzip and open it in VS Code, or you can just open it by clicking here. Either way, all you need to do is to simply follow the directions on the screen when the project opens in Live Server, and then you will be able to see output that should be almost identical to the console.log messages you see here on the right. If it isn't completely identical, then try to adjust the width of the console, and then refresh the browser window. It is important to get comfortable with viewing the console, because you will be using it a lot to debug your code as a JavaScript programmer.
Another fun thing to do is to view the actual script.js file with VS Code to see how we did this. It's pretty simple code to follow since we added lots of comments to tell you what is going on there. In the most technical of terms, the console is an object. And console.log is a method of that object. And it's way too early to explain what the differences are between a method and a function, but we will get into that sometime soon. Actually, one of the most important things for us to learn right now is the proper syntax of the console.log method, which is... console.log(data);.
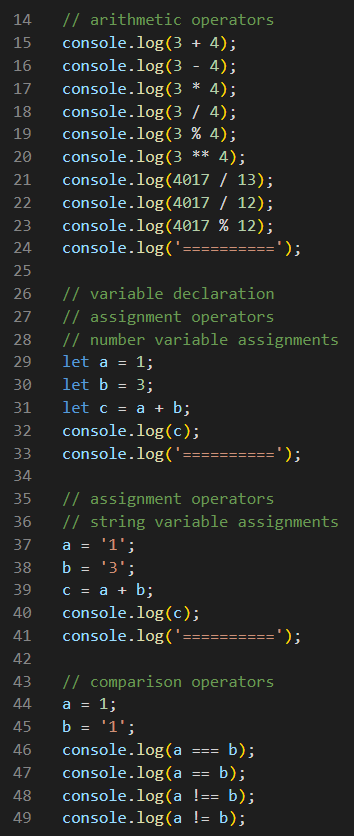
But another important thing to learn here is that we had to use the let keyword to declare our variables a, b, and c on lines 29, 30, and 31 of our script.js file. We didn't have to do that when we only playing in the sandbox. But when we start writing strict JavaScript, all variables must be declared before you can use them. But notice what happened on lines 37, 38, and 39. Since these variables were declared previously, we didn't have to declare them again to reassign values to them, even through we changed the data types from numbers to strings. And we will learn all about variable assignments, initializations, and assignments when we get to Part 4.
Document Write
Previously, we saw a way to get input from the user using prompts. And we saw a way to output data to the user using alerts. Now we know another way to output data to the console. But let's face it: we don't expect most users of our web pages to be using the console. So we are now going to show you one more way to output data, even though it is a very primitive way. To do this, you can either download this Document Write project and then unzip and open it in VS Code, or you can simply open it by clicking here.
In the early ways of JavaScript, back when JavaScript was new and it shared the World Wide Web with pterosaurs, the only way to write data to the HTML document was to use the document.write method. Yes, just as the console is an object, and console.log is a method of that object, the document is an object, and document.write is a method of that object as well. Of course, it wasn't long before better methods were invented (pun intended). These days, we get inputs directly from the HTML document object, and we output data directly to the HTML document object, using what else: the Document Object Model (aka the DOM). But let's take a quick look at this project before we move on.
Oddly enough, we are doing all of the same calculations we did before, both manually in the console, and automatically through console.logs through the script file. And if you look at the script.js file on this project, you will see that we replaced all of the console.log() methods with document.write() methods. But since we are not writing actual HTML elements using tags to the HTML document, we have to separate all of the lines by writing <br> break tags to the HTML document as well. Otherwise, we would get just one line of text that was crammed together and be completely unreadable. And just to prove that you can use this method to write real HTML elements and tags, we did two document.writes at the end of the script with an <h1> and an <img>. And we made sure that the document body had CSS styling to make it look nice. If you want to see what it would like without CSS styling, just comment out the link to the stylesheet on line 8 in the document head, and then run it again. And although this is a very primitive way to do it, we finally learned how to output data to the HTML document.
What Comes Next
In the near future, you will learn how to manipulate HTML elements through their tags in the DOM using JavaScript. You will also learn how to get input from some elements, and how to output data, messages, and images through other elements. You will learn how to add elements to your web pages, and how to remove elements as well. There is much more to learn, but he hope you had fun in Part 2. We lured you into playing in the sandbox because we thought it might sound like fun to you. And in the process, you learned about JavaScript data types and operators. You also learned how to inspect the console using Chrome dev tools. You learned how to console.log() data and messages to the console. And you used the document.write() method to output data and messages to the HTML document as well.
This was just some necessary preliminary preparation for the very next part of the course where we will really begin to dive into the subject of JavaScript. So suit up, and then click the button below.