JavaScript Coding Course
JS 101
Part 5. Using JavaScript Objects
The JavaScript Math Object

JavaScript provides an enormous set of capabilities for working with the Number primitive data type, depending on your knowledge and comprehension of the subject of Mathematics. The actual Math object is a built-in static object that provides properties and methods for mathematical constants and functions. That means that all of its properties and methods can be accessed directly through the Math namespace. We can never create a new Math() object like we so often do with many other JavaScript objects. Instead, direct access through namespace means that, when we use Math.PI, we are using a constant that is always equal to 3.141592653589793, and that can be incredibly useful when we are working with circles or circular motion. However, we can also use a function with a parameter like Math.sqrt(64) and that will always produce the result of 8, which after all is the square root of 64.
And for the usual sake of simplicity, we usually prefer to use the reference materials provided by the JavaScript Math Object from W3Schools, which includes their JavaScript Math Reference. But a more comprehensive and in-depth reference can always be obtained through the MDN JavaScript Math Reference.
For the most part, numbers are numbers. What programmers seem to love most about science and math is its relative stability and predictability. However, there is one oddity in the JavaScript Math object that can annoy some people, and that is its use of radians instead of degrees when working with angles and rotational motion. However, conversion from degrees to radians is actually an easy formula: let radians = degrees * Math.PI / 180, where the variable named degrees is a number. Of course, it appears that converting the variable named radians to a string value with radians.toFixed(2) is also a great idea as well.
Let's download and open this example to see how this can be done so easily. The code in this little project is so easy to understand that is does not require any further explanations.
A Few of Our Favorites
- Math.PI → returns the value of Pi π
- Math.abs(x) → returns the absolute value of x
- Math.sin(x) → returns the sine of x (must use radians)
- Math.cos(x) → returns the cosine of x (must use radians)
- Math.round(x) → returns the value of x rounded to the nearest integer
- Math.ceil(x) → returns the value of x rounded up to the nearest integer
- Math.floor(x) → returns the value of x rounded down to the nearest integer
- Math.random(x) → returns a random floating-point number between 0 and 1 (not including 1)
The JavaScript Oscilloscope
This project uses several of the Math object constants and methods listed above. It's actually a rather simple project in many ways. Some basic knowledge of Trigonometry is helpful, but is certainly not required. The script.js file is actually very well-commented for your convenience. And the CSS code employs several media queries to help make it much more mobile-responsive. Please feel free to look the CSS code in this project if it interests you as well. We also need to mention here that this project might be your first introduction to JavaScript Canvas. We will briefly explain what that is all about when we look at the code. The canvas is great for doing animations using JavaScript. It is a favorite for those programmers who enjoy creating games using JavaScript. Anyway, when you are ready to dig in, please download and open this project code.
The Project Code
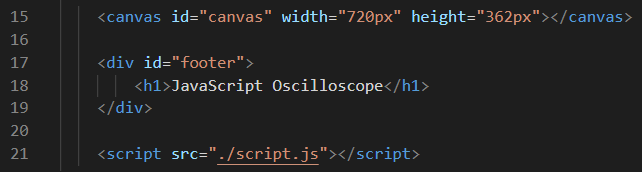
HTML code doesn't often look much simpler than the content inside the index.html file as displayed below. On line 15, we define our canvas, and we give it the unique id of canvas as well. However, one of the requirements for using canvas is that you should define the width and height dimensions of the canvas as inline HTML attributes, in much the same way as you would define inline CSS style rules, which is a practice that so far we have adamantly opposed. Nevertheless, this is how it is normally done when using canvas. Supposedly there are other ways to establish the width the height through internal stylesheets, or external stylesheets, or through JavaScript, but we have never found those ways to work for us. Welcome to the wonderful world of JavaScript Canvas. It works well, even though its coding can seem inherently weird. The rest of the HTML code below should look familiar to you. And if you have interests in the CSS code for this project, you know where to look to find that as well.
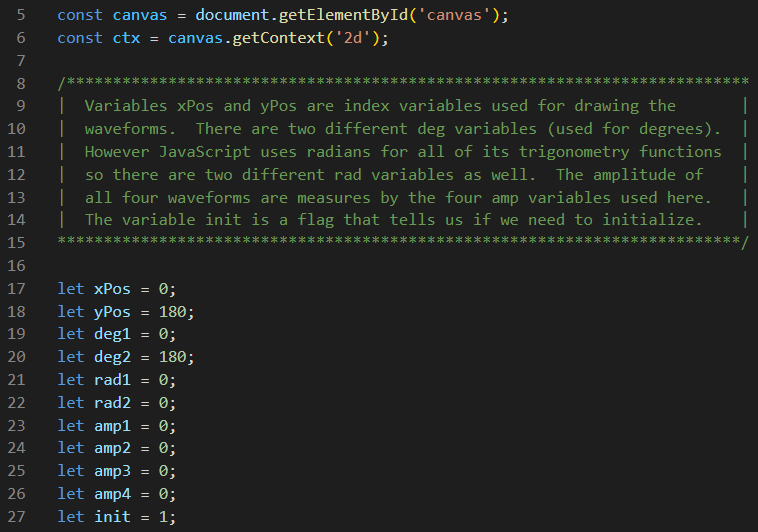
On lines 5 and 6 in the script.js file as shown below, we are declaring a const named canvas, and establishing a context for the canvas. These two lines of code are all too common in canvas projects, so get used to seeing them written this way. Lines 8 through 15 are comments that help to describe the purpose of all of the let variables that are declared globally on lines 17 though 27 below. Now that we have declared all of our global variables at the top of our script file, let's jump down to the bottom of this script.
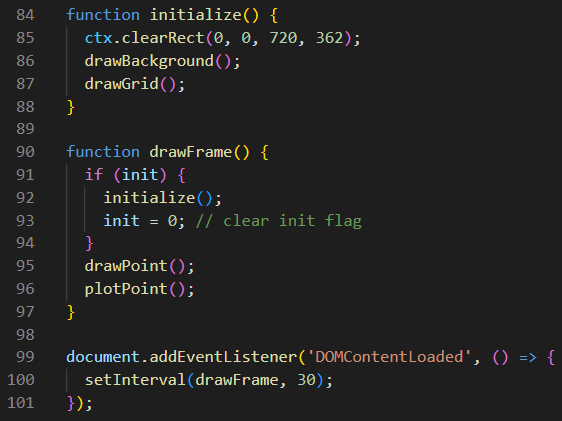
On lines 99 through 101, we are adding an event listener that waits until all of the DOM content is loaded before running the arrow function that in turn, sets an interval to run the drawFrame every 30 milliseconds. The drawFrame function is on lines 90 through 97. The if-statement on lines 91 through 94 first checks to see if the global init variable is true. And the first time this runs, it is true because we did let init = 1; on line 27. And you undoubtedly remember that the number value of 1 and the boolean value of true are considered to be equal in JavaScript. Of course that also means that the number value of 0 and the boolean value of false are also considered to be equal, so there is no need to explain this all over again, right?
Anyway, if init is true, then we run the initialize function on lines 84 through 88 before setting the init flag to 0 (or false). Then, we call the drawPoint function on line 75 through 82. Then, we call the plotPoint function on lines 48 through 73. We will look at those two functions later.
Now, let's look at the the initialize function on lines 84 through 88. Line 85 is how we clear the canvas. The canvas is a basic rectangle that starts at coordinates x = 0, y = 0, and it ends at coordinates x = 720, y = 362. And that is the easiest possible way to explain ctx.clearRect(0, 0, 720, 362);. But wait! As soon as we cleat the canvas, we call the drawBackground function, and then we call the drawGrid function after that. Let's look below to see what each of those functions do as well.
Now don't forget that ctx stands for context, and that is just another name for the canvas that we are working on, OK? Now on line 30 inside the drawBackground function, we are simply setting the fillStyle to the color black. Line 31 looks a lot like line 85 that was ctx.clearRect(0, 0, 720, 362); only line 31 is ctx.fillRect(0, 0, 720, 362); instead. See? First, we clear the canvas, then we fill the canvas with the color black.
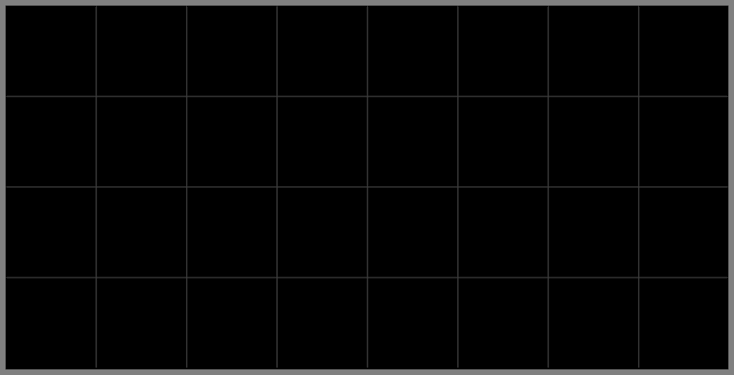
Click on the Blue Box below to show the Drawn Grid
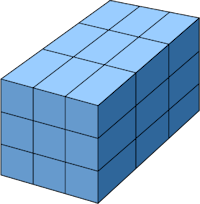
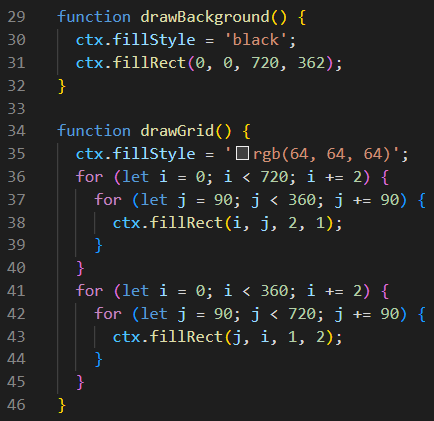
The drawGrid function on lines 34 through 46 is a bit more complicated. On line 35, we are simply setting the fillStyle to the color rgb(64, 64, 64) which is a shade of gray. That's the easy part, but don't let the four for-loops confuse you. Let's get the big picture first. We are simply drawing gray gridlines here. So try to think of the index variables i and j in terms of x and y coordinates. Of course, x is horizontal, and y is vertical.
The for-loop on line 36 goes from x = 0 to x < 720, two pixels at a time, while drawing rectangles that are two pixels wide and one pixel high. The end result is a horizontal gray gridline. But it is line 37 that determines where each line will be drawn. The for-loop on line 37 goes from y = 90 to y < 360, ninety pixels at a time. The end result of that is three horizontal gray gridlines at y = 90, and y = 180, and y = 270.
Now try to think of the index variables i and j in terms of y and x coordinates respectively. Of course that is just the opposite of what we did before because this time we are drawing seven vertical gray gridlines.
The for-loop on line 41 goes from y = 0 to y < 360, two pixels at a time, while drawing rectangles that are one pixel wide and two pixels high. The end result is a vertical gray gridline. But it is line 42 that determines where each line will be drawn. The for-loop on line 42 goes from x = 90 to x < 720, ninety pixels at a time. The end result of that is seven vertical gray gridlines at x = 90, x = 180, x = 270, x = 360, x = 450, x = 540, and x = 630.
Congratulations! Your canvas is now initialized with a clear canvas that is filled with the color black, and complete with both horizontal and vertical gray gridlines. You are now ready to run the drawPoint and plotPoint functions, which will occur every 30 milliseconds until we reach the end of the canvas. At that point, we will set init to true once again, and that will trigger another initialize which will in turn start the drawing and plotting from the left side of the canvas all over again.
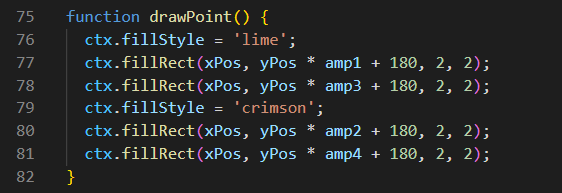
So what is actually happening here? The drawPoint function is taking the coordinates it gets from those global variables we declared in the beginning, and then it is drawing two sine waves in lime, and two cosine waves in crimson. One of the sine waves and one of the cosine waves is 180 degrees out-of-phase with the other one. And all that means is that it is going in the opposite horizontal direction.
Let's look at this function below. Lines 76 and 79 are setting the colors for these four waveforms. And then lines 77, 78, 80, and 81 are filling little 2-pixel-by-2-pixel rectangles in one of the two fillStyle colors selected. The end result is (what appears to be) four little dots in either the color lime or the color crimson. Then, it needs to run the plotPoint function to get the coordinates for the next set of four little rectangles.
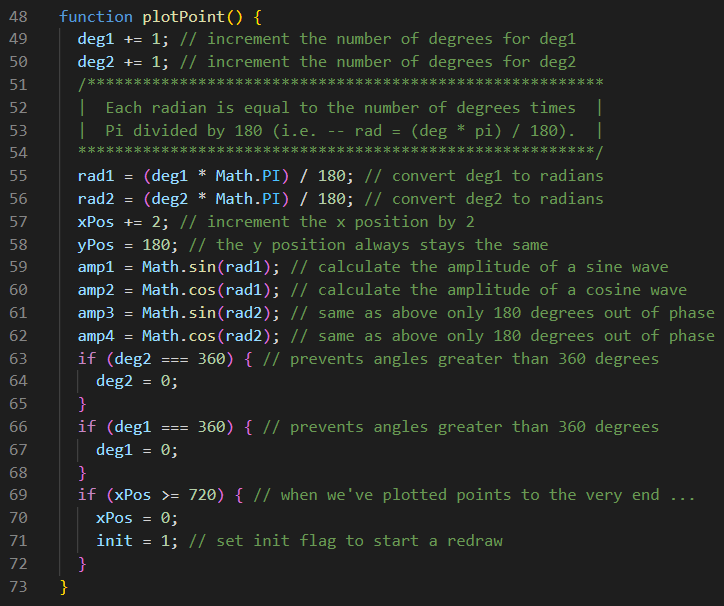
Luckily for us, this programmer documented the plotPoint function with lots of great comments. They are very helpful in trying to understand how it calculates the four points for the next cycle of the drawPoint function. There is lot going on there, and if you are a mathematics major, then you will probably find this part of the script absolutely fascinating! For the rest of us, we only need to know that xPos is the x or horizontal direction, and that yPos is the y or vertical direction. We also see that all measurements in degrees must be converted to radians for JavaScript because it only works with radians. And of course, it is always difficult to work with trigonometric functions without our old buddy Math.PI (π). But it is the amplitude of our waveforms that create the beautiful curves we see, and they are calculated using the Math.sin() and Math.cos() static methods used on lines 59 through 62.
Fixing the Bug
But there is a bug in this program! And you probably would not have noticed it if we hadn't pointed it out. It's a very tiny bug, but it is one that you will see if you are really looking for it. When this script runs for the very first time, both crimsom plot points are happening on top of the lime plot points. See that little red dot on the left side of the canvas? It only happens during the very first cycle of the drawPoint function, because it gets corrected by first cycle of the plotPoint function, and so you will never see it again. Is that crazy? Or what? One little red dot is supposed to show up in the upper left-hand corner of the canvas, and another little red dot is supposed to show up in the lower left-hand corner of the canvas, but both of them are being drawn on top of the two little green dots in the middle of the left-side of the canvas. To see this bug visually just click here to run the program. And if you miss it, just refresh your browser screen. And notice that, after another initialize happens, and the second time it draws the waveforms, the red dots show up where they are supposed to be.
So what's the fix for this? Will fixing this bug require a massive rewrite of the entire script.js file? Actually, the answer is no. Sometimes tiny bugs can be fixed by tiny improvements in the code. Believe it or not, you can fix this bug yourself by changing the values of two of the global variables at the top of the script. Right now, line 24 reads as let amp2 = 0; and line 26 reads as let amp4 = 0;. If you change those two lines of code, this bug will be permanently fixed for you, but it will still be broken on our website. Anyway, simply change line 24 to let amp2 = 1; and line 26 to let amp4 = -1;. Then, run the program again after making these changes. Now those red dots appear in the two corners of the canvas where they are supposed to be on the first cycle of the drawPoint function. You have now successfully debugged your own version of the JavaScript Oscilloscope program!
Random Number Generators
Did you know that Random Number Generators are so common in computer programming that they have their very own acronym? Well, it's true! If you ever hear some programmer talking about an RNG, you will now know WTH they are talking about, OK?
This project is more of a tutorial than a coding exercise. Our goal with this project is to fully explain the intricacies of this method that is used for generating random numbers. Games especially rely on this ability. But it is used in many other ways, like scrambling the order of questions in an exam to make it more challenging. This method can actually be used in myriad ways. However, talk is cheap. When you are ready to dive right in to look at the code in this project, and to learn from the three-part tutorial that it offers, please download and open this project in VS Code.
But before we wade deep into the code behind this project, let's use this tutorial to learn how to generate random numbers which is actually its greater purpose. The first thing you will notice when the project opens is that this tutorial is presented in three parts.
The Three Parts
In Part 1, we are going to learn how to create ten random numbers in four different ways. The first way is the generic way of Math.random(), and when you click on that button, this method will create ten random floating-point numbers between 0 and 1, not including 1. The output box at the bottom displays a new set of ten random numbers each time you click the first button. As you can imagine, this has limited usability. The second button of Math.random() * 10 simply multiplies the generic way by 10. This method will create ten random floating-point numbers between 0 and 10, not including 10. Perhaps you are beginning to see where we are going with this. The third way of Math.floor(Math.random() * 10) creates ten random integers between 0 and 10, not including 10. Oh, wouldn't it be grand if we could generate random numbers in a range between 1 and 10, including both 1 and 10? And to accomplish that goal, all we have to do is add 1. So the fourth way very simply becomes Math.floor(Math.random() * 10) + 1. This may seem like a convoluted way to get the job done, but it is actually very easy to learn once you get used to doing it. Now, let's look at Part 2.
In Part 2, we give you all the tools you need to create a Custom Randomizer. To use it, you simply type the lowest number you want in your range of random numbers in the top input box, and you type the highest number you want in your range of random numbers in the bottom input box, and then you click the button. Click the button as many times as you like to ensure that the range of random numbers being generated is acceptable to your needs. Nothing can go wrong as long as your top number is an integer that is lower than your bottom number that must also be an integer. You can even use negative numbers, if that is your desire. And once you are satisfied that you have a Custom Random Number Generator that works for you, simply copy and paste the formula at the bottom of the page into your script.js file. Pretty nifty, eh?
IMPORTANT NOTE: In Part 2, you may get some silly results if you set your lowest number to 1. For the sake of argument, let's say that you set your lowest number to 1 and your highest number to 10. We already know from Part 1 that the formula for that is Math.floor(Math.random() * 10) + 1. However, the formula that Part 2 will produce for you looks like this: Math.floor(Math.random() * 10 - 1 + 1) + 1. And that formula works perfectly well because subtracting 1 from 10, and then adding 1, still gives you the result of 10. Because of the offsets required to generate any random number between two numbers, including the lowest and highest number, this silly math is required. But we already know you are smart enough to figure that out for yourself, but we just wanted to mention this anomaly in passing.
But wait! Part 2 works just fine as long as you only require integers. What if your program requires floating-point numbers? That is an excellent question! And later, we will present you with a Challenge to solve this problem yourself. But we will present this challenge to you after we look at the project code, OK?
In Part 3, we simply explain everything all over again, just in case you are using this program at some point in the future, but have forgotten everything you once knew about the Math.random() method. And we hope you find this tool useful. But now, let's look at the code behind this project.
The Project Code in Part 1
The project code shown below is the HTML content found inside of the document body of the index.html file. And since this is the first page that loads when you launch the web page, it will always land on this code for Part 1. On line 15 through 21, you will find this simple navbar, and it appears at the top of all three HTML files in this project. On line 23, we are using the special character ♦ and that is what produces the ♦ diamond in the middle of the <h1> heading. You will also find that symbol on all three HTML files in this project. And of course we could have simply added the Unicode ♦ character without using a special character as long as we have this line <meta charset="UTF-8"> somewhere inside the <head> section of our HTML web page. That line of code tells the web browser that it can accept Unicode characters just as easily as any other text. But you already knew that, so let's move on.
On lines 26 through 43, we have a container div with 4 item divs nested inside of it. You've seen this used many times before so long explanations are basically unnecessary. However, each item div has a button with an appropriately numbered id assigned to it, and below the button, there is a paragraph. And without bothering to show the CSS code for this project, we can tell you that the container div is a simple flexbox that defines flex-direction: column; as one of its rules. Of course this div has a second class name of mbot. That class simply adds 20 pixels of margin to the bottom of the div. And you will find that class used at various places within this project, and that is why it deserved a separate class name.
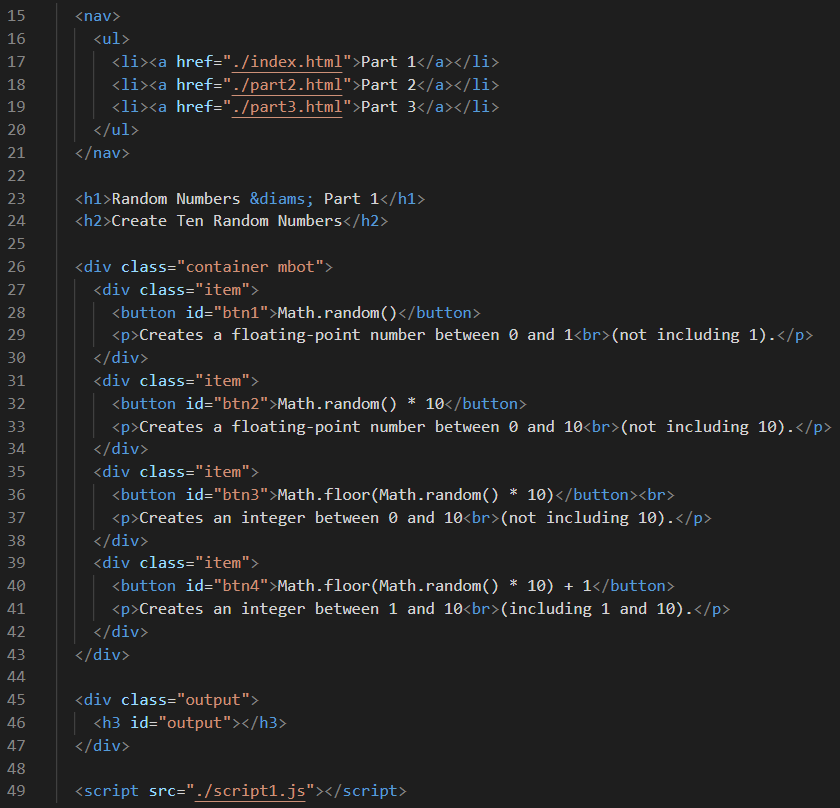
On lines 45 through 47, we have a div with a class of output, and nested inside of that div we have an <h3> element with an id of output. That is perfectly acceptable HTML code. When Chevy Chase drives his classic '57 Chevy into valet parking at his favorite restaurant, the parking attendants don't ask to see his id, and they certainly can tell the difference between him and the obvious class of his car. HTML is smart like that too! Anyway, this output div is where the script1.js file will output the ten random numbers it generates by the clicking of one of the 4 buttons in the container div above. It really is as simple as that. And it goes without saying that any website can have multiple numbers of HTML files, CSS files, and JavaScript files, but we just said it anyway. Now we should look at the script1.js file.
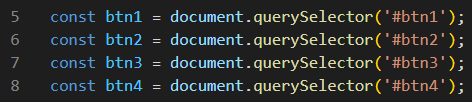
On lines 5 through 8 below, we see four const variables being declared. These global variables can be accessed from anywhere inside the script. And it should come as no surprise that these are the locations of the four buttons used by events in this script.
Of course line 59 below tells the browser to wait until the DOM content is loaded before launching the init function on line 46. And guess what it does as its first order of business? If you guessed that it adds click event listeners to each of the four buttons we defined as globals, you would be correct! Oh look! Each button launched a function with a name similar to the button name. So btn1 launches the doit1 function when clicked. Maybe this script is too simple to need explanations, So for that, we apologize.
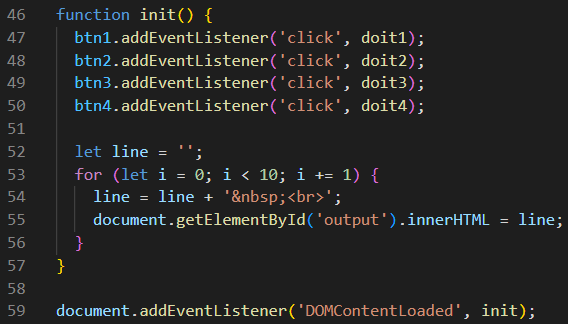
We might need to explain lines 52 through 57 above. On line 52, we create a let variable named line and assign an empty string to it. The for-loop on lines 53 through 56 does two things. First, it concatenates a non-breaking space (or ) and a break tag (or <br>) to the line variable, which was nothing more than an empty string before. And then it outputs that line (ten times) as a way to clear out any previous data that was in the output div. Yes, you are 100% correct! Line 52 could have been written as const line = ' <br>'; and that would have eliminated the need for line 54 entirely.
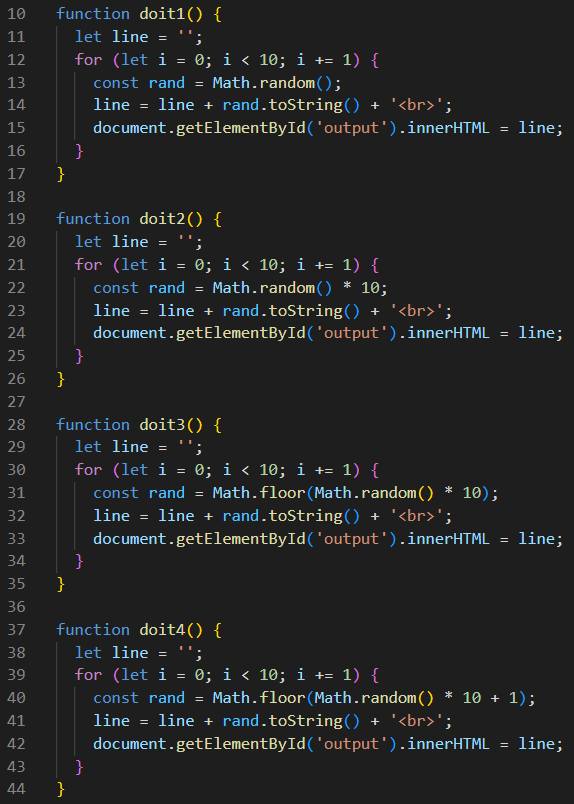
Now, let look at the four doit functions below. All four of them are very similar. And of course, the little trick we played with lines 52 and 54 above in the init function will not work here. Why is that? Well, it is because the rand const variable in each of these four functions is being concatenated to the line variable, and you simply cannot alter a const in any way after it is defined. But of course the rand variable needs to be converted to a string variable before concatenation, and we also need to concatenate a break tag to the end of that string. So what is actually happening here? Yes, the rand Math object formula is being used (ten times, as per the for-loop) to generate each of the ten random numbers that will be displayed in the output div at the bottom of the page.
But wait! How come the rand variable can be a const, and the line cannot? Isn't the rand generating a different random number through each iteration of the for-loop? Would you not consider that a change to that variable? And the answer is both yes and no. Yes, that variable changes in value with each iteration of the for-loop. But also no. Since that variable has block scope inside of the for-loop, the change is long forgotten by the time the next loop iteration occurs. We admit openly that variable scope can often be difficult to understand in the beginning. And yes, we certainly could have declared rand with the let keyword. But this was a great example of block scope, so we could not pass up this opportunity to show you an example in practice. And if all four of these doit functions look similar, that is because they actually are. The only real difference between them is the Math object formula used by the rand variable. Later on, we will show you a way to combine all four of these functions into only one function by sending the formula as a parameter.
The Project Code in Part 2
The HTML code in Part 2 differs a bit from the code in Part 1. One difference begins with line 26 in this container div, which requires no mbot class. And there are only three item divs inside this container, but each one is different. One major difference in Part 2 is that we have two inputs of the number type. You may have seen very few input elements up to this point, so we will describe these two inputs for you now. Line 28 tells you right away that this input is of type="number". That means that it only expects, and will only process, data entered that is of the number primitive data type. Notice that both the inputs on line 28 and line 32 have an associated unique id that will identify which one is the lowest input, and which one is the highest input. Both inputs also have range-limiting min and max values that give us the ability to put an acceptable range on the values entered into these two inputs. Lastly, each has a default value. The lowest is set to 50 by default, and the highest input is set to 100 by default. The paragraphs in lines 29 and 33 help explain the intended use for each of these input elements to the user.
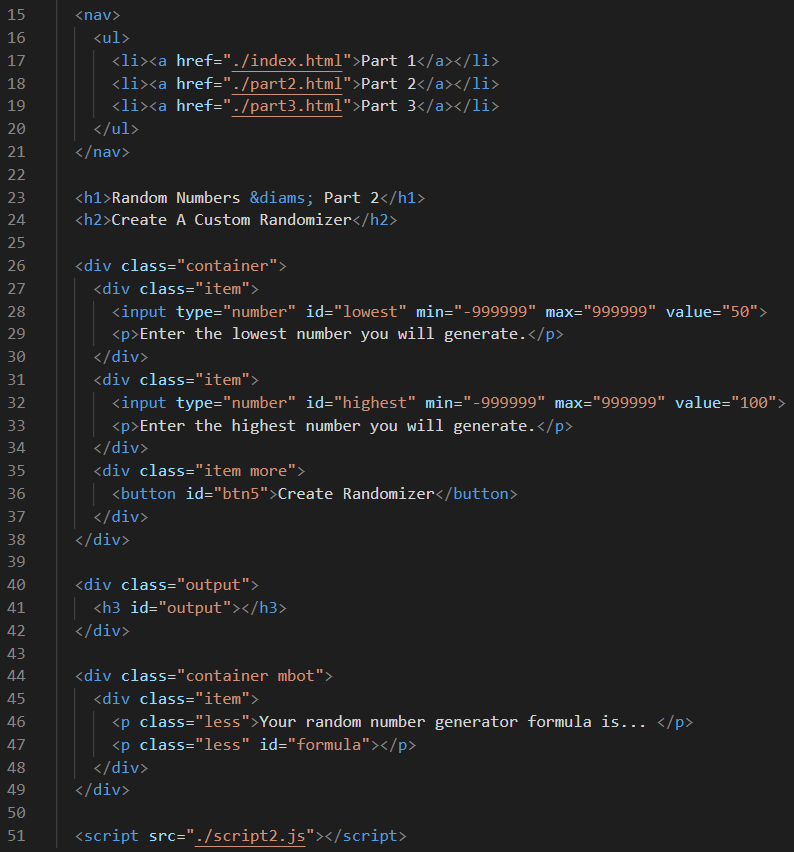
The item div on line 35 has two classes. The second class name associated with this div is named more, but there is nothing magical about the more class that only serves to add 5 pixels of margin and 5 pixels of padding to this div. On line 36, we have a button with the unique id of btn5, just to continue our current scheme of button numbering. Lines 40 through 42 have the very same output div code that we saw in Part 1. Lines 44 through 49 are something new. The div on line 44 has two classes, and we already know what both of them are all about. But this container div only contains one item div which contains two child paragraphs, both with the class of less. The less class only serves to define 0 pixels of margin and padding for these two paragraphs. However, the paragraph on line 47 has the unique id of formula. From what you know already about this project, we are guessing that have some idea what kind of data we can expect to show up there, right? And of course, on line 51, we link this part2.html file to the script2.js file. Having two script files prevents confusion between either one or both. Now let's take a look at that script2.js file.

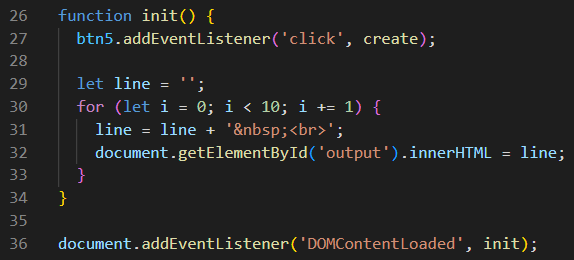
Ah yes! On line 5 above, we see that we have one declared global variable. And on line 36 below, we see that the init function is called when the DOM content has loaded completely. On line 27, we add a click event listener for btn5 that launches the create function when that button is clicked. The rest of this function requires no further explanations.
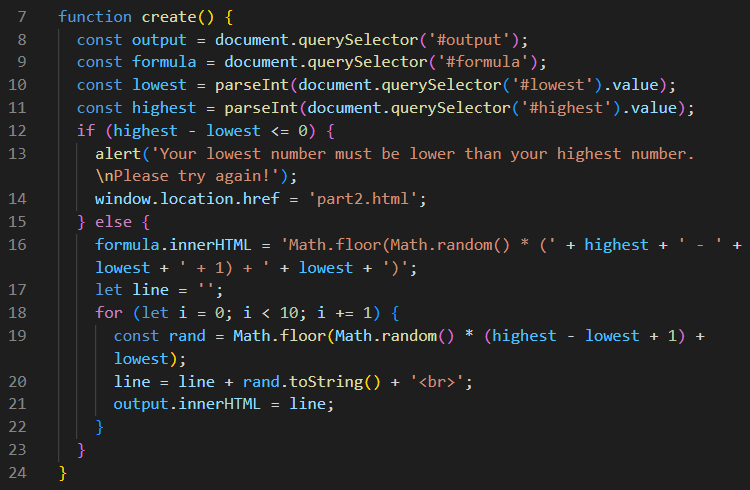
So now, let's look at that create function as shown below. And the first thing we see is that we have two const variables for the output and the formula. These could have been declared as global variables just as easily. But this works, so why should we fuss about that? Well, one good reason is because the next two const variables for lowest and highest could never be declared as globals because this function requires access to their values locally. The if-statement on line 12 is there to prevent the user from entering the lowest and the highest values in the wrong order. If that happens, then an alert is generated, and the page reloads. However, there is a bug here that allows the user to enter blank inputs, and we will show you how to prevent that bug from happening in the near future. The rest of this function is mostly self-explanatory. the const named rand on line 19 does all the heavy-lifting. But line 16 displays the formula for the user, and this is perhaps the most important part of Part 2 (pun intended).
Since Part 3 has a lot of HTML text content and CSS styles, with no JavaScript at all, we will leave it up to you to look at that code on your own.
The Dollars 💵 and Cents 🪙 Challenge
This challenge will ask you to create a project called Dollars and Cents. The end goal of this project is to create a function that creates a formula that anyone can cut-and-paste into their own project for a random generator that generates random numbers in Dollars and Cents. Your project should allow the user to generate a random number (or a group of random numbers) between 0.01 (one cent) and 1.00 (one dollar). Since Part 2 only works with integers, you will need to figure out on your own how to convert your formula to floating-point numbers in that given range of 0.01 to 1.00, including both.
As a separate project, please make a copy of the my-template project in your JavaScript Coding Course folder. And if you cannot locate that, then please download a new copy of that project zip-file here. Your challenge will be to use as much of the code in the part2.html file in your own index.html file, and as much of the script2.js in your own script.js file, and CSS styles from the style.css file as well. Give your project the title of Dollars and Cents. Hopefully you will find this project to be both challenging and fun. Good Luck!
RNG Version 3
There are better ways to write much of the code in RNG Version 2, the project you just worked on. However, we will allow you to download this RNG Version 3 project so that you can look at the code inside. Yes, it works the very same way, but the code is more compact and often more complex, especially in the script1.js file. We will skip another series of long explanations, but you should be able to compare it against the RNG Version 2 code to get a good idea about how these changes make RNG Version 3 much more efficient and much better overall.
Oh, and one last thing we almost forget to mention: the problem we had with being able to enter blank inputs in script2.js is now fixed in this version. The magic there is all part of the isFinite() top-level function. Its main purpose is to determine if a value is a finite number. If so, it evaluates to true. However if the value is found to be Infinity, -Infinity, or NaN, then it evaluates to false. So try to enter a blank into both or either of the inputs, and the appropriate alert will appear to inform you that you must enter valid data.
The JavaScript String Object
Although the Math object can be fun to work with, you will undoubtedly use the String object much more often. Generally speaking, websites contain lots of text. And it is difficult to imagine a scenario where you will not use string variables and string methods to manipulate the text on your websites. And of course, we always try to provide good online reference documents each time we introduce a new subject. For upfront explanations that are often the easiest to understand, we usually prefer W3Schools JS String Reference, but for a much deeper understanding of almost any JavaScript subject, it is hard to avoid reading about these subjects on MDN.
One major difference between the Math object and the String object is that the Math object is a static object. That means that it has no built-in constructor. For that reason, You could never create a new Math() object in this way, but you can create a new String() object, even though that is probably not something you will do very often. It is difficult to talk about constructors without a lengthy discussion. But for now, just make a mental note that constructors exist, but not for Math objects, so we can move on.
Your knowledge of string primitive data types should be pretty good by this point in the course. You certainly know the differences between strings and numbers. And you know the differences between the addition operator we use on numbers and the concatenation method we use on strings, right? If we asked you how "1" + "1" could possibly be "11", you already know the answer, right? And we've already had a quick crash course on template literals, so you know the value of using backticks, and the differences between using single-quotes and double-quotes, especially when either of those characters are used inside of a string, right? And you know already know how to escape one of those characters in a string as well, right? So... 'Don\'t say you don\'t!' But anyway, there is so much more that you can do with strings, and that is what these next few lessons are going to teach you.
String Methods
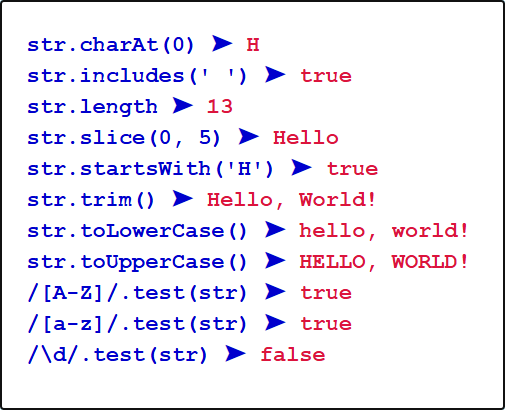
The String Methods Tests project was designed to give you a quick preview of the ten string methods used in the next project after this one, plus one string data property as well. Go ahead and click on the link in the line above, and we will briefly explain what each line of the code does behind each line of output.
The first thing to know is that the string variable named str was assigned a value of 'Hello, World!'. On the third line, we are getting the data property of that string, so we now know that the length of str is 13. Now, let's look at the first line, which is almost self-explanatory. That line is telling us that the first character of the string, or charAt(0), is H. We could have used any number from 0 to 12 here. For instance, str.charAt(9) is r. You will find that this is a very useful string method for extracting substrings from within other strings.
On the second line, we are looking at the string str to see if the string includes any blank spaces. It does, so it reports true. On the fourth line, we have decided to take a nice slice out of this string. And the slice we took had started with the first character and ended before the fifth character. The result is what we expected. On the fifth line, let's suppose that we did not already know that this string started with an H. In that case, it would return the boolean value of true if that the string starts with that letter, and it would return the value of false if it did not. The sixth line is very handy. It simply trims the leading and trailing spaces from any string, which is useful wehn taking input from a user. So a string with lots of leading and trailing spaces like Bob Smith would become Bob Smith after it was trimmed.
Lines 7 and 8 can be incredibly useful when taking user input. People who use cellular phones are notorious for never entering text using capital letters. Or they might enter their name in all caps, which can also be annoying when you are trying to collect valid data for a (let's say) user database. For those reasons, the two string methods of toLowerCase() and toUpperCase() can be very useful. And on the last three lines, we are using the test() method by sending str as a parameter to that method. However, we are testing the string for the three Regular Expressions that are listed there in order. And just FYI, Regular Expressions will be covered better in a future lesson. But for now, all you really need to know is that /[A-Z/ is the regular expression that tests to see if a string contains any uppercase letters. If it does, it returns true. And /[a-z/ is the regular expression that tests to see if a string contains any lowercase letters. If it does, it returns true. And /\d/ is the regular expression that tests to see if a string contains any numerical digits. If it does, it returns true. But wait! Hello, World! does not contain any numerical digits! Oh yeah! So in that case, it returns false.
Yes, it is true that there are many others string methods and a few more string data properties. But we will let you expore the vastness of this subject on your own. This project is here only to give you some idea what we will be learning in the next project. And even though it is not required, please feel free to download the zipped-up String Methods Tests project files as well. We will not be taking this preview project apart one line at a time, but you are more than welcome to sift through all of this code on your own.
Join Our Chat Room
Well, this is not really an invitation. We actually do not have a chat room for you to join. But the very next project is called Chat Room. So click on the link on the left to get a glimpse of what we will be working on here. And please feel free to play around with the user interface for this project.
But before we do a deep dive into the code for this project, we want you to know that our primary focus will be mostly on the string methods used here. The subjects of forms and user inputs will be covered later in other lessons. However, it will be necessary to briefly discuss program flow control, even though we are not strong proponents of designing elaborate flowcharts and wireframes. Instructors in other web development courses will often demand that you produce beautiful flowcharts and wireframes. But we feel that learning to write code is a much better use of your time. If you want visual flowcharts, then just ask an AI chatbot to create them for you. Anyway, that's our staunch philosophy and policy on flowcharting your projects.
Nevertheless, this is a huge project with a lot of code. So if it seems like we are rushing through it without explaining every single minute detail, that is because we actually are. So now, it is time to download, unzip, and open in VS Code the project files for Chat Room. When you are ready, we will start exploring the code.
HTML Code
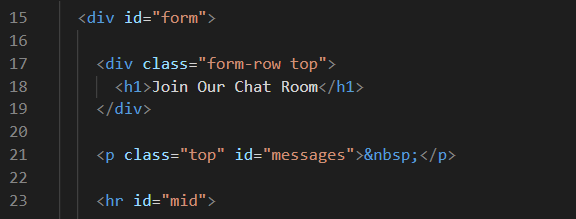
We will present the HTML content in the index.html file in three sections. The opening tag for the container div for this project starts on line 15, and it has an id of form. We decided that we would emulate a form rather than actually create one. The only other element of great interest here is the paragraph on line 21 that has an id of messages. We will send updates to this paragraph through JavaScript to help inform the user of the status of the form while they are filling it out.
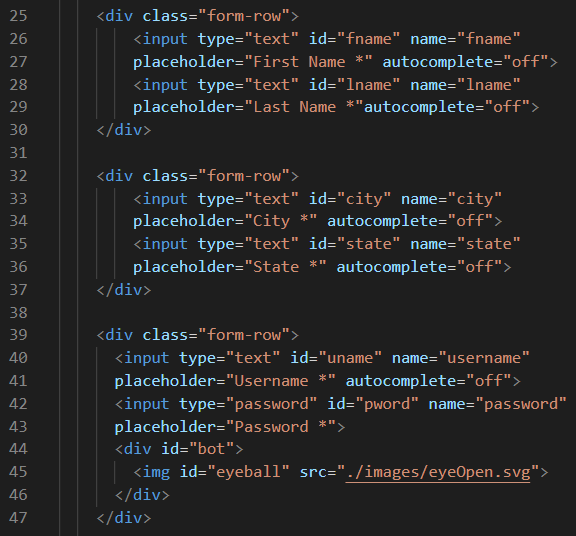
This middle section contains three form-row divs, and each one contains two user inputs. The data they will contain includes the user's first name, last name, city, state, username, and password. We abbreviated some of the ids to fname, lname, uname, and pword, and the placeholder text makes it obvious what data is expected to be entered into each input field. And the messages paragraph above will help to clarify what data is expected. Notice that the first five inputs are all of type="text", but the sixth input starts out as type="password". The difference between an input with a type="text" and a type="password" is that the characters typed into the password field are hidden and replaced by a little dot. However, you will notice that we also have added an eyeball image at the end of the third form-row, and clicking on that eyeball will toggle the input type of the password field so that it can be revealed or hidden, depending on the wishes of the user typing the data.
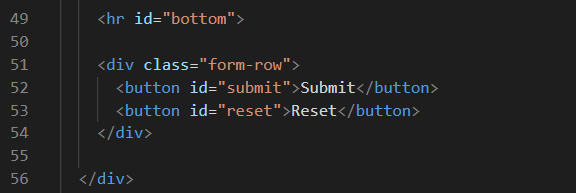
This bottom section contains one last form-row and it contains two buttons: one to Submit the data typed into the form; and one to Reset or clear all of the data in the form. The closing tag for this container div is on line 56.
CSS Code
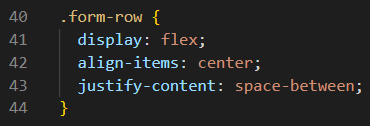
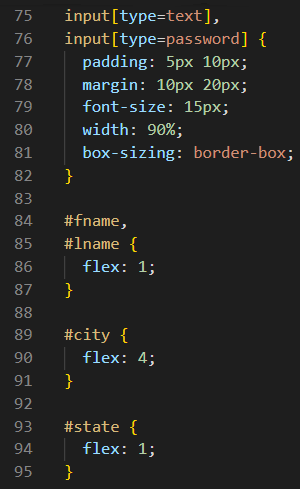
Since this course is about learning JavaScript, we will quickly run through the CSS code. Notice in the code block below that each form-row is a standard flexbox with CSS flex rules that should be very familiar to you by now.
And within each form-row are two inputs with CSS rules defined below on lines 75 through 82. However, you probably have already noticed that some of these input fields are of different widths, and that is caused by assigning each input a flex property with a number value. Notice that fname and lname have the same width, and that is due to the fact that both of them are assigned a value of 1. But the name of each city will be much longer than the two-letter abbreviation for the state so we assign the city a flex value of 4, and that will make it four times wider than the state.
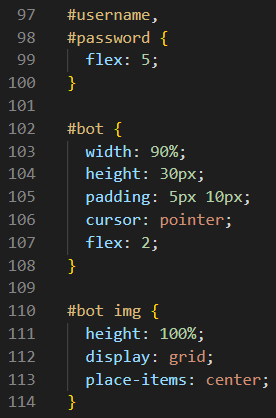
On this third form-row, we had to make room for the eyeball image at the end of the row, so we settled of this fuzzy math that makes the uname and the pword 2.5 times wider than the eyeball image. Since flex only allows integer properties, we had to do it this way for the best fit.
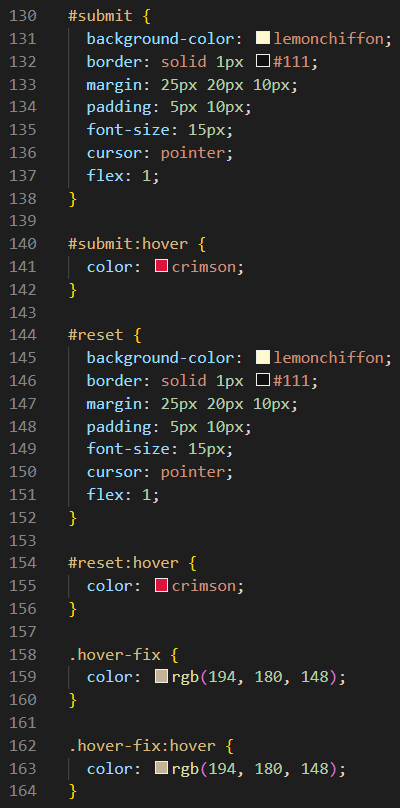
The CSS rules for our two button elements are shown below. Originally we tried to style both buttons the same. And as you can see, both buttons are styled exactly the same, including their hover colors. But we ran into problems when we had to disable the Submit button, and the only way to solve that was to add a new class named hover-fix, with its related pseudo-class named hover-fix:hover. You will see how that happens when get into the JavaScript code.
JavaScript Code
Wow! Just look at all the global variables that are declared at the top of this script file! Lines 5 through 14 should make perfect sense to you now that you've seen the index.html file. Line 15 is an array that contains the two-letter abbreviations for every state in the United States, plus the District of Columbia, and the five U.S. territories of Puerto Rico, the U.S. Virgin Islands, Guam, American Samoa, and Northern Marianna Islands. To include the U.S. mail codes for our three Freely Associated States, and our three Military Mail Codes, that would require adding six more. And if we were to include the abbreviations for Canada, that would've require 13 more. We love our Canadian friends! But this project is for demonstration purposes only, was not intended for use in real life, so let's move on.
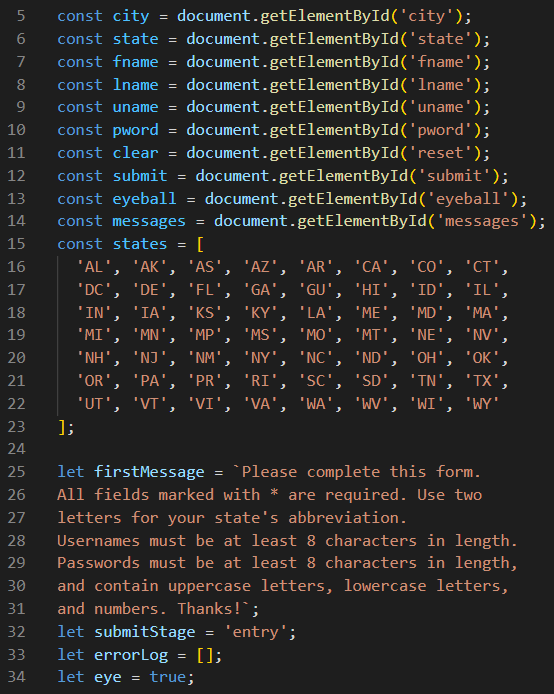
Besides these 11 const variables above, we also have declared 4 let variables as well. These are actually important. On line 25 through 31, we declared a let named firstMessage. Since that is the long string that appears when the project first loads, it deserved a separate variable. And since it never changes, even though the messages paragraph does eventually receive different data, this variable could have been declared as a const. The variable named submitStage is required so that the user gets a chance to fix errors and/or change data entries before final submission. If there are any errors, they will be added to the errorLog array. And the state of the eyeball is being tracked by the eye boolean. If eye is true, then the password is being hidden. If eye is false, then the password is completely visible.
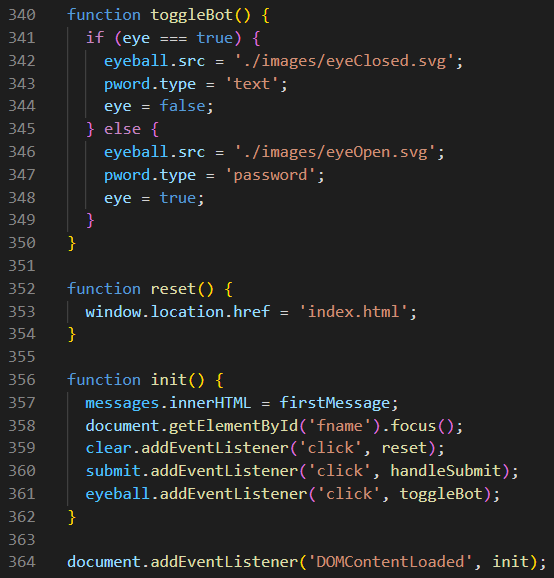
Now let jump all the way to the bottom of the script.js file. We've seen similar code in the past. After this newly-added event listener detects that all of Document Object Model (DOM) is loaded into memory, it will launch the init function on lines 356 through 362, and we see thatit has five tasks to accomplish. First, it displays the firstMessage text inside of the messages paragraph. Next, it sets the focus on the fname input, which basically just means that the blinking cursor no resides inside that user input. Lastly, we add three click event listeners. A click on the reset button (named clear here) will launch the reset function on lines 352 through 354, which essentially just reloads this web page. A click on the submit button will launch the handleSubmit function which we will look at next. And lastly, a clicking on the eyeball calls the toggleBot function, which simply changes the eyeball image, while it toggles the type of the pword input between the types of text and password. Now let's jump down to the next block of code which contains the code for the very important handleSubmit function.
Program Flow Control
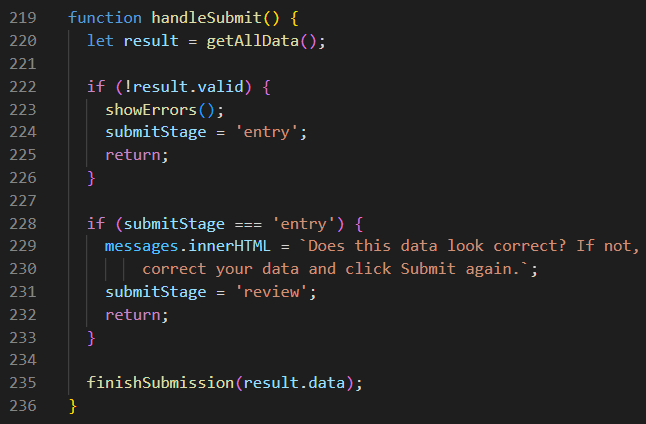
The handleSubmit function acts as the air traffic controller for everything else that happens in this project. As you might recall, we assigned entry to the submitStage variable on line 32 during our global variable declarations, but submitStage might eventually be assigned review on line 231, if all goes well up to that point. Hey, somebody needs to be the boss, and it might as well this function, right? Now let's take a closer look at this function line-by-line.
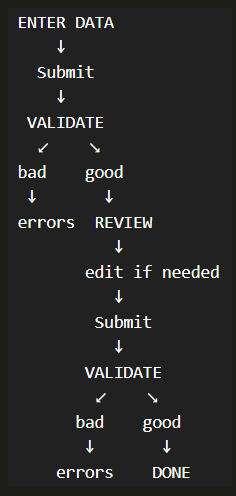
On line 220, we call the getAllData function, which returns a result that we assign to the variable named result (seriously, we are not trying to be funny here). But then we test to see if the result we got back is valid on line 222. If it is not, then we call the showErrors function, and then we reassign entry to the submitStage variable. And then, we return back to the beginning of this function to do line 220 all over again. However, if the data was valid, then program control moves us down to the if-statement on line 228. And we already know that the condition on line 228 is 100% true, so we print the message on lines 229 and 230. And then, we assign review to the submitStage variable before we return back to the beginning of the function. This will give the user one last chance to change any of the data before the last and final run of the handleSubmit function. So on this run, we once again getAllData, and assign it to the result variable. And if the result is valid, it skips over the if-statement on line 222, and then it skips over the if-statement on line 228 because that condition is no longer true. And then, it calls the finishSubmission function on line 235, while sending results.data as a parameter to that function. Of course, if line 222 would have detected invalid data, then we would need to showErrors once again and we are back in our entry submitStage once again. Hopefully you will find the flowchart shown on the right to be helpful.
But before we get into all of the code in the gargantuan getAllData function, let's take a peek at these other two functions we mentioned: the showErrors function and the finishSubmission function. If any errors were detected, then we need to inform the user so that they can correct them. On line 197, we start by assigning an opening <span> tag and some text to the errorMessages variable. Then on lines 198 though 205, we concatenate each of the errors we found in the errorLog (plus some punctuation, and a closing </span> tag) to the errorMessages variable before we display it for the user on line 206. We did not show you this when we were looking at the CSS code, but everything inside of the span tags will be displayed in the color crimson, which seems rather appropriate for error message, right? And we are sure that you are wondering where this errorLog came from, correct? Yes, it is created in the getAllData function when the data evaluated is not valid.
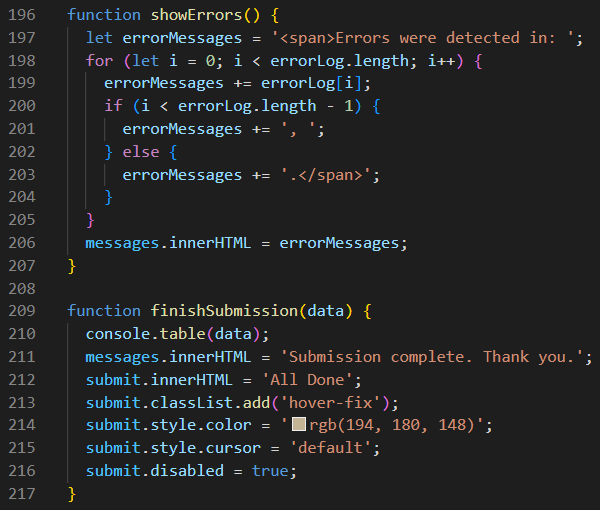
However if all of the data was valid, and it was reviewed and/or corrected before that final click of the Submit button, then we called the finishSubmission function which accepts data as a parameter. And we already know that result.data was sent to this function from line 235 inside of the handleSubmit function. So on line 210, we send a table of this data to the console. Of course, the user probably has no idea that this data is being displayed there. But you can see it if you right-click on that web page and select Inspect, and then click on the Console tab. Pretty cool, eh? On line 211, we inform the user that the submission is complete. On line 212, we change the legend on the Submit button to All Done, and then on line 213, we add a class to the submit button of hover-fix. And lines 214 through 216 are there to disable the Submit button completely. This means that only the Reset button and the eyeball are available for clicking, and we already know what happens when we click on either of these items.
The getAllData function is absolutely huge, so it will be presented in three separate parts below.
Oh look! On line 240, we are making sure that we start off with an empty array assigned to our errorLog. Then on lines 242 through 249, we are creating an object named data that will store all of the data we collect as key-value pairs. And all of those key names and values assigned to them should make perfect sense to you. On lines 251 through 256, we are sending each one of those data values as string variables to the checkForEmptyString function as parameters. And what that function returns is a boolean value of either true or false, which is being assigned to a variable that denotes its validity. For instance, the variable named validState will be assigned a value of true, as long as it was not an empty string. Something as simple as a boolean variable can get confusing at times. Maybe checkForEmptyString was a bad choice for the name of that function. A better choice might have been isNotEmptyString. And we hope that makes sense to you.
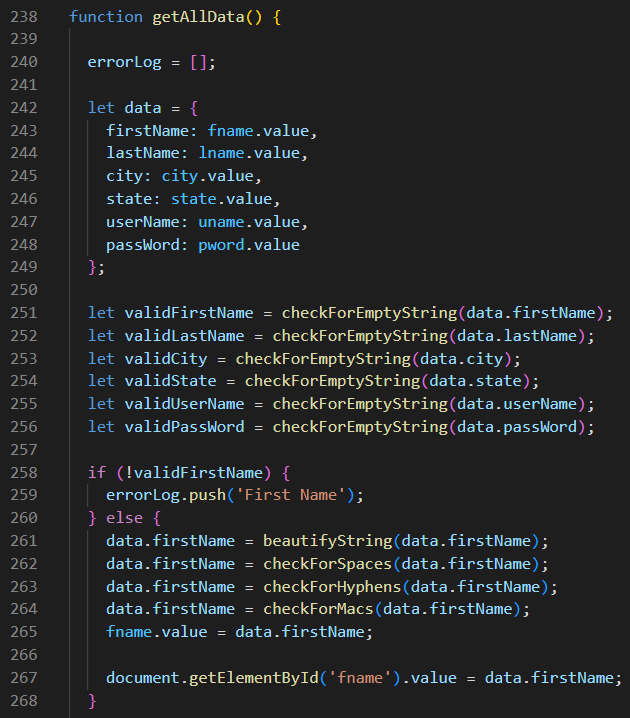
But the real fun begins on lines 258 through 268 as we perform a series of string manipulations on the data that was entered as the firstName. And of course, if on line 251 we found an empty string entered into the First Name field, then the variable named validFirstName is not true, and we will push 'First Name' into our errorLog array, and we are done evaluating the firstName. Otherwise, we perform the functions on lines 261 through 267. The beautifyString function on line 261 simply converts the string entered into a string that has a capital letter as its first letter, and lowercase letters for the rest of the string. For instance, the string robert or ROBERT is converted to Robert. The checkForSpaces function on line 262 looks for spaces within the string and converts the character right after each space to a capital letter. So a name like Anne marie will be converted to Anne Marie. Similarly, the checkForHyphens function on line 263 looks for hyphens within the string and converts the character right after each hyphen to a capital letter. So a name like Jean-louis will be converted to Jean-Louis. And the checkForMacs function on line 264 looks for names that begin with Mac or Mc, and then it converts the letter following that prefix to a capital letter, so a name like Mcdonald becomes McDonald, and a name like Mackenzie becomes MacKenzie. If this project was being created for use on a real website, then we would also need to checkForDes, so that a name like Demarcus would be converted to DeMarcus. And how about a name like Lemans? As you can see, it is not impossible to overthink the possibilities. Anyway, after all of these string manipulations, the converted name is updated in our data object on line 265, and it is also displayed on the form by line 267.
Looking at the block of code below, we can see that the lastName string gets almost the same treatment as the firstName string, with one exception. On line 276, the checkForO_Names function looks for strings that start with an O' prefix. So a name like O'connor will get converted to O'Connor. These types of names are almost always last names, and that is why we did not do this for first names.
On lines 282 through 290, we process our city name similarly, so a city with a name like New york city gets converted to New York City, and a city named Winston-salem gets changed to Winston-Salem. Nothing else new is being introduced in this block of code.
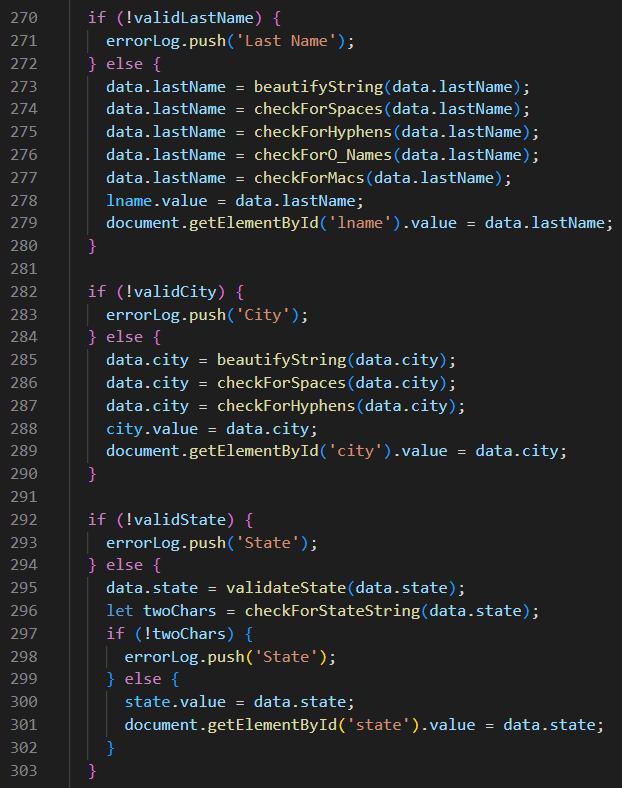
However, we do something completely different when dealing with the state. On line 295, we send our state name to the validateState function as a parameter. That function simply trims off any leading or trailing spaces in the string (as if that had not been done already), and it converts the entire string to uppercase letters. Then on line 296, we send the result of that conversion to the checkForStateString function, and that function returns a boolean that is assigned to a new variable named twoChars. However the checkForStateString function is actually check for two conditions. Yes, it must be only two characters in length. But it must also match one of the 56 different state abbreviations in the states array that we declared as one of our global variables in the very beginning. So a string like ca gets converted to CA and that passes the condition of the if-statement on line 297, so the converted state name is updated in our data object on line 300, and it is also displayed on the form by line 301. However, if the user entered a string like Mass or Fla, those strings are not two characters in length and would make the twoChars variable false. Likewise, if the user entered a string like BC for British Columbia, that would also make the twoChars variable false. In either situation, it would fail the condition of the if-statement on line 297, so line 298 would push the string of 'State' into the errorLog array. Once again, we must state (pun intended) for the record that we love our Canadian friends! But this project is much larger than intended already. And for that, we sincerely apologize.
Now let's take a look at how we validate the userName and passWord in the block of code below. So at the risk of being completely redundant, the validateUserName function on line 308 simply trims off any leading or trailing spaces from the userName. Then on line 309, we pass the userName as a parameter to the checkForEightCharsMin function which returns a boolean of true if the userName string is 8 characters or more in length, and it returns false if the userName string is less than 8 characters. And by now, you know what the remaining code does. Please remember that the only requirement for the userName is that it needs to be at least eight characters in length.
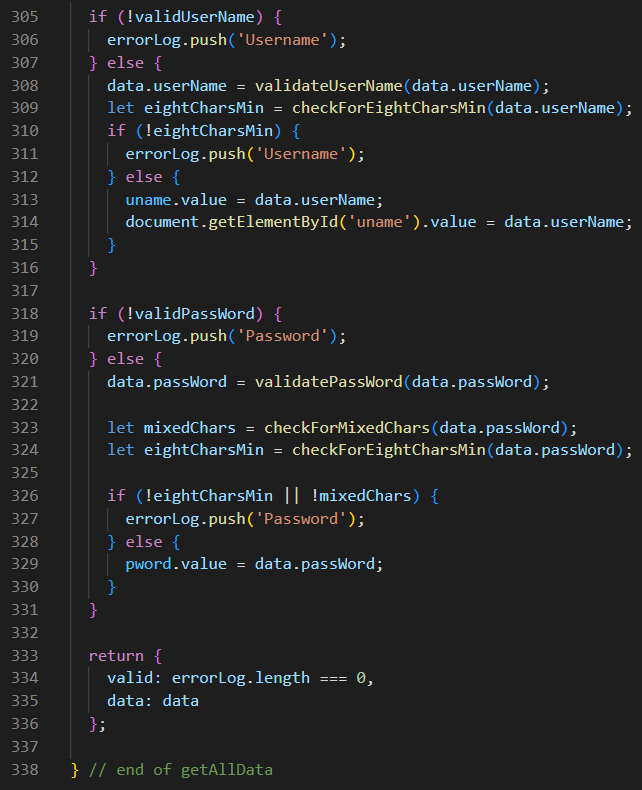
The validatePassWord function on line 321 redundantly trims off any leading or trailing spaces from the passWord string. And just FYI, using spaces in a password is generally considered to be a bad practice, but using them as leading or trailing characters can be especially bad, because the user may have entered spaces by accident, so now their password no longer works. Let's just avoid creating passwords with spaces and this problem will be permanently solved. But let's not forget the other requirements for passWord here. Our password must be at least 8 characters in length, and it must also contain at least one uppercase character, and at least one lowercase character, and it must also contain at least one numerical digit. But luckily for us, all of those requirements can be checked with only two functions: the checkForMixedChars function on line 323 and the checkForEightCharsMin function on line 324, which we saw used on the userName string. And both of these functions return booleans. So the if-statement on lines 326 through 330 does the password validation for us. On line 326, we are checking to see if either eightCharsMin or mixedChars (or both) are not true. And if that is the case, then we push 'Password' onto the errorLog array and we are done. However, if both conditions are true, then we update passWord in our data object as the last step on line 329. Of course there is no need to update the pword field in the form because it is an input of type="password" by default. So if the user wants to see what password they typed, they only need to click the eyeball next to that input.
Now that we have done string manipulations and/or data validations on all six of our form inputs, we have one final step at the end of the getAllData function on lines 333 through 336 above. And that all-important step is to return two items from this getAllData back to the line of code that called it in the first place. And that line of code is line 220 in the handleSubmit function as shown below. So the variable named result will be receiving a boolean value named valid, and the newly-updated object named data. Of course we can see from line 334 above that valid will be true if the length of the errorLog is 0. But it will be false if there were any error messages pushed into that array. And now the rest of the handleSubmit function should start to make more sense. On line 222, we see what happens if valid is not true. But we can also see that the rest of code is doing if it is true. This concludes our discussion of Program Flow Control. Now let's look at all of the supporting Utility Functions.
Utility Functions
Since we did the String Methods Tests project earlier, long explanations may not always be necessary. And click on the link to that project if you need a quick review. For example, once you know what the trim string method does, then the checkForEmptyString function on lines 36 through 43 below is basically self-explanatory, right?
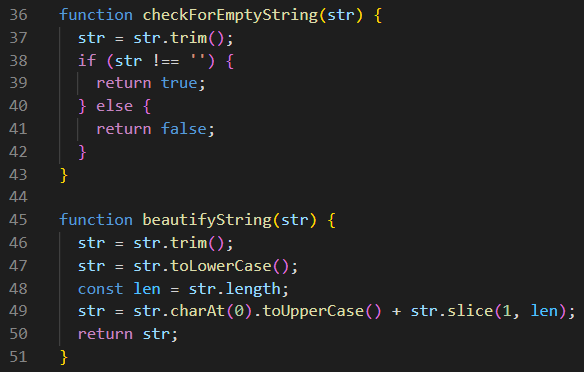
The next utility function is a little more challenging. In the beautifyString function on lines 45 through 51 above, we trim the string. Then, we convert the entire string toLowerCase. Then, we determine the length of the string. Then, we change the first character of the string toUpperCase before we concatenate it to the rest of the string. And once you understand how charAt and slice works, then line 49 really is easy to understand. That means that a string entered as mAYBELLINE will be returned as Maybelline on line 50.
The checkForSpaces function on lines 53 through 84 is a longer function, but that doesn't necessarily mean that is more difficult to understand. And before we look at any of the code, we need to see the big picture. This function is looking for spaces in the middle of the string that we are sending to it. And for every space that it finds, it must convert the character right after it to a capital letter. And so, a string like New york city becomes New York City. Now let's look at the code.
On line 54, we declare an empty array named slices, which will contain those separate words that will need to be capitalized. On line 55, we declare an empty string named newStr, which will hold our converted string at the end. On line 56, We declare another array named spaces, which will mark the location of each word in the string that needs to be capitalized. And just knowing that we need to capitalize the very first word forced us into entering 0 as the first item in that array.
On line 58, we check to see if this string includes any spaces. If it does not, then we skip all the way down to the else on line 81, and the we return the string unchanged on line 82, and we are done. However, if the string does have spaces in it, then on line 59, we find the length of the string, and store that value as a variable named len. Then, the for-loop on lines 61 through 65 then cycles through each character in the string looking for spaces. And when the if-statement on line 62 finds a space, it pushes the location of the next character after each space into the array named spaces. And so technically, the array called spaces does not contain the location of spaces at all. Instead, it contains the location of words that need to be capitalized. So the choice of the variable name spaces is unfortunate. A much better variable name would have been words. Anyway, after the for-loop cycles through all of the characters in the string, and the if-statement locates all of the "spaces", then the len variable is pushed into the spaces on line 67. And that means that words is also an inaccurate name for the spaces array as well. Finding descriptive variable names is always one of the challenges in computer programming.
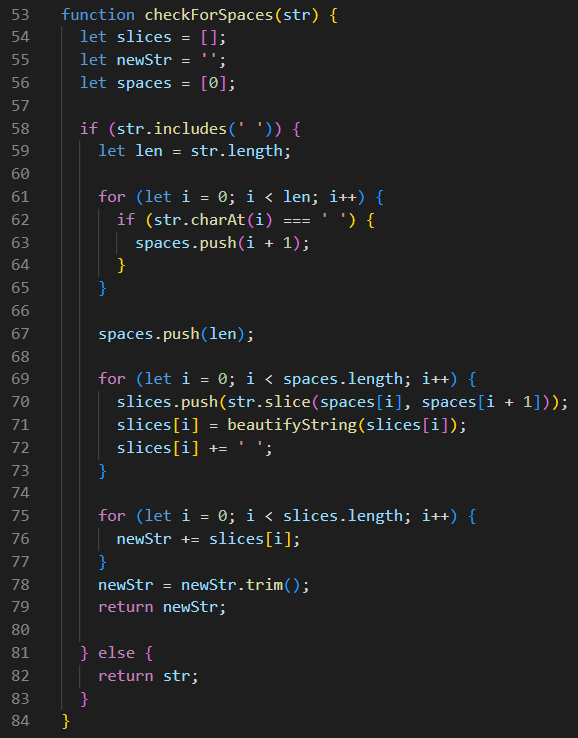
Next, we have another for-loop on lines 69 through 73. And just for the sake of argument, let's say that we are running the checkForSpaces function using New york city as a parameter sent as the string. In that case, spaces = [0, 4, 9, 13];. With only 4 elements in the spaces array, the for-loop on line 69 will only loop 3 times because of the for-loop's condition of i < spaces.length. On line 70, it grabs each slice between each of the spaces and pushes it into our array named slices. (Now remember that slice is a string method, and slices is the name we gave to our array.) And just to make our work easier, on line 71, we send each one of these slices to our beautifyString function, which simply returns it back to us with the first letter capitalized. Line 72 concatenates a space to the end of each one of our slices. And when this for-loop is complete, and in the case of the New york city, we will now have slices = ['New ', 'York ', 'City '];.
There is one final for-loop on lines 75 through 77 that simply concatenates each one of our slices into the newStr string variable, which then becomes newStr = 'New York City ';, but there is on last problem: we have an extra space at the end that needs to be trimmed. And that happens on line 78, before line 79 returns newStr to the line of code that initially called this function.
And if seemed to you like there was a lot going on in the checkForSpaces function, you are correct. There was! But we have good news here. The checkForHyphens function shown below is almost identical in almost every way. The main differences are that we renamed our spaces array to hyphens, and since hyphens separate the words, there is no need to concatenate spaces to the end of each one of them. So the city of Winston-salem becomes Winston-Salem. And the conversion of the name of Jean-louis returns it as Jean-Louis. It really is as simple as that.
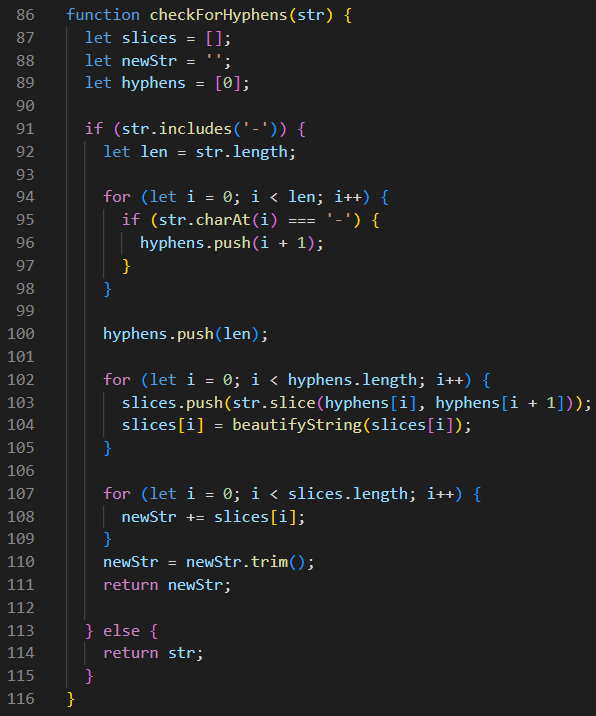
The checkForMacs function is easier to understand than either the checkForSpaces or the checkForHyphens because we are only looking for prefixes at the beginning of the string. And thanks to the startsWith string method, this task is actually rather easy. The prefixes we are looking for are Mc and Mac. Mc is handled below by lines 121 through 126 where we simply capitalize the third letter in the string. And Mac is handled below by lines 127 through 132 where we simply capitalize the fourth letter in the string. There a couple of slice methods used for the conversions in each case, but we presume that you won't require our long explanations to understand what is happening here. Anyway, Mcdonald is turned in McDonald, and Mackenzie is turned in MacKenzie. And if for any reason, the user did not want the fourth letter of their name capitalized, that's too bad! We did it anyway. 😄
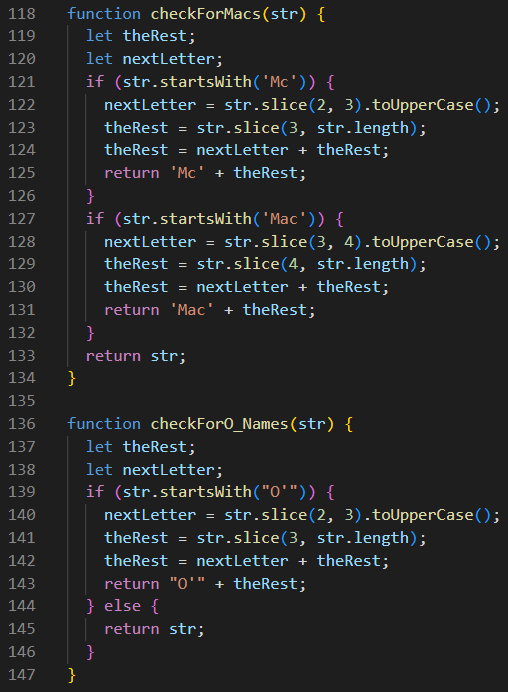
And if you look at the checkForO_Names function above, you will see that the code is almost identical to the code we used for the prefix of Mc, except that we change it to O'. So the last name of O'connor becomes O'Connor. It is the apostrophe that actually trips the switch.
The next four functions are all very easy to explain. The validateState function on lines 149 through 153 trims the string, and then changes the entire string to uppercase letters before it returns it. But the checkForStateString on lines 155 through 162 trims the string, and then checks to see if the length of the string is only two characters, before it checks to make sure that it is included as one of the 56 abbreviations in the states array that was declared as a global variable when the script first loaded. So if both conditions are true, then it returns that boolean value. Otherwise, it returns false.
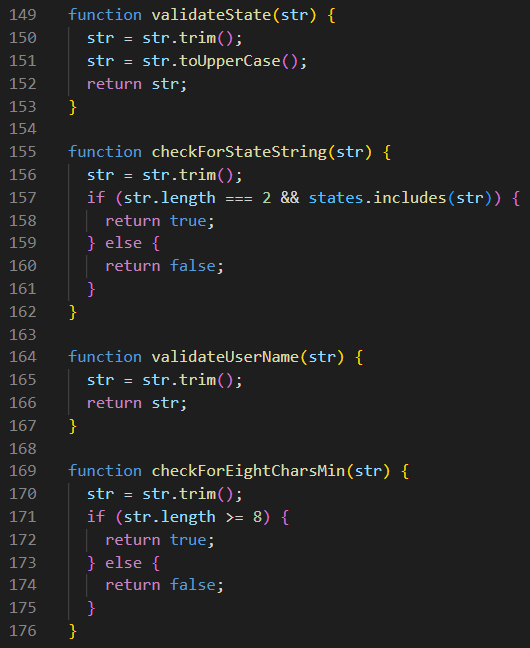
The validateUserName function show above on lines 164 through 167 simply trims the string before it is returned. And the checkForEightCharsMin function on lines 169 through 176 checks to see if the length of the string is greater than or equal to 8 characters before returning it.
The validatePassWord function shown below on lines 178 through 181 also simply trims the string before returning it. And if it seems like there is a lot of string trimming going on in this script, that is because there actually is. But there will be fewer worries of hidden spaces, thanks to all of these mostly redundant trims.
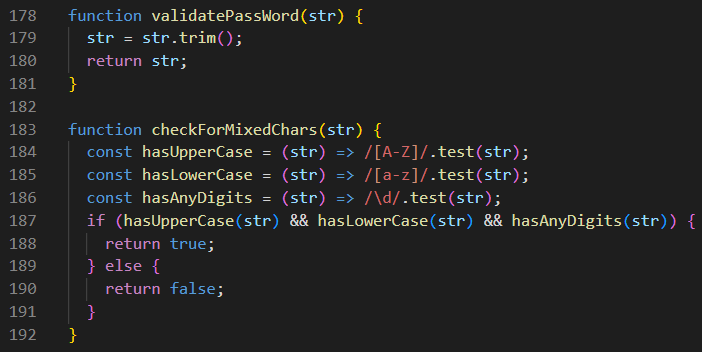
Up until now, we have not mentioned Regular Expressions. They will actually be covered in depth in future projects. And besides the test string method used three times above, there are no other string methods used in the chackForMixedChars function on lines 183 through 192 below. So on line 184, we are sending the string as a parameter to an otherwise unnamed arrow function that will test the string against the regex of /[A-Z]/. And believe it or not, that is how we test a string for uppercase letters. The boolean result of this arrow function is then assigned to a const named hasUpperCase. On line 185, we do something similar, except that the regex this time is /[a-z]/, and the boolean value that is returned from that test is assigned to a const named hasLowerCase. Then on line 186, we are once again doing a similar string test, but the regex we are using this time is /\d/, even though /[0-9]/ would have given us the same result. This regex is used for finding any arabic numerals between the values of 0 and 9, and the boolean value that it returns will then be assigned to the const named hasAnyDigits. So don't forget what our rules are for passwords, On line 187, we can see that this if-statement is testing for three possible true values, and from the rest of the code we see what will be returned if any or all of these values are found to be not true. And we can also see what gets returned if all three are true. Anyway, welcome to the wonderful world of Regular Expressions.