JavaScript Coding Course
JS 101

Part 6. Your Objectivity Rules!
JavaScript Date Objects
Some of the most fascinating projects you can create using JavaScript are done with Date Objects. This subject can get very deep fast, so we prefer reading about this on the W3Schools website at W3Schools Date Objects. The explanations they provide are generally easier to understand than those found on other websites like MDN, even though greater subject depth can usually be found on MDN. But one of the projects we will do in this part of the course was taken directly from the W3Schools website, and our project will combine their analog clock with our own digital clock in a project that we like to call Two Clocks. But we will do two projects that are possibly easier before we get into that one. To preview the next three projects, simply click on the links before.
- Date & Time Info
- Time Zone Info
- Two Clocks
Links To Previews
- Date & Time Info
- Time Zone Info
- Two Clocks
Links To Projects
Date & Time Info
We hope you find these three projects to both fun and instructive as well. And we are certain that you will learn a lot of JavaScript coding skills along the way. All three of these projects use code that goes well beyond the scope of simply printing out dates and times. So without further ado, let's dive right into the Date & Time Info project. And when you have the code for this project open in VS Code, we can begin.
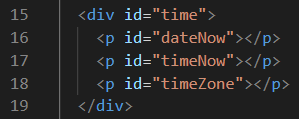
Everything you need to know about the content in the document body of the index.html is shown in the image above. We won't insult you by explaining it. And we won't bother to show you the CSS stylesheet code either. However, we did declare font-size: 57.5%; in the :root, and we are using only rems and percentages to style the other elements in this project. So if you have an interest in that, then please feel free to peruse the style.css file as well.
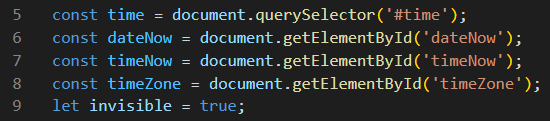
At the very top of the script.js file, we are declaring our global variables. The first four are locations on the web page, and since they never change, they are declared with the const keyword. Each one of these is located by its id, but we declared the one on line 5 with querySelector, and the other three with getElementById, just to illustrate the two different ways that you can accomplish the very same thing. But the variable on line 9 is a boolean data type that definitely will change, so it must be declared with a let keyword. And you will see the invisible boolean variable change later, so remember where you saw it first.
Jumping all the way top the bottom of this script file, we are setting an Interval that will call the clock function every 1000 milliseconds. Can you tell us why we are doing this every 1000 milliseconds? And do you remember what this type of function is called as well? We'll even give you a hint in a riddle. Its name is half of the name of the 12-step program that alcoholics in recovery attend. What is the name of this type of function? Got it? Great. Let's move on.

As we look at the clock function below, we have another question for you. Why was the variable on line 14 declared with the const keyword instead of a let keyword? Yes, we know what you are thinking. If the time is being updated every 1000 milliseconds, meaning that the time is constantly changing, then shouldn't it be declared with the let keyword? Now remember that the clock function runs every 1000 milliseconds, so that means that it creates a new Date object and assigns it to the variable named today each time the clock function runs. And during those 1000 milliseconds, the value of the today variable never changes. And when the function ends, that variable is no longer used, and it is sent off to garbage collection. Yes, there is a real thing in JavaScript called garbage collection. It is a fundamental, automatic memory management process handled by the JavaScript engine to identify and free up memory occupied by objects that are no longer reachable or referenced by the program. So the answer to the question we asked is that the today variable should be declared with a const keyword, because it never changes during the 1000 millisecond lifespan of this function.
And if you want to see what the today variable looks like, you could always put console.log(today); on line 15, and then you could view the value of that Date object in the console every 1000 milliseconds, OK?
Lines 19, 20, and 21 each call a function and pass the today variable as a parameter to each one of those functions. And the result that each function returns is then placed as innerHTML inside each one of the three paragraph elements, declared with an id that was previously described.
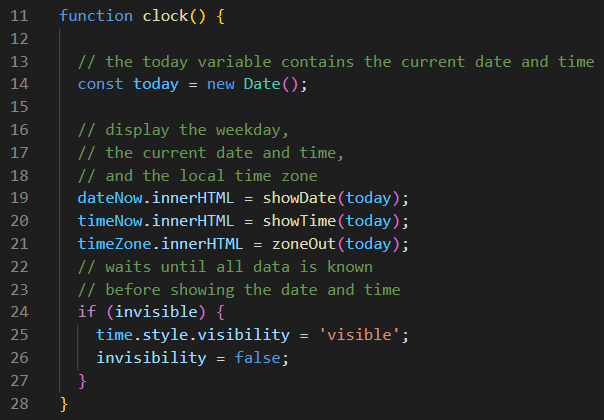
The last thing that happens inside of the clock function is on lines 24 though 27. Do you remember that we set the global variable of invisible to false when this script file first loaded? The reason we did that is so that all of the elements inside of the time div would not appear on the screen until the clock function provided it with some data. Of course that does introduce a delay of up to 1000 milliseconds before this data is displayed. But we believe that it looks better than three light blue bars with no data in them. If you want to see true ugliness, then set the invisible variable to true on line 9, and then start the program all over again. See?
Otherwise, the first time the clock function runs, it sets the invisible variable to false on line 26. It does that right after it performs the style code on line 25. Then, each time the clock function runs after that, it no longer looks at the code beyond line 24, because if (invisible) is the very same code as if (invisible === true). Therefore it no longer looks at the rest of the if-statement since the value of invisible is now false.
Now let's discover what these three function calls do on lines 19, 20, and 21. And in order,
they are showDate, showTime, and zoneOut. Notice that each one passes the
today variable as a parameter to each function. And then, the result that is returned from
each one of these function calls is then displayed in the three paragraphs, that are in order
named dateNow, timeNow, and timeZone. Now let's first look at the
showDate function on line 41 below.
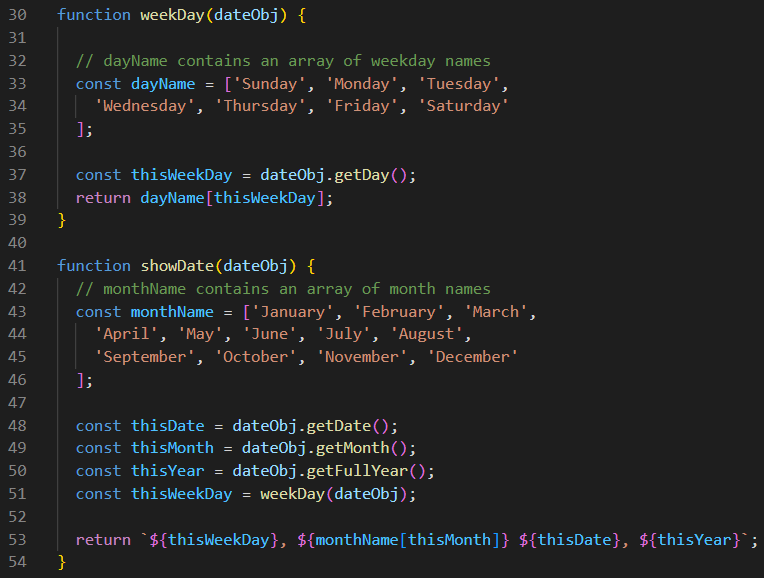
Of course we are passing the today variable as a parameter to showDate, and this function will know this parameter by the name dateObj, which seems like a perfectly descriptive name for this parameter considering what it is. On line 43, we declare an array of monthNames. It is obvious what that array is all about. On line 48, we are using the getDate method that is built into the JavaScript Date object, and we are using it to extract the day of the month, and then that value is stored in the thisDate variable. Lines 49 and 50 are doing something similar using builtin methods to extract the month and the year from the Date object.
Line 51 is doing something different than lines 48, 49, and 50. It needs to extract the day of the week from the Date object. So it is calling the weekDay function on lines 30 through 39. It should be obvious what the dayName array is all about. And we can see another builtin methods being used on line 37. Can you see the difference between the getDay method on line 37, and the getDate method on line 48? Anyway, line 38 uses the variable named thisWeekDay (which is an index value of 0 through 6) to get the correct day of the week from the dayName array, and then it returns it back to line 51 where the function was called from, and it assigns that string value to thisWeekDay. Try not to get too concerned that both of these functions have variables with the same name of thisWeekDay. Since both variables only have scope within the boundaries of each function, it's not a problem. OK? And did you also notice that every single variable within these two functions is declared with the const keyword? Their values never change so that is also not a problem.
On line 53 above, we concatenate all of the data we collected into a long template literal string, and we return it to line 19, where it is assigned to the innerHTML of the dateNow paragraph that is displayed on our index.html page. That takes care of dateNow.
Now let's get timeNow by calling the showTime function from line 20. And we can see how that function works below. And the first thing we notice is that lines 57, 58, and 59 are all declared with the let keyword, even though we are using similar builtin JavaScript methods to the ones we used in the showDate function. And the reason behind this is because these three variables will change thanks to the ternary operators on lines 67, 70, 73, and 74. Why is that? Because the hours must be converted from the 24-hour (military time) clock to the 12-hour (civilian time) clock. And also, the minutes and seconds might need leading zeroes added to them if they are not double-digit values. Of course the ampm on line 64 can be declared with a const because it will not change within the next 1000 milliseconds. If you understand ternary operators, then the five examples of them used here will make perfect sense. Otherwise, you may need to review the very end of Part 4 where we talked about how they are basically just scaled-down if-else-statements. However, you might find the comments in the code below helpful as well.
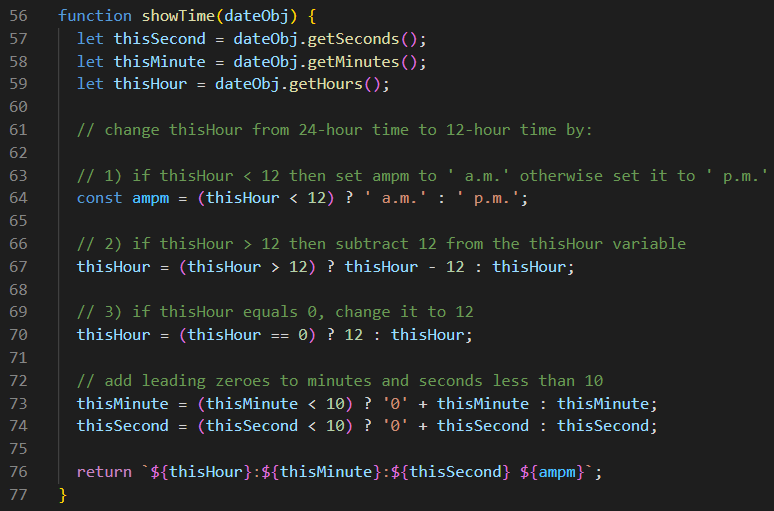
Line 76 above is yet another fancy template literal concatenation that is returned back to where it called from. If you know how to follow the code, you will see how this puts the current time on the screen in the second blue bar, that is right below the current date that is displayed on the first blue bar.
That third blue bar on our home page is for our current time zone. And that information is included inside our Date object. It is the last bit of information included in that string, sandwiched between a set of parentheses. Of course anytime you are curious about the information you get back from the Date object, you can always just do an Inspect > Console and then type new Date to see all of the information that it provides. Cool, eh?
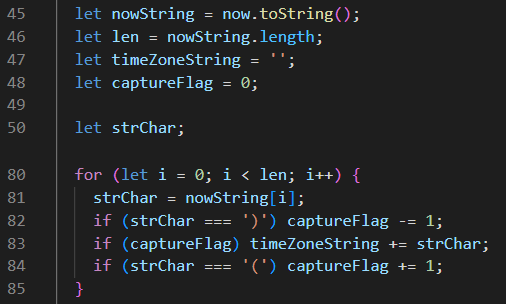
And it is the zoneOut function shown below that finds and returns that information. On line 80, we take our first step by converting the Date object to a string variable, and then assigning it to the const named nowString. On line 81, we are finding the length of that string, and assigning it to a const named len. The next three variables must be declared as let variables because their values will change.
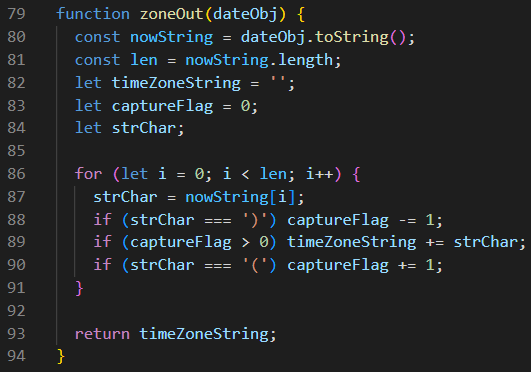
Lines 86 through 91 are a classic example of a garden variety for-loop. This for-loop iterates through each character in the string and stops when it reached the length of the string. The variable named strChar on line 87 temporarily stores each character before testing it in the next three lines of code. Now rememeber that we assigned the value of 0 to the captureFlag variable before this for-loop even started. On lines 88 and 90, it is searching for parentheses. And on line 89, it will not add any characters to our timeZoneString as long as the captureFlag does not have a value that is greater than 0. However at some point, it detects the opening parenthesis on line 90, so it increments the captureFlag by 1 so that its value is now greater than 0. That means that line 89 will begin adding each character it finds in the string to the timeZoneString, starting with the very next iteration of the loop. And that will continue until line 88 detects the closing parenthesis and decrements the captureFlag by 1 returning its value back to 0. When the for-loop completes, line 93 returns the timeZoneString to where this function was called from. If you follow the code back to where it began, you will find that it now places the current time zone information on the third blue bar on our home page.
Did you have fun doing this Date & Time Info project? If so, you are ready for the Time Zone Info project, which adds greater complexity to the project we just completed.
Time Zone Info
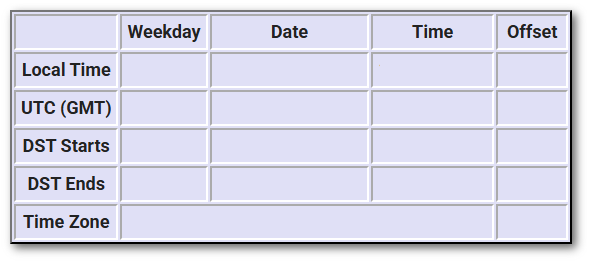
For this project, we are using this simple table on the left, and updating only 18 of the <td> elements that are currently blank. From the table headers in bold, it should be obvious what data each one of the table cells will hold.
We are going to jump around in this project and reveal various sections of code to better illustrate how its various parts all fit together. It really isn't as complicated as it seems when you see how each piece of the puzzle fits together. Please don't become discouraged by this technique. We will be presenting the code in this order for your benefit. When you get this project code downloaded, unzipped, and opened in VS Code, then we will begin.
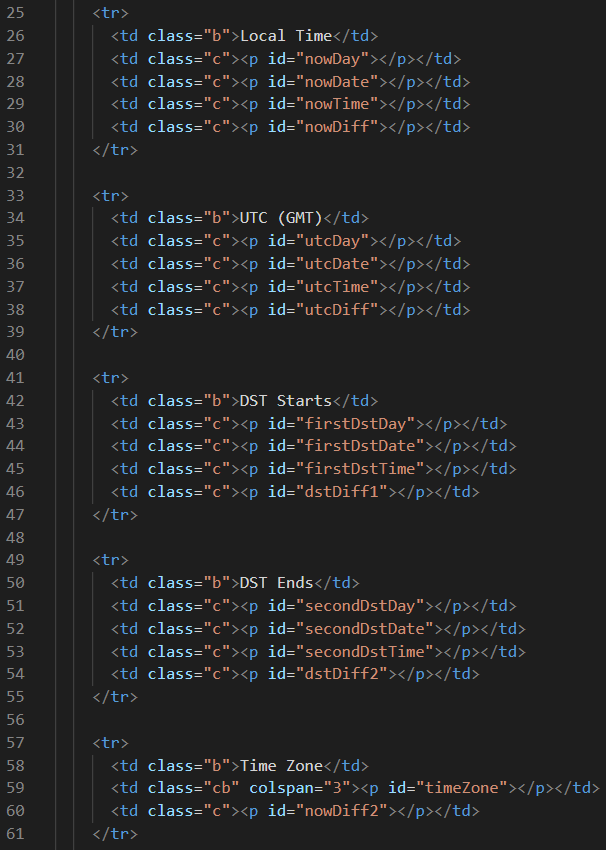
Below is the relevant HTML code. These are the 5 rows of data that we will update every second. Notice that there is one colspan="3" for the timeZone in the bottom row. Also notice that 18 of these table cells have an id. Now let's jump down into the script.js code.
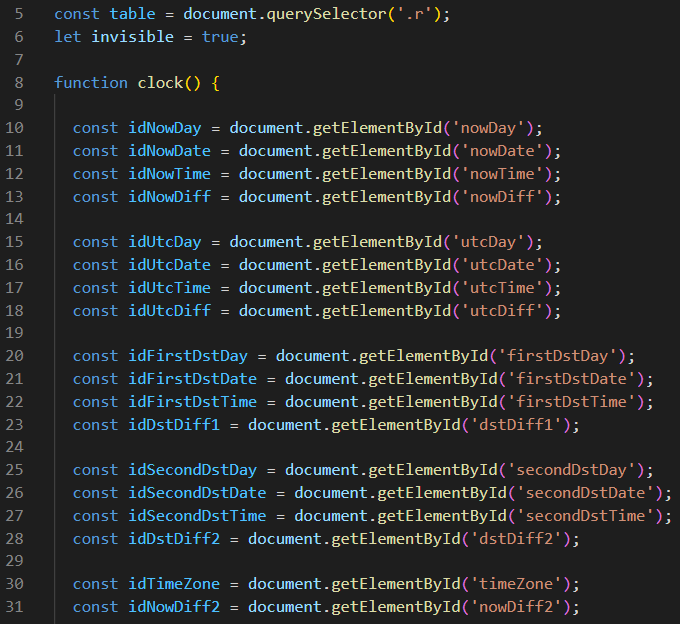
At the very top of this script file, we define a const named table and we have a let boolean named invisible. We used this in the previous project so we will not explain it again, except to say that the table remains invisible until we have enough data to populate it. These are the only two global variables for this entire project.
The clock function begins on line 8 and ends on line 154. And since this is such a long function, we will break it down into sections. Notice that lines 10 through 21 define const variables that are the locations of the 18 table cells we just saw in the index.html file. Once we know the locations of where to store the data, we will do lots of calculations before we display it. But for now, let's jump over the calculations to see how that data is displayed.
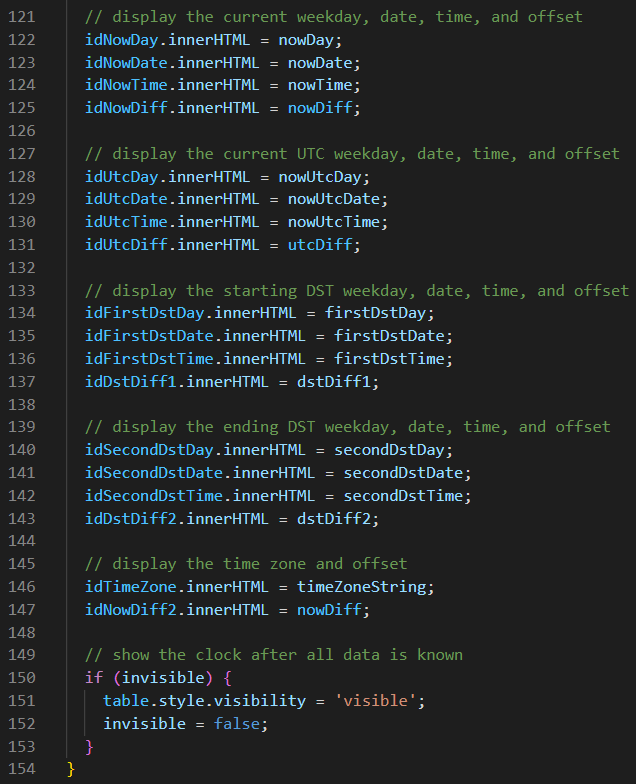
Lines 121 through 147 below show where each data value is displayed. So what we have just seen in these three blocks of code should give us a greater understanding of how this table is constructed. Lines 149 through 153 is the code that makes the table visible after all of the data is ready to be displayed. The clock function then ends on line 154.
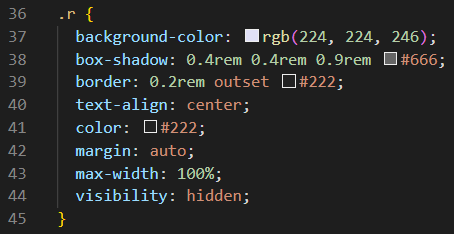
Shown below is just a small amount of the CSS code. These are the CSS rules for the table that has a class name of r. We have no idea why the programmer chose that class name. It is not very descriptive, is it? But let's move on.
At the very bottom of the script.js file, we have this bit of code that you have seen many times before. However, this particular block of code launches the clock function every 1000 milliseconds, thanks to this setInterval function. This event listener function differs from one in the previous project in that we are using an arrow function rather than an anonymous function, which is the correct answer to the riddle we asked back then. OK?

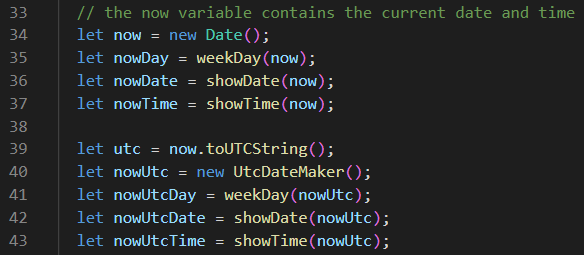
Now we are ready to look at all of the calculations required to generate the data that will be used to populate this table. On line 34 below, we generate a new Date() object, named now, and we can extrapolate most of the data we need from that object. On lines 35, 36, and 37, we are sending now as a parameter to three different functions. These will be used to populate the first three table cells. On line 39, we are using an internal method to the Date object named toUTCString(). This will convert our local date and time to a date and time with Universal Time Coordinates (UTC). On line 40, we create a new variable named nowUtc by creating a new object that is returned from the UtcDateMaker() function. On lines 41, 42, and 43, we are sending nowUtc as a parameter to the same three functions we used in lines 35, 36, and 37. And believe it or not, this provides all of the data we need for 6 of the 18 table cells we need to populate. Now let's look at the four functions we just mentioned.
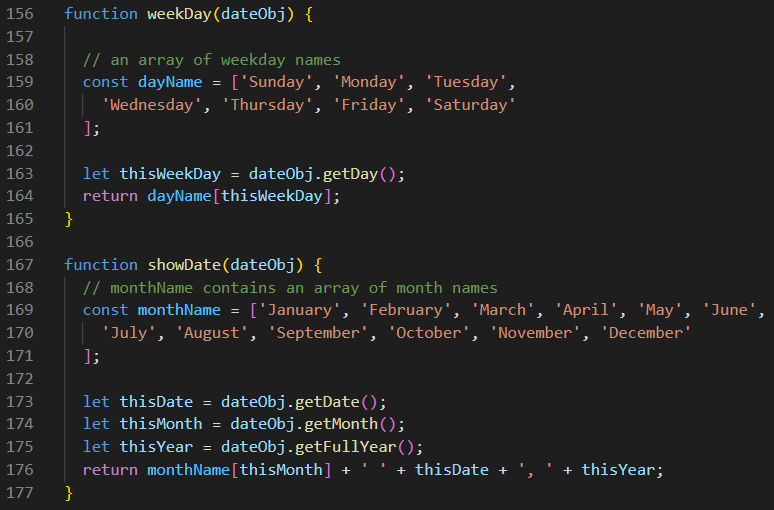
The weekDay function shown below is actually pretty simple to understand, it returns the actual day of the week depending on the parameter we send to it, whether that's now or nowUtc.
And the showDate function is just as simple, It returns a properly formatted month, day, and year for any valid Date object we send to it as a parameter. Pretty cool, eh?
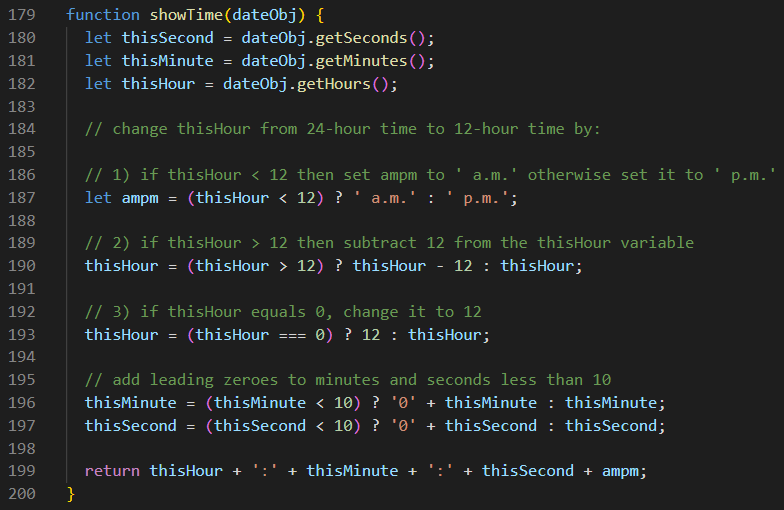
But the showTime function shown below is just as cool. Actually, it appears that we are repeating ourselves needlessly here! These same three functions (weekDay, showDate and showTime) are almost identical to the ones we used in the previous project. The only differences we can see are the ways that the string is formatted before it is returned. In the previous project, we used template literals. In this project, we are using the old-fashioned way to concatenate string variables. Otherwise, the code is basically the same.
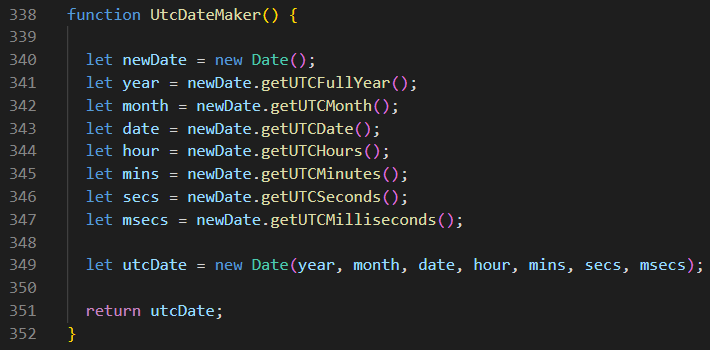
But this UtcDateMaker function is somethimg completely new. In order to know everything we need to know about our local time zone, we need to be able to compare it against the UTC time zone. And that's what we are doing here: generating a new Date() object based on Universal Time Coordinates (UTC). Amazingly enough, the Date object methods used in lines 341 through 347 are already included with the Date object. Are you beginning to see just how powerful the Date object really is? Theoretically, this program should work in any time zone around the world, thanks to the absolutely awesome power of the Date object.
You've seen this code shown below in the past project as well. This is how we extract the local time zone from the now Date object. Of course, we must first convert it to a string variable. Then, we must find the length of that string. Then, we need to create an empty string named timeZoneString. We also need a captureFlag to which we assigned the value of 0. And we declared a variable named strChar without assigning any values to it. Now we are jumping from line 50 to line 80 just to preserve our continuity of thought.
The for-loop on lines 80 through 85 loops through the nowString one character at a time until it find the open parenthesis on line 84, At that point it increases the captureFlag to the value of 1. Now the loop with add each character it finds to the variable named timeZoneString until it finds the closing parenthesis on line 82. Then, it decreases the value of the captureFlag to the value of 0 again, which means that it has completely found the entire timeZoneString. And we are done.
Now we can look at the code that is between lines 50 and 80, that was hidden from us in the code we looked at above. The code below is going to help us determine a few things. It will help us determine whether our local time zone observes Daylight Savings Time (DST). And it will help us determine the start date and the end date of DST, as well as the offset (plus or minus) from Standard Time. For time zones that are east of UTC, the offset will be plus. For time zones that are west of UTC, the offset will be minus. And to make better sense of all of that, we need to look at four more functions.
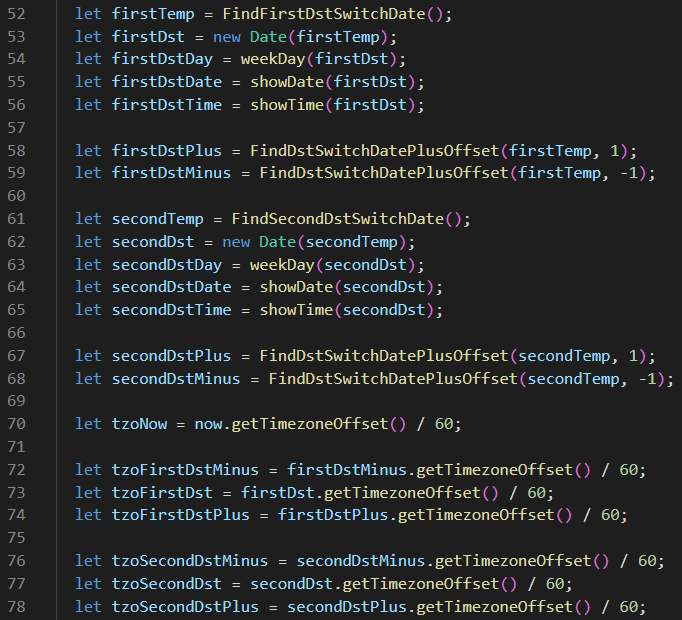
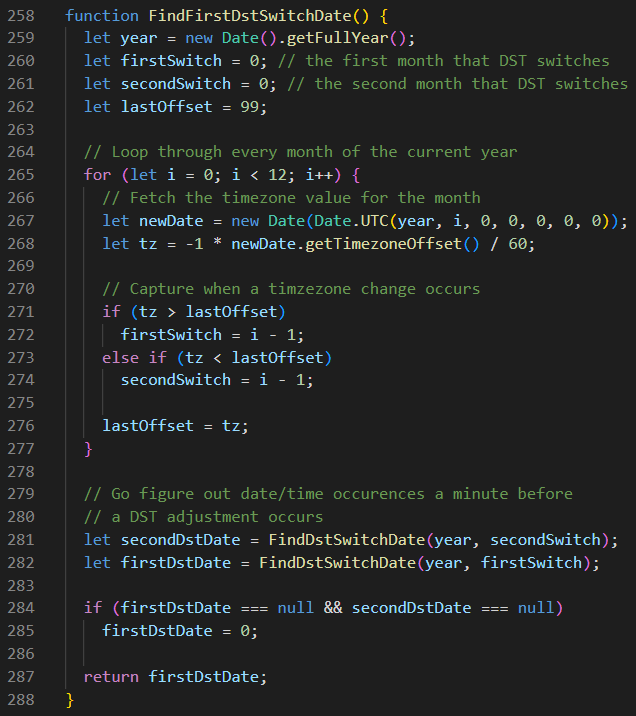
The code we see above is not well commented. But the four functions shown below are heavily commented. And that will help us understand what is happening here. But it can get very complex, so if you are satisfied that the code works, and don't want to get a headache sifting through the rest of this code with a fine-toothed comb, we completely understand. However, a general understand might prove helpful, so please follow along anyway.
Remember that FindFirstDstSwitchDate was called from line 52. And when all is said and done, this function returns firstDstDate as seen on line 287. And once we have that value, lines 53 through 56 make much better sense because we've seen the functions of weekDay, showDate, and showTime before. But let's quickly look at line 268. We just wanted to point out here that getTimezoneOffset is another built-in method of the Date object, and it returns a number in minutes. So of course, to get the correct number in hours, we simply divide that number by 60. Now let's skip ahead to the next function.
Remember that FindSecondDstSwitchDate was called from line 61. And when all is said and done, this function returns secondDstDate as seen on line 319. And once we have that value, lines 62 through 65 make much better sense because we've seen the functions of weekDay, showDate, and showTime before. But let's quickly look at line 300. We just wanted to point out here that getTimezoneOffset is another built-in method of the Date object, and it returns a number in minutes. So of course, to get the correct number in hours, we simply divide that number by 60. Is there an echo in here? Or did we just experience Déjà vu? Now let's skip ahead to the next function.
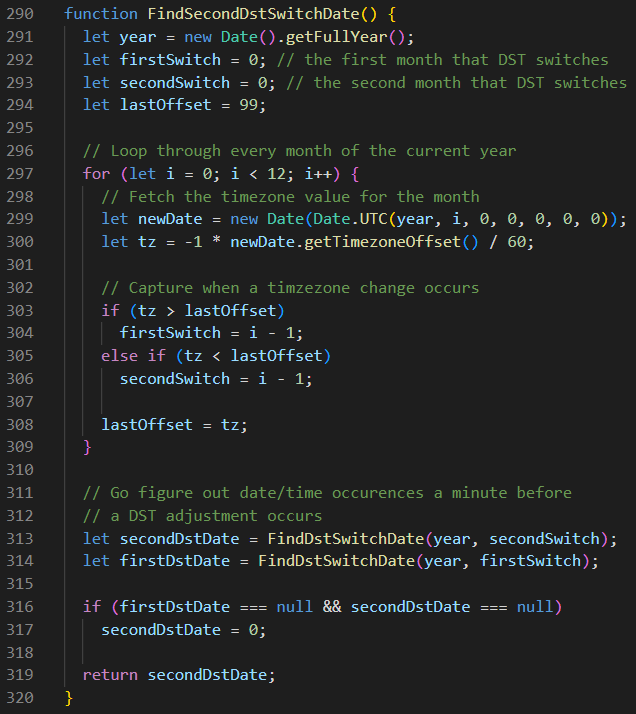
Did you notice that both the FindFirstDstSwitchDate and the FindSecondDstSwitchDate functions call the FindDstSwitchDate function twice? Well, it's a very long function that is somewhat difficult to understand. It starts on line 202 and ends on line 256, so we are are showing it here in two parts. But the (almost) bottom line here is that on line 253, it returns a dstDate. And lines 281, 282, 313, and 314 will determine on their own whether the dstDate that was returned was the firstDstDate or the secondDstDate. And if you also look beyond those four lines of code, you will see that if both of those variables evaluated to null, then we set the firstDstDate and/or the secondDstDate to 0. What that is telling us is that this time zone does not observe DST.
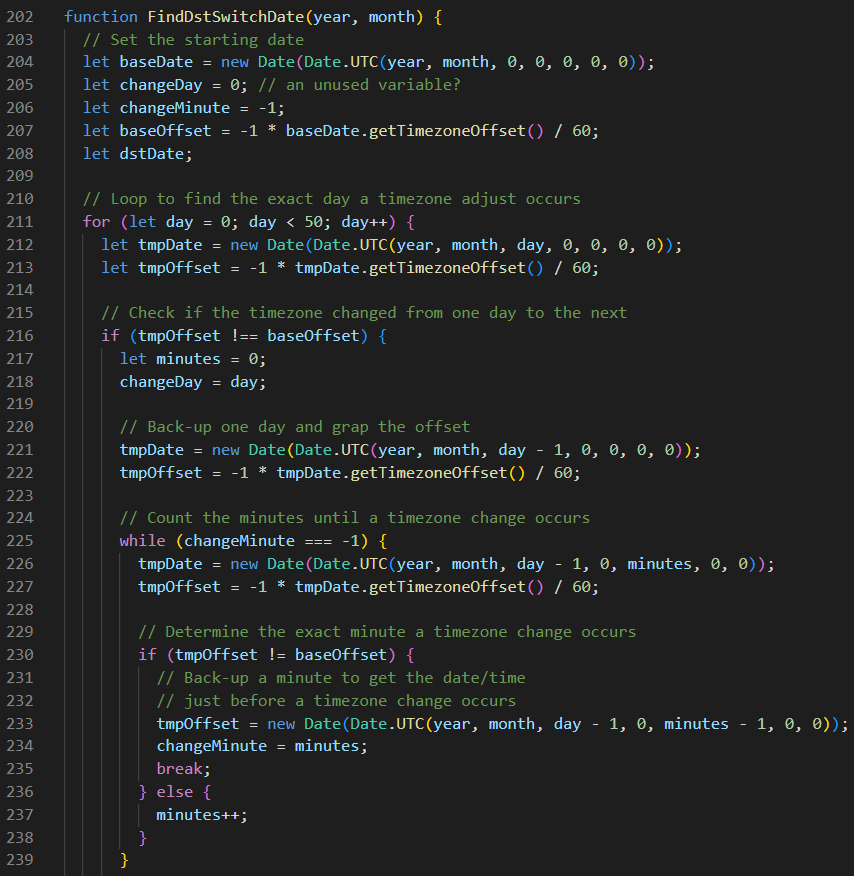
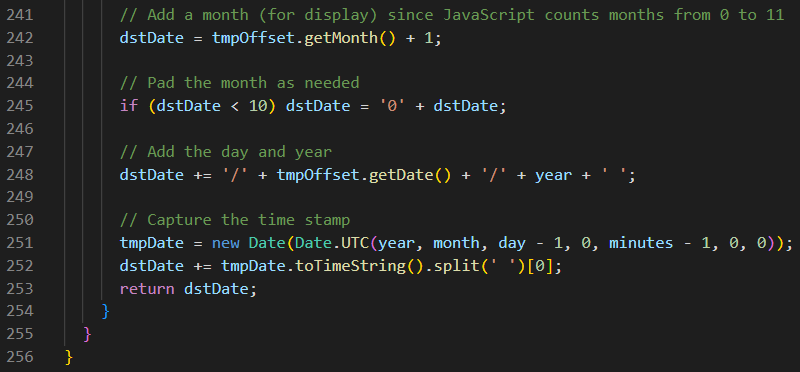
Now, we quickly skipped over four lines of code on lines 58, 59, 67, and 68 because that was the beginning of calculating time zone offsets. Since there are are 24 standard time zones based on one-hour increments, and there are 38 distinct time zones in use worldwide that are based on a variety of other factors, this problem can become mathematically complex. Nevertheless, this is very well-documented on Wikipedia, so please visit that web page if you find this subject of interest.
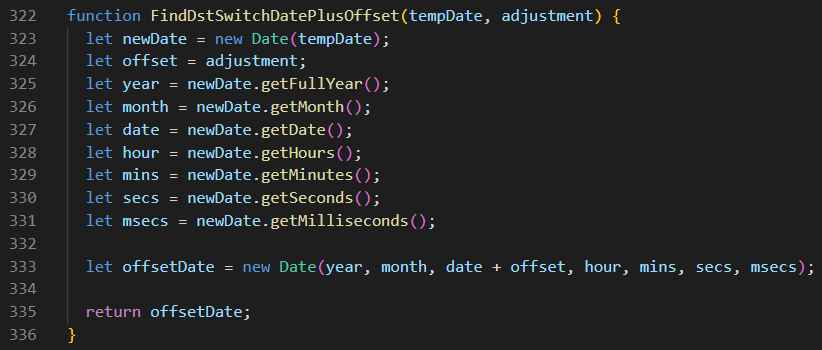
Oh, but wait! This FindDstSwitchDatePlusOffset function shown below is not nearly as scary as the one we looked at previously. We simply calculate the offsetDate based on the tempDate and the adjustment we sent to the function as parameters, and then we return offsetDate to the line of code that called it. Piece of cake!
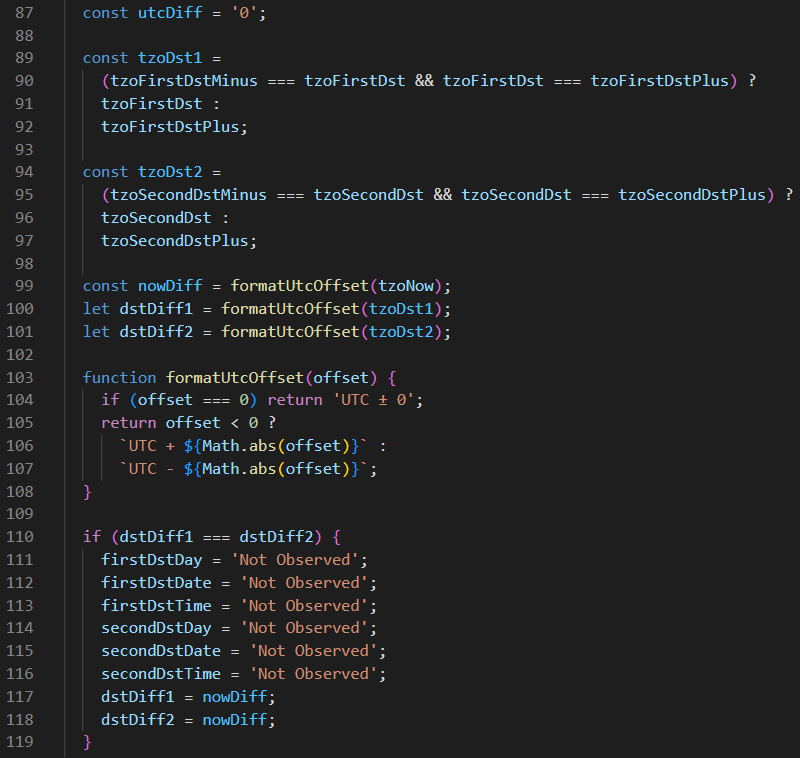
Suddenly, the timezone offset code (often abbreviated to tzo) on lines 70 though 78 begin to make better sense. And all of the lines of code shown below should also start falling into place. One thing that makes this code rather unique is that we have a function nested inside of this clock function. And while that is perfectly acceptable to JavaScript, it is something that we usually try to avoid because of scoping issues. But since this is such a simple function, that should not be a problem here.
On lines 99, 100, and 101, we call calling the formatUtcOffset function on lines 103 through 108. This function simply calculates whether UTC is offset by a positive or negative amount of time, or not offset at all. The if-statement on lines 110 through 119 will determine whether DST is observed or not. And if it is not, then it will fill in the appropriate six table cells with text that states Not Observed. But if DST is observed in this time zone, thenit fills in the appropriate two table cells with the correct DST offset values.
So what happens next? It seems like we've calculated all of the required data to fill in all 18 of the table cells. And it's true that we have. The last step is to complete the bottom part of the clock function, which plugs those 18 values into their appropriate slots in the table. You have seen this code before, and it is very well-commented for your convenience.
This concludes our discussion of the Time Zone Info project. Now it's time to dive into the Two Clocks project, which is actually two projects in one!
Two Clocks
This project is a combination of two separate projects: the Canvas Clock which is actually an Analog Clock that was created by W3Schools, and a Digital Clock that is our own invention. We changed very little of the code in the Canvas Clock, except for the background color of the canvas, so we will not take the time to explain each and every single line of their code. But we do recommend doing their project as presented directly from their website. It is presented in five parts, with each part building on the previous part. And you can make a copy of the my-template folder, and simply rename it to canvas-clock before opening it in VS Code. Then, it becomes a simple matter of cut-and-paste of the code on their website to your own canvas-clock project. When you are done, you will have a working Analog Clock.
The Analog Clock
And the Canvas Clock is a perfect introduction to canvas which is often the best and most efficient way to perform JavaScript animations including those used in interactive games. And as usual, we like to use these two sources of information on canvas: the W3Schools Canvas Tutorial, and the MDN Tutorial. But please don't go too far down the rabbit hole. We will be doing lots of JavaScript canvas projects in future lessons. This Canvas Clock was just a quick introduction so that you could see its power in action. And it is always good practice to create your own projects and to type your own code. Once again, we strongly recommend that you do the W3Schools Canvas Clock as a separate project. When you are done, you will already understand half of the code in the Two Clocks project.
The Digital Clock
All done with the Canvas Clock project? Great! Now let's do this Digital Clock project together. It might sound illogical, but this project is a little more complicated than the analog Canvas Clock. But by doing both the Canvas Clock and the Digital Clock projects separately, it will all make much better sense when we combine the Two Clocks together in a single project. So now you should perform the ritual of downloading the code for the Digital Clock project. And once it is open in VS Code, we will begin.
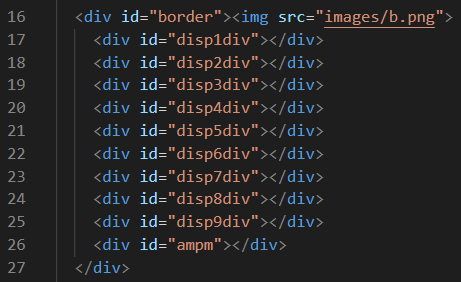
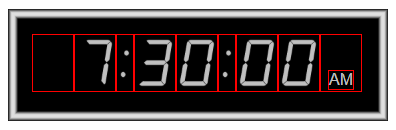
The HTML code for this project is actually very simple as illustrated above. We are giving the container div an id named border that contains eleven images inside of it. The first of these is the actual border image named b.png. It is the only image that does not have an id. And that is because the other ten images are actually only image placeholder divs that will be assigned images once each second. The picture on the right of this text illustrates how these ten divs are arranged. We added a red border around each of these to help illustrate the placement of each one of these image placeholder divs for your convenience. Now let's look at the CSS code for this project as shown in the next three pictures below. The most interesting parts of the #border code is that we assigned a 40-pixel top-margin, and gave it relative positioning because all of the image placeholder divs need to have absolute positioning in relation to this border div. And lastly, we are assigning hidden visibility to the div, but only until we have some data to display inside of it. You will see that explained when we get into the JavaScript code.
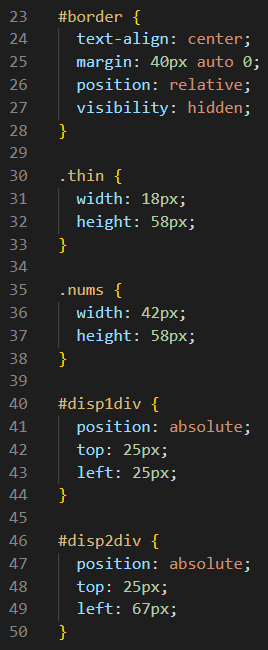
Notice in the CSS code above that we have two different classes of image placeholder divs here. One is named thin because the two colons are much thinner than the seven nums. However, each one of the seven nums divs also has an id so that it can be positioned absolutely to create a coherent and uniform display. This is done by positioning the left of each of these divs at a location just one pixel to the right of the width of the div preceding it. And that is how it is done starting with #disp1div and #disp2div above. That is also how it is done in #disp3div through #disp9div divs shown below.
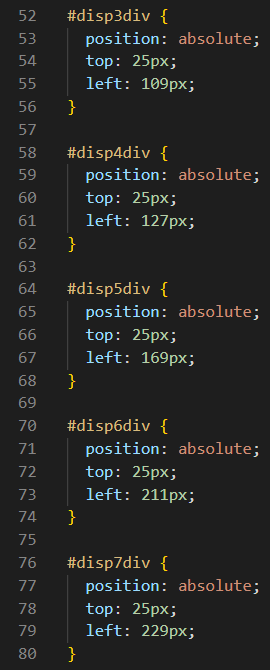
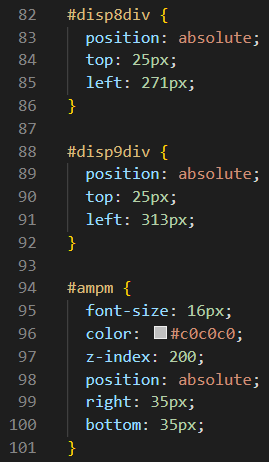
Of course, it is the #ampm div that differs from the others. That div has a smaller width and height, so it is positioned absolutely just 35 pixels from the bottom, and 35 pixels from the right. That positions it within the #disp9div div which isn't used for anything else, but the spacing looks good between all of the other elements, and that's what really matters here. Lastly, you will see that #ampm was given a z-index of 200. That number is much higher than it needs to be. Any value greater than 1 would have worked here. The end goal here is to make sure that the #ampm div always appears in front of and on top of the #disp9div div. Now let's look at the JavaScript code below.
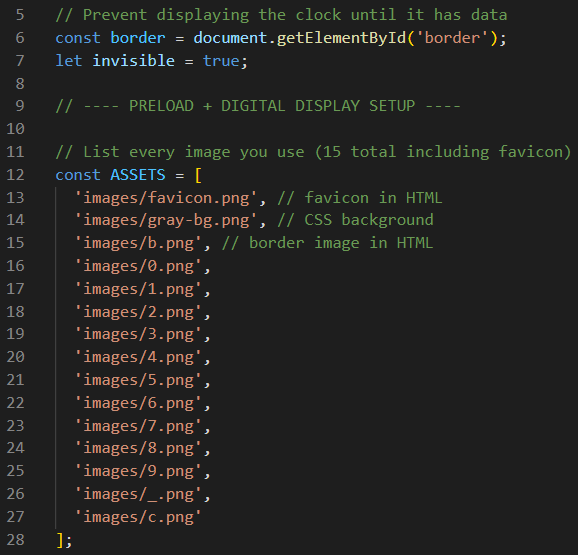
At the very top of the script.js file, we are declaring our global variables. On line 6, we are declaring a const that defines the location of the border div. That will prove useful later. On line 7, we are declaring a let boolean variable named invisible and assigning a value of true to it. Remember that the border div was given hidden visibility in CSS. And since the border div is actually the container for the other children inside of it, they will also remain hidden until the border div is made visible again. The comment on line 5 gives us clues about what these two variable assignments are doing for us.
The const object named ASSETS on lines 12 through 28 is an array of all of the images used by the digital clock. We are going to preload these images into memory to prevent any glitchy behavior once the clock starts, so that the time will be displayed in a more professional presentation. Earlier versions of this program did not show smooth transitions between numbers when the clock started displaying the time. Preloading the images fixes this behavior. Now that the global variables are declared, let's jump to the bottom of this script file.
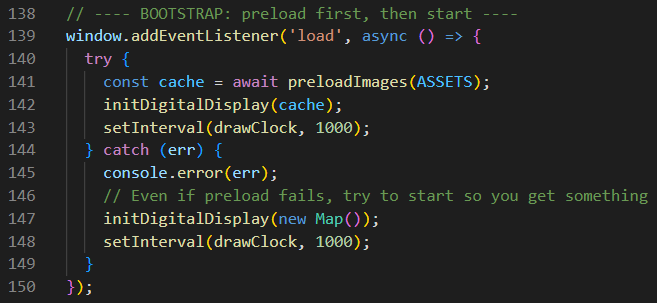
The first thing to notice above is that line 139 adds an event listener that waits intil the window loads. Then, it launches an asynchronous arrow function with a try...catch statement. If you have not seen a try...catch statement used before, then pay close attention to how this one works. The try portion is what hopefully happens at runtime. But if for some reason there is a error, then the catch portion runs instead.
If there is a problem, it would most likely be caused by line 141. On line 141, we are declating a const named cache which is assigned an array of all 15 images that is returned from the preloadImages(ASSETS) function. That may take some time and that is why this arrow function is asynchronous. And so, we will await the array being returned from the function. If the function does return the array of all 15 images, and does assign it to cache, then on line 142, we send the cache as a parameter to the initDigitalDisplay(cache) function, and on line 143, we set an interval timer to drawClock every 1000 milliseconds.
However, if for any reason the array is not returned in time, then the catch portion executes instead of the try portion. On line 145, we send the error that occurred to the console. Lines 147 and 148 are almost identical to the code in the try portion, but since there is no cache to work from, a new Map() object is created so that the interval timer still runs drawClock every 1000 milliseconds. That is preferable to crashing with an error in the console, even if performance is a little bit glitchy. Now let's look at the preloadImages(urls) function below.
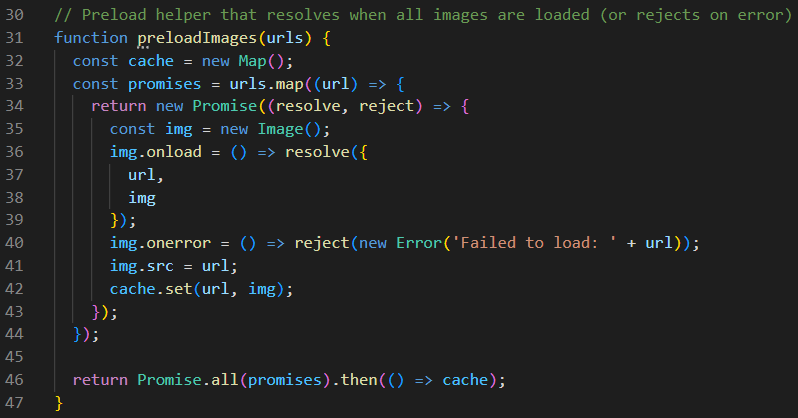
When we look at this function above, we see that it is very complex. It was written entirely by OpenAI's ChatGPT. It involves creating a new Map() object, and several new Promise() objects, as well as several new Image() objects, and quite possibly one or more new Error() objects. Plus, there are at least five arrow functions, with some of them nested inside of other arrow functions. Perhaps we can ask ChatGPT to explain it to us at some point in the future. But for now, let's just recognize that it works well, so that we can move on to the other project code, as shown in the next block of code below.
Ah yes! This block of code looks much more comprehensible! On line 50, we declare a let variable named digitImgByValue without assigning values to it. We can tell by the two curly brackets that this will be an object that holds key-value pairs. That's why it has two curly brackets rather than two square brackets like the let variable named dispImgs on line 51. That variable will be an array object, and that is why it has two square brackets instead.
Now, the function on line 53 named initDigitalDisplay(cache) is taking the cache of preloaded images we just created as a parameter to that function, and creating the key-value pairs we just mentioned. And it should make perfect sense that the numerals of 0 through 9 are being represented by images of seven-segment LCDs, with each one displaying that particular numeral. But we also have blanks and colons in our display. And we can also call them by name from this object as well. Now let's look at the next block of code, which is still part of this long initDigitalDisplay(cache) function.
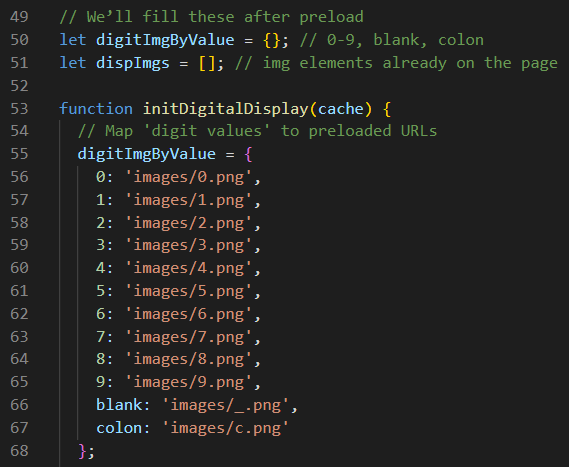
Ah yes! On lines 71 through 74, we are creating a new const named divIds. And isn't that the perfect name for the nine divs in our digital clock display? On lines 76 through 83, we are mapping the divIds by the id of each div. Basically, line 77 is grabbing each one of those divs by its id. And line 78 is creating a new img element for each one. Line 79 assigns a class name to each img by using our old friend, the ternary operator. In short, we already know that two of these imgs are colons, so we will assign the thin class to them. All others will be assigned the nums class. Those were defined in the CSS code we looked at earlier. Line 80 simply defines the alt property of each img element an empty string. Line 81 is simply amazing, in that, it replaces the children in each div with the img element that is assigned specifically to each div. Of course, each div only has one child element. And then on line 82, we return each image to the line of code that called it, which is line 51. This might seem like a very complicated way to do this, but this is the modern ES6 way. If we were to use a for-loop, it could become much more convoluted and confusing. Lines 86 through 95 assigns either a blank or a colon to each of the nine divs, and then we are done. Also please remember that this long initDigitalDisplay(cache) function only runs once! After the digital clock display is completely initialized using this function, the drawClock function takes over, and thanks to setInterval, it draws a new clock every 1000 milliseconds (or every 1 second). Let's look at the drawClock function next.
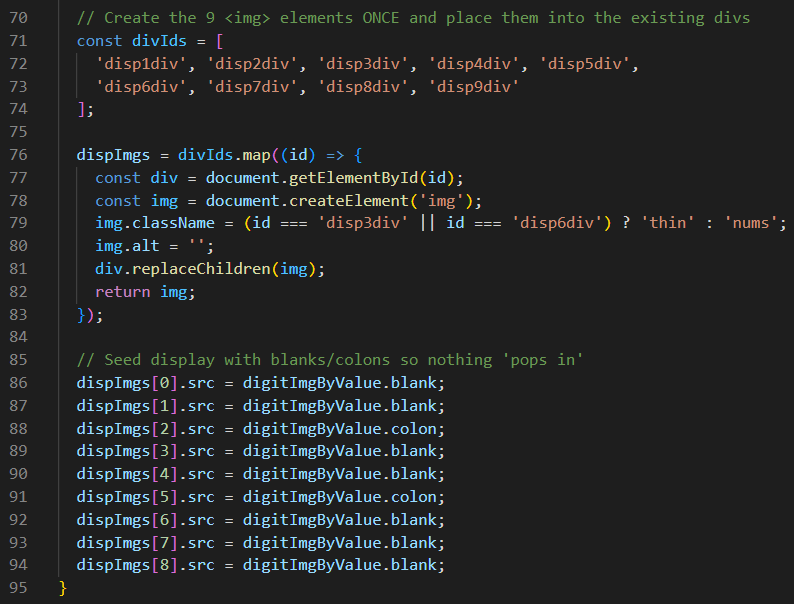
Now that the digital clock display is completely initialized, the drawClock function will run once per second to update the digital clock display. This is perhaps the easiest part of this project to understand. On line 98, we create a const variable named now and assign a new Date() object to it. Don't be alarmed that we are using a const because the lifespan of the now variable is only one second. On line 99, we are using the getHours method to extract the hour from the now variable. On line 100, we are assigning the same value to the hours24 variable, and we will see why in a moment. On lines 101 and 102, it seems rather obvious what we are doing.
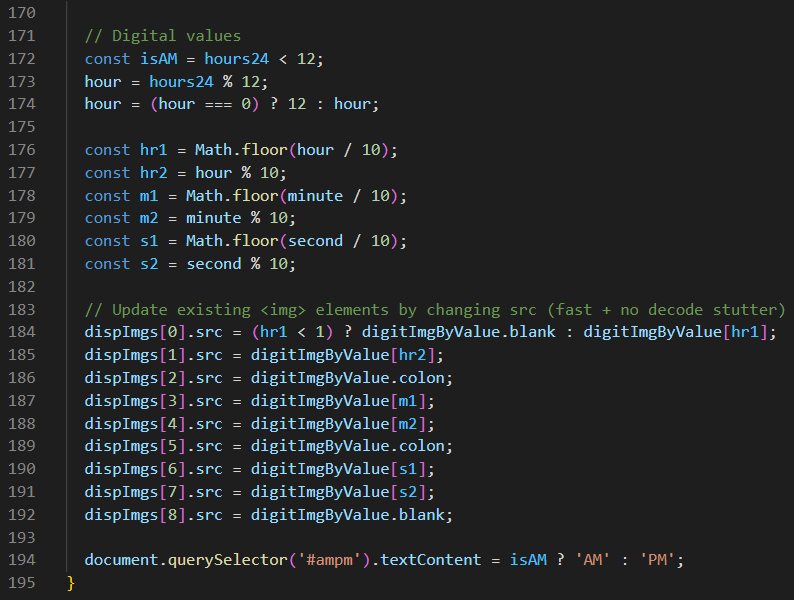
On line 105, we are declaring the isAM variable. Because the getHours method gives us a value that is between 0 and 23 inclusive, we need to find out if now is occurring in the morning. And if hours24 is less than 12, then we know that isAM is true. Otherwise, it is false. We will see how the isAM boolean variable is used in a moment.
Line 106 is using the remainder operator to find the value of the hour variable. And of course, if we divide hour24 by 12, then we get a remainder value between 0 and 11 inclusive. But wait! There is no zero o'clock. And that's why the ternary operator on line 107 exists. In other words, if the value of hour is 0, then hour is assigned the value of 12. However if hour is not 0, then hour retains its value of 1 through 11. Got it?
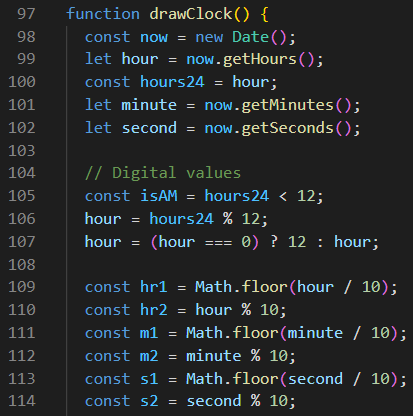
Lines 109 through 114 are very interesting. We know that going into line 109 that hour will be a value between 1 and 12 (because of what happened above this line). Let's suppose that its value is 12. OK fine. Math.floor() rounds down to the nearest integer. So 12 ÷ 10 = 1.2, but we are rounding that value down to the nearest integer so the hr1 variable is now 1. On line 110, we are using the remainder operator to determine the second digit we will display for hours. And the reminder of 12 % 10 = 2, so we assign that value of 2 to hr2. That is how we will get 12 to appear on our digital clock display. Lines 111, 112, 113, and 114 are doing something similar, but just remember that minute and second will be some value between 0 and 59. So if the value of minute is 48, then m1 will become 4, and m2 will become 8. See how that works? Cool!
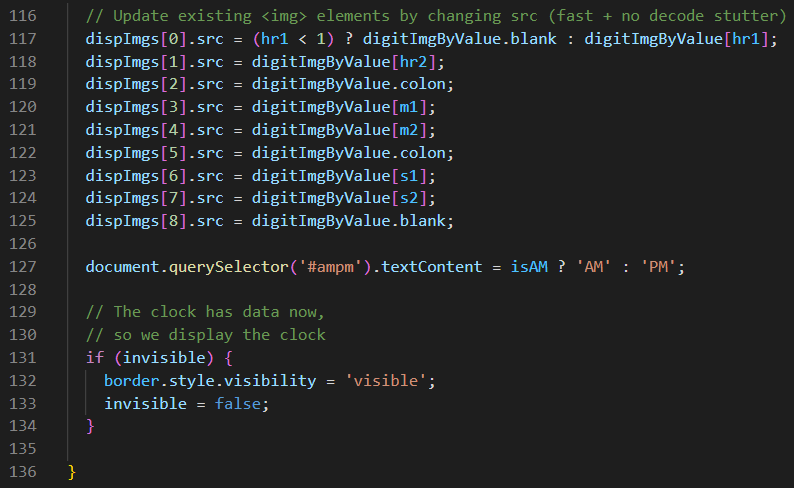
Lines 117 through 125 simply place the correct images inside the correct divs. However, line 117 is a little tricky in that, if the value of hr1 is less than 1, then we display a blank there instead of a number. Otherwise, it will display a 1 in the cases of 10 o'clock, 11 o'clock, and 12 o'clock. All of the others are straightforward, except line 125, which will always display a blank. And that is because of line 127, which will display AM in the ampm div if isAM is true, and PM if isAM is false. Lines 131 through 134 set the display to visible now that we have real time data to display. And it sets the invisible variable to false so that it will not need to evaluate this if-statement again.
Putting Two Clocks Together
Now that we know how both clocks actually work, it is a breeze to combine Two Clocks into one project. And when you do that, the Two Clocks launch together as one project. Let's download the Two Clocks project code so we can see how this is done.
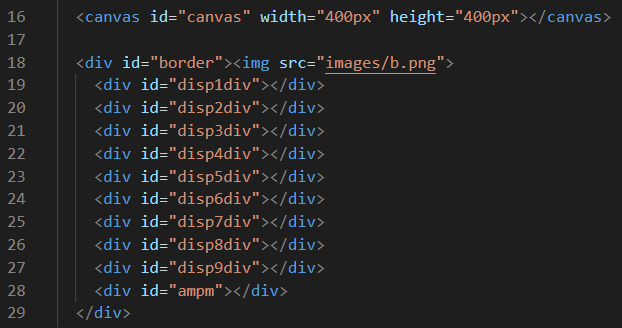
The HTML code for Two Clocks is actually very simple. On line 16, we add the same canvas element definition, except we removed the inline style that gave the canvas a background-color of #333, a shade of dark gray. And since the Canvas Clock had no other CSS code, the canvas clock was left-aligned. However, the Two Clocks project does have an external stylesheet similar to the one used by the Digital Clock project, so the canvas clock is center-aligned and the background is now the tiled image of gray woven fabric. The rest of the HTML code was taken directly from the Digital Clock. Now let's look at the CSS code for this project.
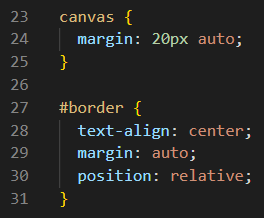
We gave the canvas top and bottom margins of 20px, and auto margins for the left and right sides. That put the canvas in the center of the web page and added some vertical spacing to make it look nice. And because of those canvas margins, we no longer needed the 40px top-margin we had in the Digital Clock project. We were also able to remove the visibility: hidden; rule as well because the digital clock will already have data before it is displayed. We will see that later in the JavaScript code below. Now let's jump to the bottom of the script file.
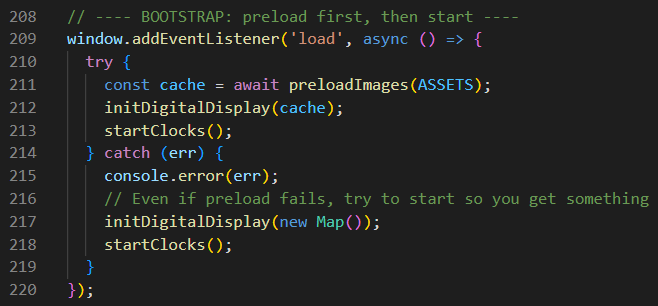
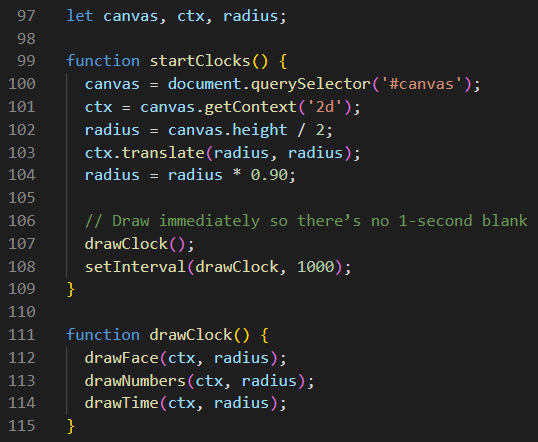
The window load asynchronous event listener is identical to the one in the Digital Clock, except that we are calling startClocks() instead of doing setInterval(drawClock, 1000); and that is because that interval is set after we have data for both clocks, as we will see below on line 108. Of course, we also see that the drawClock() function is only drawing the canvas clock by calling those three functions listed. But don't be alarmed by that because the new drawTime() function draws both clocks: the analog canvas clock first, and the digital clock after that. One other difference from the Canvas Clock is that the canvas and ctx variables are defined as let variables here rather than as const variables. That was probably done to solve some issues with variable scoping. So now, let's jump down to line 154 to see how the new drawTime() function works.
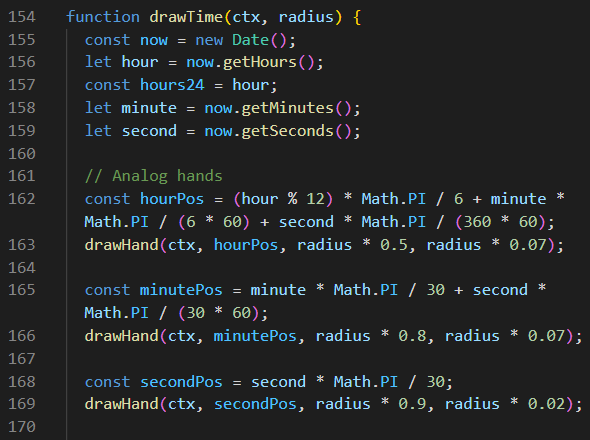
Lines 155 through 159 allow us to get our hour, minute, and second values which we need for both of these clocks. Lines 162 through 169 calculate the values required to draw the three hands of the analog clock, and it passes those values to the drawHand function as parameters. Line 170 is the dividing line between code required for the Analog Clock and code required for the Digital Clock.
The rest of this code is identical to what we saw in the Digital Clock project. The result is Two Clocks: one analog, and one digital, that are perfectly synchronized to work together.