Advanced System Tools
Lesson 0
Part 8. Your Project Portfolio
What is JSON?

We cannot possibly help you create your very own Project Portfolio until you know about JSON files. This acronym JSON stands for JavaScript Object Notation. And yes, we pronounce JSON just like the name of the character Jason from the epic Greek poem Argonautica, or the name of the terrifying antagonist in the Friday the 13th movies. But rather than getting into a long discussion about ancient Greek literature, or Friday the 13th movies, let's instead look at what JSON is, and what JSON does for us.
This Wikipedia article is a good place to start. And we designed our next project using a modified version of the JSON code we found in this article. To begin, let's first take a quick look at our JSON Example project. This preview is not very impressive. Perhaps it would be better to first download the JSON Example Project Code. And you might as well save this ZIP archive file in your HTML Crash Course folder in Documents. That is also the folder where we told you to save your Portfolio Showcase in Part 6, so it makes perfect sense to store it there. Then, you will need to unzip this archive file, and subsequently open it in VS Code.
But your ability to understand the code in this project depends greatly on how far you've gone through the other course material on this website. So for those who are just getting started, please feel free to Skip Ahead to a much simpler explanation of the Showcase Portfolio project code. For all others, please continue on with the JSON Example Code.
Skip AheadJSON Example Code
The code you see below is an actual JSON file called person.json. And to reiterate, this is a modified version of the JSON code we found in the above-mentioned Wikipedia article. We used the code they had listed there, and added some code called emojis, which we will explain later. Notice that all of the data inside of this JSON file is enclosed in two curly brackets. The opening one is on line 1 and the closing one is on line 33. When we discussed JavaScript Objects in our course, we talked about key-value pairs, and that is exactly what you find on lines 2 through 5. For each key, there is a value following the colon that separates the two. And notice how conveniently this data represents the JavaScript data types that we have already learned about. The values on lines 2 and 3 are obviously two string variables. The value on line 4 is unmistakably a boolean variable. And on line 5, we can see that the value of the age key is undoubtedly a number data type. Notice that we use a comma after each key-value pair. And it is also important to note that JSON is unlike JavaScript in that it only allows double-quotes to enclose its keys and string variables. If you try to use single-quotes, VS Code will throw a hissy fit, by underlining each offending piece of data with red undulating lines.
But wait! What is happening on lines 6 through 11? Oh that? That's no big deal. JSON allows us to nest objects inside of other objects. To access that data, we would simply use another layer of dot-notation. For example, we would use address.city if we wanted to know which city John Smith lives in. We will see this later when we dive into the JavaScript code.
Oh but wait! Suddenly there are square brackets in the phone_numbers data on lines 12 through 20! But once again, there is no need to panic simply because phone_numbers contains a nested array that also contains two nested objects.
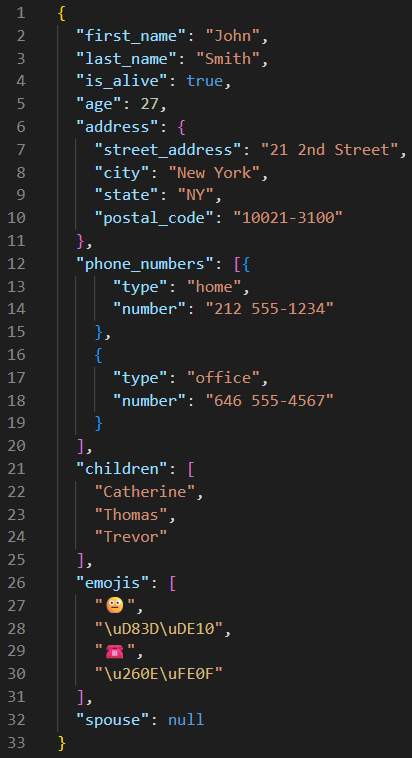
And we can also see on lines 21 through 25 the names of John Smith's children, which are three string variables inside of an array. There is a joke in here somewhere about John's children not leaving the nest yet, but we will avoid telling it. But just look at lines 26 through 31. This is an array that we added called emojis to illustrate two different ways that emojis can be stored in a JSON file. But more importantly, please notice that the arrangement of commas used to separate data fields is very important! For each object, array, or primitive data type that has more data following it, a comma is required. Notice that both Catherine and Thomas, on lines 22 and 23, must be followed by commas to signal that there is more data to follow. However on line 24, Trevor does not have a comma following his name. In fact, adding a comma here would break this JSON file. But line 25 does require a comma after the square bracket, because there is yet another array called emojis that is listed after children. Lastly on 32, we see that John's spouse is defined with a null data type. That's obviously a personal matter that this JSON file will not expand upon. However, it seems tragic to us that John Smith is only 27 years old, and has three children to raise all by himself. Obviously, you can learn a lot from a JSON file.
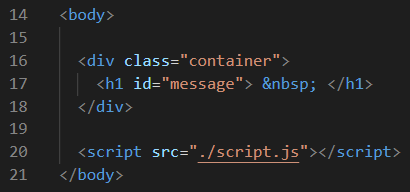
We will not spend any time describing the document body of the index.html file that we see below.
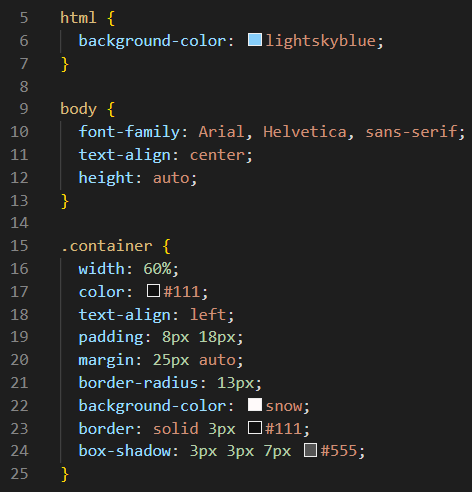
Nor will we waste your time by talking about the CSS code in the style.css file that is illustrated below.
But what possible good can come from JavaScript Object Notation if we never spend any time talking about the JavaScript code used to access it? On line 5 below, we define a const variable using the name of message, which is the same name used by that element's unique id in our index.html file. And by jumping to the bottom of this script file, we see on line 29 that we add an event listener that calls the getData function as soon as the Document Object Model (DOM) content is fully loaded.
The getData function here uses a fetch command, which is a built-in Application Programming Interface (API) method that allows us to retrieve data from our person.json file. When we begin talking about using a fetch method, there is a much larger discussion we could have about promises and asynchronous HTTP requests using modern JavaScript features like async and await. And most certainly, that discussion would be much more germane if we were attempting to read the data from a JSON file that was part of an API on an Internet server. However, our JSON file is a local file that requires no special hoops to jump through to get access to its data, so we will skip this long explanation for the sake of brevity. Instead, let's go with a quick and painless explanation.
On line 9, we fetch the person.json file that is stored locally. On lines 10 and 11, we return the response we get back from the file in JavaScript Object Notation. On line 13, we begin to parse the data that we received as a response.
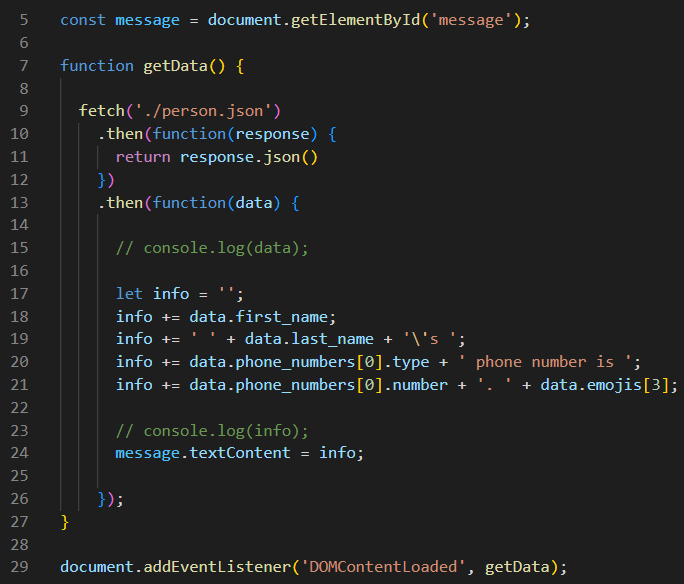
When working with JavaScript, it is always helpful to Inspect the Console. And if we uncomment line 15, we will be able to see all of the data that we received as a response from the person.json file, which should be basically identical to the actual JSON file that we just looked at. Or, if there was a problem, we will see error messages in the Console. But there should not be a problem, unless the JSON file was changed in some way.
Lines 17 through 21 is where we create the message that appears on the home page of this project. Of course the very first thing we need to do on line 17 is to declare a let variable which we chose to call info, and we assigned an empty string value to that variable, since we already know what its data type should be. And then, starting with line 18, we concatenate our first dot-notation value to our empty info string. We get that value with data.first_name. Then on line 19, we concatenate to info a single space, plus data.last_name, and also an apostrophe, a letter s, and one more single space. Notice that we used a backslash as an escape sequence before the apostrophe, so that JavaScript would not recognize it as just another single-quote, which would signal to JavaScript that it was the end of the string. Now on line 20, we are dealing with the phone_numbers array which has two elements in it. And we want to find the home type of phone number, not the office type of phone number. We know that we extract that type by specifying the zeroeth (0th) element in the array, so we use this special three-part dot-notation on line 20, which will give us the value of home, and then we concatenate that and the rest of the string on that line to info. On line 21, we are doing a similar thing using another special three-part dot-notation and that will give us 212 555-1234, which we will concatenate onto info, along with a period, another single space, and an emoji of a telephone, which we get by using data.emojis[3].
Now if nothing appeared on our home page, then we would know that there was an error somewhere, and we would need to uncomment line 23 and Inspect the Console to see which line was producing the error. We could also uncomment that line if we simply wanted to see the info string printed to the Console. However, all that really matters is line 24 displays the correct message on our home page.
Emoji Codepoints
We have to admit that displaying emojis on our web pages can be fun! And our absolute favorite website for finding emojis is The Ultimate Emoji Guide, mostly because it is free, requires no login to use it, doesn't force us to cringe through a bunch of disgusting advertisements, and it has a super-fast search engine for finding emojis. If you've found an emoji website that you like better, then please feel free to use it instead. However, besides showing us what a particular emoji will look like on any operating system, another reason why we prefer Emoji Guide is that it shows us three different ways to display an emoji:
- Codepoint
- Symbol
- HTML
What you see below is only the top part of the screen that is produced when you search for telephone, and then click on the first emoji it finds. One feature that is really nice is the copy button right below the emoji. It even has social media icons you can click on, so you can paste the emoji you just copied to a post that you either like or dislike. And yes, we know that Twitter is now called X, and that Google+ no longer exists. But that isn't our main purpose in using this website.
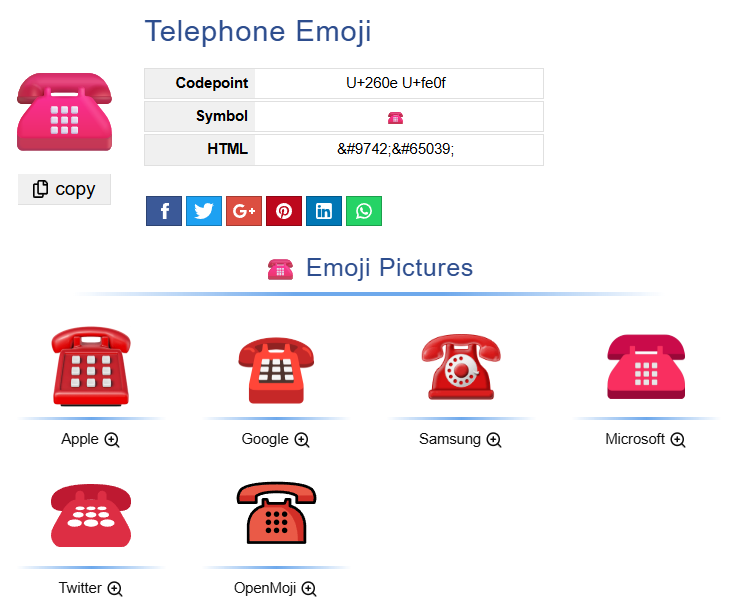
Almost all modern web browsers support the UTF-16 Unicode character set by default, even if it is not specified in the document head of an HTML page. That means that we can simply copy-and-paste an emoji Symbol like ☎️ into the text content of our web page, and it will magically appear there. Of course, we can also just copy-and-paste the HTML special character code of ☎️ and that will also produce the result of an ☎️ emoji.
But if you read the Wikipedia article, you learned that JSON requires that Unicode characters must be encoded using UTF-8, instead of UTF-16. But don't panic and start writing an algorithm that converts UTF-16 into UTF-8 by creating the equivalent UTF-16 surrogate pairs, because this website already has the Codepoint required for each Unicode character that you want to use. According to this website the Codepoint for this telephone emoji is U+260e U+fe0f. But JSON prefers it to be expressed as "\u260E\uFE0F" or "\u260e\ufe0f". Hexadecimal numbers can be expressed with uppercase A-F letters or lowercase a-f letters. Hexadecimal regards these characters as numbers regardless of the case used, but you already knew that. The point we are making here is that the UTF-16 surrogate pairs on lines 28 and 30 of the person.json file produce the same emojis that you see on lines 27 and 29, respectively.
Your Portfolio Showcase Code
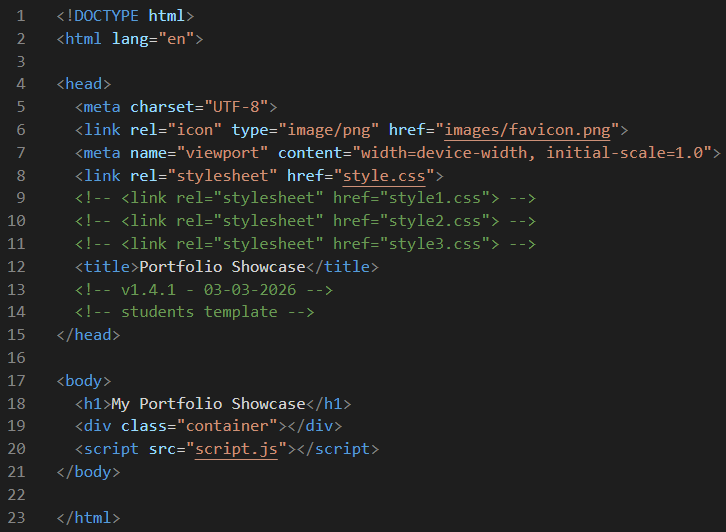
HTML content doesn't get much easier than this. Inside of the document body, we have an h1 element on line 18, an empty container div on line 19, and a link to our script file on line 20. But for this project, you will only concern yourself with the document head, especially lines 8 through 11. Notice that we have a link to our style.css file on line 8. But we also have three other links to CSS stylesheets below on lines 9, 10, and 11 that are commented out. The one on line 9 is basically the same as the one on line 8. We only included it here in case the original style.css file gets damaged in some way. Anyway, we are presenting you with three different styles for your Portfolio Showcase here. If you decide that you don't like this purple theme, then please comment out line 8, and instead uncomment line 10 or line 11 to see a completely different theme for your Portfolio Showcase. And of course, depending on your CSS skills at this point, we would encourage you to design your own personally-themed stylesheet here as well.
Now let's take a look at only part of the script.js file. Most of the JavaScript code here is not something we expect you to learn and know. We'll get deeper into all of this JS code eventually in our JavaScript Coding Course. But for now, let's just focus on code that we can modify without causing errors. On line 34 below, we define the path to our projects.json file. And on line 35, we have an alternative JSON file that you could use by uncommenting line 35, after you comment out line 34. The difference is that instead of displaying three blank projects in the top row, it displays a sprouting seedling and some text about how to add more projects. This is great for our learning experience, but we should never allow this alternative in a professional portfolio that we are planning to show to a prospective client or employer. OK?

Now let's open this project to see how it works by clicking here. If we click on any part of that first square, the Hello World project will open in a new tab of your browser. Let's test that now by clicking there. The Hello World project is here only as a placeholder to illustrate how a linked project works. Your prospective client or employer has great hopes that your skills are well beyond this simple Hello World projects, right?
NOTE: Please don't allow yourself to become alarmed if you are unfamiliar with all of the technical JavaScript terms in the next paragraph. JavaScript Object Notation (JSON) is based on JavaScript and Objects, and you will eventually learn all of these terms when you finally get to our JavaScript Coding Course. For now, just chill, follow along, and enjoy the ride. OK?
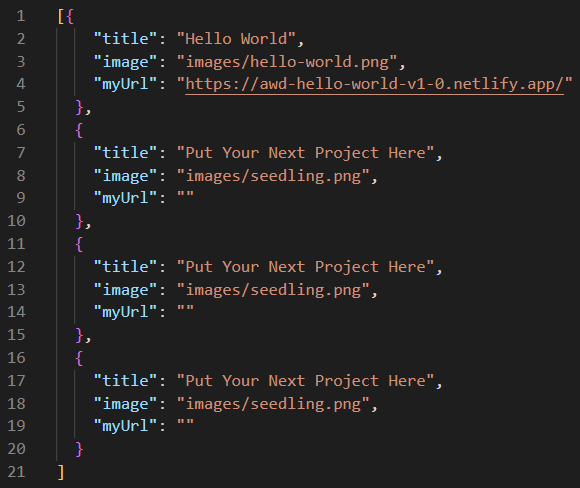
Now let's take a look at this projects.json file. This file acts as a mini-database for all of the projects you intend to display in your Portfolio Showcase. As you can see, there is an array of four objects inside this projects.json file. And each object contains three key-value pairs. The three keys for each object are title, image, and myUrl. The values assigned to each of these keys is a string variable, even though image is definitely the path to an image file in our images folder. And it also seems to recognize that myUrl is actually a link to some project that already exists in cyberspace.
If you were going to add a second project to this Portfolio Showcase, you would first need to deploy it through Netlify. And Part 7 has all of the instructions necessary for you to learn how to do this. And you would also need to take a screenshot of this project so that you could add that image to your images folder.
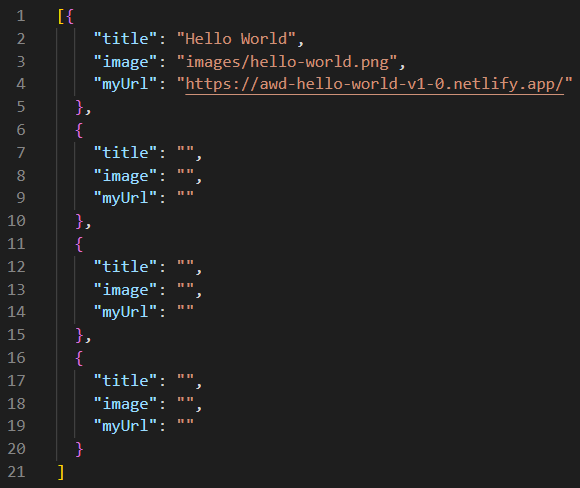
Now let's take a look at this alt-projects.json file. It looks very similar, except that each project has a blank myUrl value. Each of the last three projects has a title and an image, but it has no link assigned to myUrl. That means that clicking on each of those squares takes us nowhere.
Adding Another Project
Now let's take the steps required to add another project to our projects.json file. Of course that will require having the Portfolio Showcase open in VS Code. So if you do not already have that project downloaded into your HTML Crash Course folder inside your computer's Documents folder, then you first need to download this ZIP file to that location, where you will unzip it, and open the resulting portfolio-showcase folder with VS Code.
The lines we will need to edit in VS Code are lines 7, 8, and 9. Let's begin by typing Yellow Submarine between the two empty double-quotes on line 7. Next, we need to take a screenshot of our project, and copy that image file into our images folder. However, in order to expedite this process for this exercise only, we will provide you with this image, which will open in a new tab on your browser. Then, you can right-click on that image, select Save image as... from the pulldown menu, and then save this file to the images folder for this project. Once you have that image stored in the folder you will type images/yellow-submarine.png between the two empty double-quotes on line 8. The last step is to enter the link for your newly-deployed project that now exists on Netlify. Since you did not create that project yourself, we will provide you with this link that you will type between the two empty double-quotes on line 11 for myURL. And the text you will place there is...
https://awd-yellow-submarine-v1-1.netlify.app/
When you are done, your revised projects.json file should look like this:
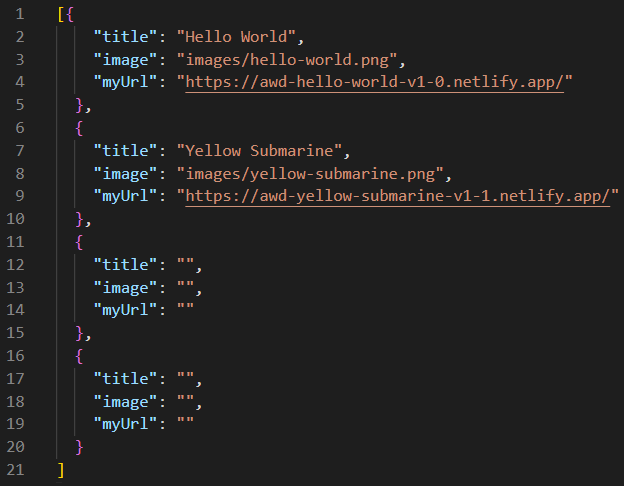
Now, we need to open this project from VS Code using Live Server so that we can test it. Of course we already know that clicking on the first square opens the Hello World project in a new tab on your web browser. But thanks to the code we just entered into our projects.js files, clicking on the second square should now open the Yellow Submarine project in a new tab on your web browser as well. If for any reason it does not, you must have done something wrong, so you'll need to examine the steps you took to learn what went wrong. If the project image does not appear in the second square, then you must've done something wrong while doing those steps as well. Troubleshooting your own code is all part of the process.
Going Further
Now, let's suppose that you already have deployed a few of your best projects to Netlify. And you have also taken some nice screenshots for each one of them as well. All projects in your Portfolio Showcase work perfectly, but you need more project squares. In fact, another row of four squares would really be nice. But adding more project squares should never be a problem, as long as you modify your projects.json file using the proper syntax.
Let's do this is a few easy steps.
- Copy lines 16 through 20.
- Add a comma after the curly bracket on line 20.
- Press the Enter key to create an empty line 21.
- Paste the code we just copied into line 21.
- You should now have five objects instead of four.
And you can repeat this process as many times as required to add as many projects and additional rows as you desire. Just follow these simple rules:
- This JSON file contains an array of objects.
- The array starts with an opening square bracket.
- And the array ends with an closing square bracket.
- Each object must have a comma after it, unless it is the last object in the array.
- And of course, the last object in the array must not have a comma after it.
- Edit the title, image, and myUrl values for each new project.
Don't foget to deploy your Portfolio Showcase to the Internet using Netlify. And be sure to create a URL for it that is easy to remember and that has your name on it for all to see.
Optional
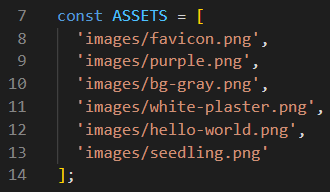
As your Portfolio Showcase grows with each project you add, you may want to add your screenshot images to the const variable named ASSETS in your script.js file. If you do this, your images will be preloaded, which will make them appear faster when your Portfolio Showcase loads each time. This simple array is displayed below. It is a very easy task to add your screenshot images to this array.