HTML Crash Course
HTML 101
Part 5. Using Templates
Download and Save
Now we will learn how to use Template folders. If you remember from our lesson about Emmet, we could create a blank HTML file very easily with just a few clicks and keystrokes. However, that would only give us a blank HTML file without a favicon, or a link to a CSS stylesheet, or a link to a JavaScript file, not to mention the favicon image file, and the blank CSS and JavaScript files as well. And so, it's actually quicker and easier to copy and paste a Template folder, and then begin coding almost immediately. And we believe that you will find this cookie-cutter approach to be the most efficient way to start coding new projects. But you cannot do this without a Template folder to start from, so we will now download, extract, and save a Template folder before going any further. So, let's get started.
First, you will need to download the compressed and zipped version of the Template folder to your computer's Downloads folder. To do that, click here. Next, you will want to copy and paste that my-template.zip file into the HTML Crash Course folder inside your Documents folder.
The next step is to extract all the files inside this compressed archive file called my-template.zip. Depending on your operating system, there are different ways to extract files from a ZIP file. If you are using Windows, simply right-click on the ZIP file, and then select and left-click on Extract All... from the pull-down menu. Then the files will be extracted to a folder called my-template. If you are using a Mac, simply right-click on the ZIP file, and then select Open With > and Archive Utility.app (default) and click on it, and then the files will be extracted to a folder called my-template When you've completed these steps, your HTML Crash Course folder should look something like the image below.
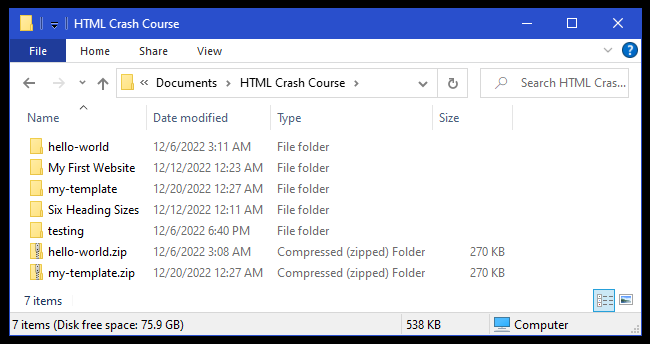
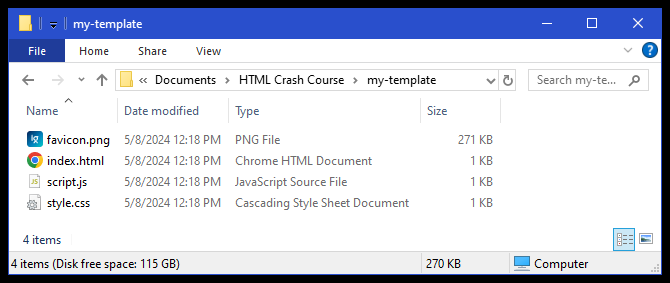
And if you open the my-template folder, you will find that it contains the four files illustrated below. We now have a Template folder, we can copy it to create a project folder for each new project we begin in the future! Over time, you may want to make changes to this folder. Maybe you have a favicon image that works better for you, or maybe your basic HTML code needs changes to reflect your own personal preferences. You may even have some CSS code in your style.css file that you use for each and every project. Eventually you will customize your Template folder in ways that work better for you. But for now, let's just use this Template folder as we move on.
Fun With Emmet
In Part 6 of our lessons on Basic System Tools, we briefly mentioned Emmet without properly introducing you to Emmet. And we do apologize for that, but we felt that you needed to know just a little bit more HTML code before we showed you the awesome power of Emmet. So now that you've been exposed to some HTML elements and tags, it's time to reach out and feel The Force. We can do that by first downloading this this ZIP file into the HTML Crash Course folder that resides inside your Documents folder. Then, you can unarchive that ZIP file by right-clicking on it, and selecting Extract All... from the pulldown menu. A folder called fun-with-emmet will appear. Now, you can open that folder in VS Code, and we can begin this new project.
NOTE: If you are If you are using a Mac, simply right-click on the ZIP file, and then select Open With and Archive Utility.app (default) and click on it, and then the files will be extracted to a folder called fun-with-emmet.
Now the first thing you will notice is that, of the four files in this folder, none of them is an index.html file. There is an index-old.html file here, but for now, let just ignore that file. In order to create our own index.html file, we need to click on File, and then New File... from the menu at the top of VS Code. And when the New File dialog box appears, type index.html, and then press the Enter key. Then a Create File dialog box will appear that points to the fun-with-emmet project folder. Click the Create File button, and the file will be opened automatically in VS Code with the cursor blinking on line 1 of this blank file.
Now you might remember how to create starter code using Emmet. But just in case you do not, on line 1 we type and exclamation mark ! and press the Tab key (or the Enter key). That should produce an HTML document with 11 lines of code. And just for fun, let's autoformat this code by selecting Beautify file from the Command Palette... and after you do that, you should have 14 or 15 lines of code that are all nicely formatted. And if you did everything right, then your code should look like the image shown below.
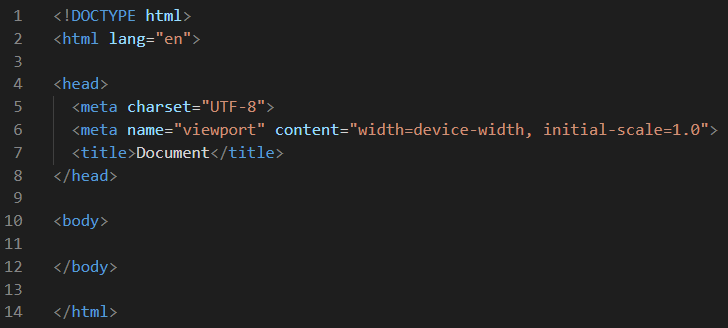
Now, if you look at the instructions.txt file in this folder, you will see that we just completed the first five steps. And they are:
- Create a new file by clicking File > New File...
- Name this New File index.html and Save it in this folder.
- Select that file in VS Code. It will be completely blank.
- On Line 1, type ! and then press the Enter key.
- Beautify file using the Command Palette...
But before we move on, let's take a few minutes to learn from Master Jedi Emmet, OK? Click on line 11 (if that is the blank line between the opening and closing body tags), and type h1 and press the Tab key. This is how a Jedi would create a set of opening and closing h1 tags. And isn't it preferable to type only these three keystrokes than to type these nine characters <h1></h1> to produce the same result?
Now let's remove those h1 tags from line 11, and type p and press the Tab key. Using The Force, it only takes two keystrokes to produce <p></p> which would otherwise require seven keystrokes.
Let's do one more before we move on. Type img and then press Tab. Aren't you amazed that it only requires these four keystrokes to produce <img src="" alt=""> which would otherwise require nineteen keystrokes to produce. Yes, we have yet to learn what the alt attribute does for us, but before you remove this element, notice where Emmet placed the blinking cursor! How did he know that we needed to next type the file name of the image that we are going to display? By now, you should already know that Emmet wields The Force, so we will learn from his knowledge of The Force as often as possible in the future. So now, please make line 11 a blank line once more and we will continue on with this project. Let's do the next seven lines from our instructions.txt file.
- Click on Line 11 between the two body tags.
- Type .container>.item*5>h1 and press the Tab key.
- Beautify file using the Command Palette...
- Type a capital E between the two h1 tags on lines 13 and 22.
- Type a capital M between the two h1 tags on lines 16 and 19.
- Type a capital T between the two h1 tags on line 25.
- Open using Live Server. Obviously something is missing here.
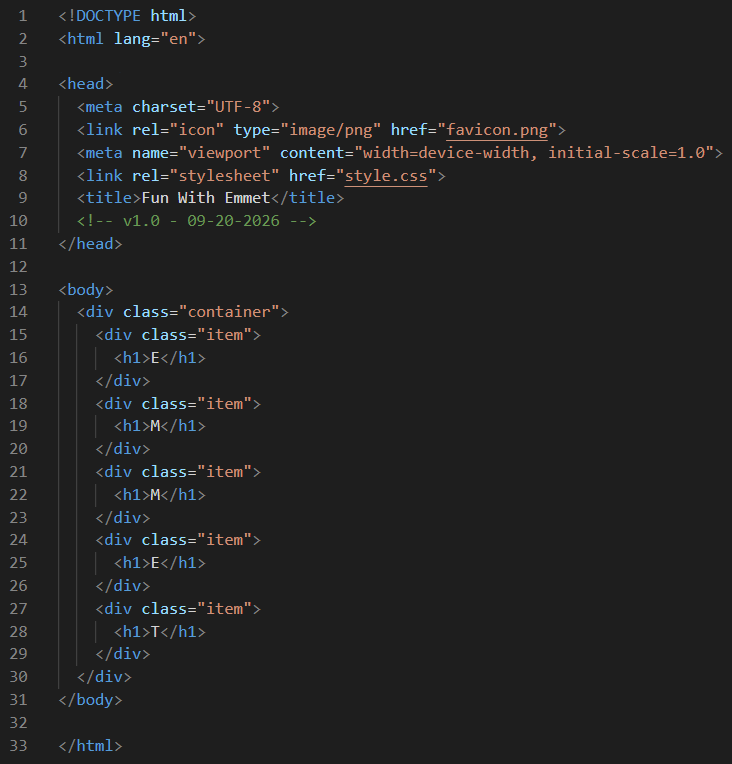
If you did everything right, then your code should look like the image displayed below.
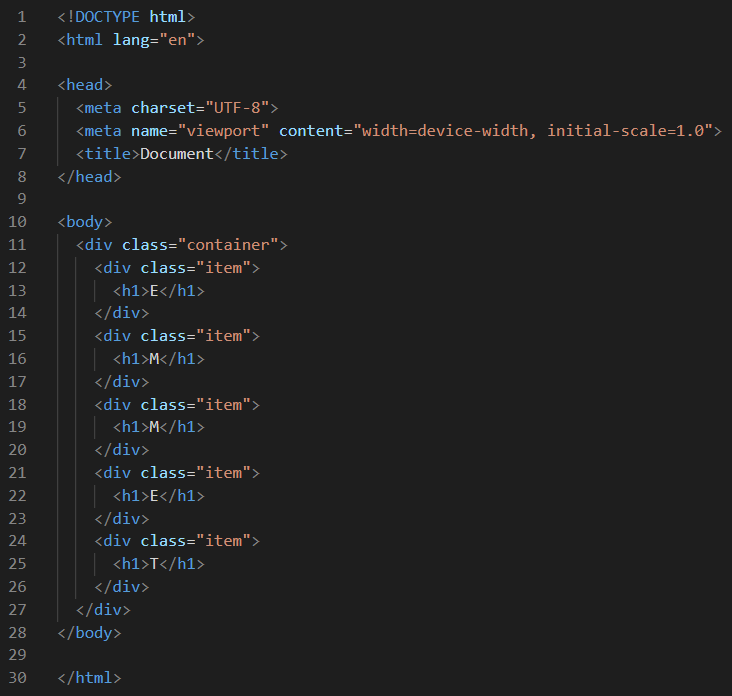

And granted, we are getting a little bit ahead of ourselves here. So far, we have not talked about some of the tags and elements we see here. We have not discussed what a <div> is, or what a class attribute does for us, let alone these five nested item divs inside of a container div. In fact, the only elements we are 100% familiar with at this point are the five <h1> elements that spell out E M M E T. And those five elements are the only things we see when we open up this project using Live Server. And even though the Jedi Mind Trick we did on line 7 of our instructions was certainly a timesaver, we expected something cooler when we launched this code in Live Server, right?
The one thing that is missing here is that we have no link to the CSS stylesheet. The document body code is 100% correct if it looks like the image shown above, but the document head is missing some code that would make this project worthy of our hard work. So let's continue on with the other instructions.
- Now copy the entire document head lines 4 through 11 from index-old.html
- Now paste that code on top of lines 4 through 8 in your index.html file.
- Now look at your index.html file that is open in your web browser.
- Pass your mouse over the five letters on the screen.
Your code should now look like the code listing below.
And with a proper link to your CSS stylesheet, then your project should work exactly like this. But best of all, you not only learned how to wield The Force, thanks to Master Jedi Emmet, but you also witnessed some of the awesome power that a CSS stylesheet can offer. And we think this is the perfect segue into the CSS Coding Course.
But wait! Before you go, no HTML Jedi should wield a lightsaber without knowing some of the tricks in this CSS Cheat Sheet.
May The Force Be With You!
Now Let's Learn Some CSS!
Did we just learn everything there is to know about HTML? Obviously the answer is, "No, not by a long shot!" But remember that this is only a crash course to get you started. Admittedly, we have only scratched the surface of HTML. Please remember that according to MDN (formerly known as the Mozilla Developer Network), there are at least 142 HTML tags. We have only covered about 10% of the elements and tags used in HTML5. However, we have reached a point where it is difficult to discuss other HTML tags and elements without mentioning their relationships to the way we style them using CSS.
Remember in the Wizard of Oz movie how everything was filmed in boring black-and-white until Dorothy crash-landed her house in the very colorful Land of Oz? That's basically where we are right now: right before the house crashes. And hence, the name HTML Crash Course.
We have also included the advanced subject of Chrome Dev Tools here as Part 6. And you can either look at that part now by invoking it from the pulldown menu on the right, or you can return back here sometime in the future when this subject seems more relevant. At this point, jumping into CSS is probably a much better idea.
Yes, this is a very unceremonious graduation. But now that you have your Bachelor's degree in HTML, it's time to start Graduate School to get your Master's degree in CSS. So, let's move on to the CSS Coding Course. Any objections?