HTML Crash Course
HTML 101
Part 1. Elements and Tags
The three main languages used to develop web pages are HTML, CSS, and JavaScript. We will learn the basics of HTML first.
HTML stands for HyperText Markup Language. It is the standard language used to design web pages for use on the World Wide Web, more commonly referred to as simply "the web". The current standard for HTML is version 5 and it is more commonly referred to as HTML5. And it pretty much goes without saying that web pages are viewed on the web by using a piece of software called a web browser.
CSS stands for Cascading StyleSheets, and CSS will be covered in a separate course. HTML and CSS work together hand-in-hand to help us create web pages that are both informative and aesthetic. We use HTML to put content on our web pages, and we use CSS to add style to that content. But for now, let's not get too far ahead of ourselves. For now, let's concentrate our efforts on learning the basics of HTML.
HTML uses elements as its basic building blocks to construct web pages. And each element is specified using tags. Tags do not appear on the actual web page. They only appear on the HTML document, which we will also refer to as the source code. Tags define each element, and that is what makes them so important.
In HTML5, some elements use an opening tag and a closing tag to define where each element begins and ends. However, some elements do not use closing tags, so it is important to know when a closing tag is required and when it is not. We'll learn more about that later.
All tags are enclosed in angle brackets. For instance, <p> is the opening tag for a paragraph. When a closing tag is required, it will use a forward-slash to signal the end of that element. For instance, </p> is the closing tag for a paragraph. In its simplest form, all the plain text that appears between the opening and closing paragraph tags is the paragraph itself. Below is an example of a paragraph in HTML.
<p>This is a paragraph.</p>
When the line of code above is interpreted by your web browser, all you will see on your display is the text between the two tags. But now we are getting ahead of ourselves. We should talk next about the basic structure of an HTML document.
The three most important elements in any HTML document are defined through six tags, placed in this order:
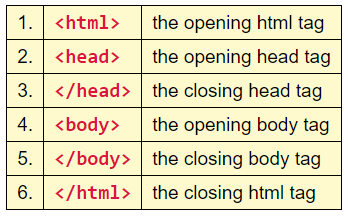

Basically, the two html tags define where the HTML document begins and ends, so all the other elements and their associated tags must go between the opening and closing html tags. And there are also two head tags that define where the document head begins and ends. And there are also two body tags that define where the document body begins and ends. Notice how the document head and body are nested inside the two html tags. This arrangement is very important to the overall structure of the web page.
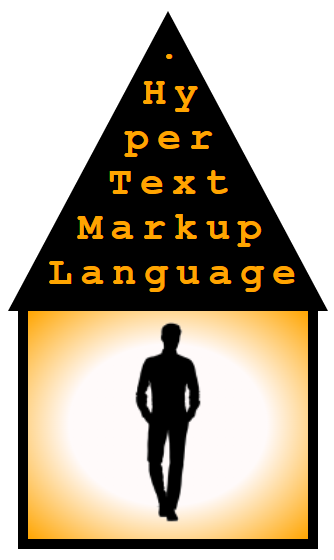
Think of the two html tags as a structure like this house. And think of the two head tags and the two body tags as the guy who lives inside the house. The guy has a head, and he also has a body. In an HTML document, the <head> contains important information about a web page, and the <body> contains the physical content that makes the web page work. That's a lot like the guy who lives inside the house. His head contains his brain, which stores important information about the guy, but none of that information would do him much good if he didn't have a body to do his important work, right?
So the <head> of our HTML document contains all the important information about our HTML document and our web page, and it is contained between the opening and closing head tags. And (with two possible exceptions which will be explained later), none of the information contained in the document head is actually displayed on our web page.
However, it is the job of the document <body> to contain all the content that is displayed on our web page. That content is contained between the opening and closing body tags. Therefore, most of the elements and tags we will learn about in this crash course will be used in the body of the HTML document.
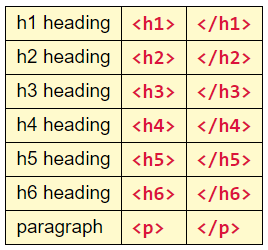
Besides the html, head, and body tags mentioned above, we will also need to learn about these elements that require both opening and closing tags:
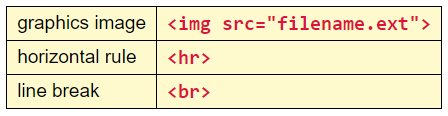
And we will also need learn about a few elements that require no closing tags:
But enough of these long boring explanations. Let's dive right in and look at an actual HTML document and the resulting web page, shall we?
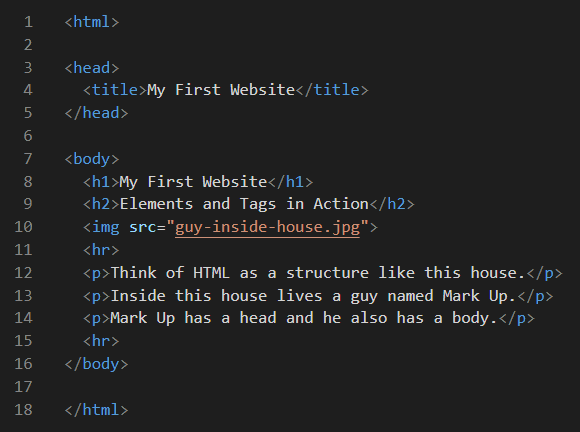
The HTML code listed above will produce a web page that looks something like the image below.
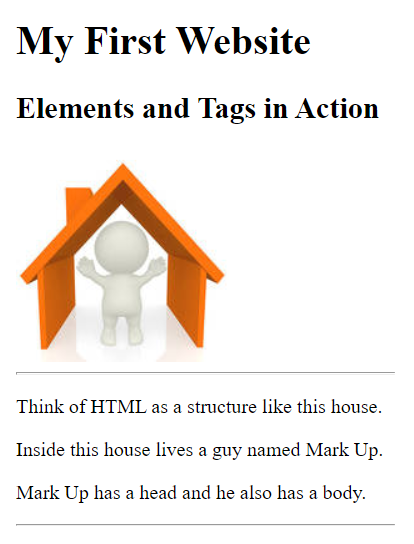
Pretty cool, eh? But wait! Let's talk about the web page structure and the elements and tags used in this web page.
The very first thing you notice is that the source code starts with an opening html tag on line 1 to tell the web browser that this is where the HTML document begins. On line 3 is the opening head tag. And on line 4, there is some information about this web page in the form of opening and closing title tags. Although this does not appear anywhere on the web page, this title will appear on the browser tab. Then on line 5 we see the closing head tag which marks the end of the document head.
The document body begins on line 7 with the opening body tag. All tagged elements inside the document body do appear on the web page. On line 8, we see an h1 heading. On line 9, we see an h2 heading which appears in a slightly smaller font size by default. On line 10, we have an image tag which defines the source file of the image that will appear on our web page. Remember that <img> tags do not require closing tags. On line 11, we have a horizontal rule which also does not require a closing tag.
After the horizontal rule, we have three paragraphs on lines 12, 13, and 14, followed by another horizontal rule on line 15. The closing body tag on line 16 marks the end of the document body and the end of content on our web page. And finally, the closing html tag marks the end of the html document and the web page. The closing html tag will always be the very last line in any html document.
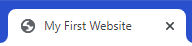
The <title> is the only HTML element that is inside the document head for this web page, and that means that it does not display itself on our web page. However, the title does appears on the browser's tab for this web page. For Google Chrome, the title looks like this on the browser's tab. Remember that we already mentioned that none of the elements contained in the document head are actually displayed on our web page with two possible exceptions. Those two elements are the title, and the other one is the favicon. Since we did not assign a favicon to this web page, the default favicon for Google Chrome web pages (that do not assign a favicon of their own) is the little "world globe" icon to the left of the title. We will learn more about favicons later.
It bears repeating that most of the HTML code for your web pages will probably go inside the document body. So now let's look at some of the code we have in our document body above. There are opening and closing h1 and h2 tags at the beginning of the document body. And we also see that the text for our h1 and h2 elements are large and bold when compared to the three lines of normal paragraph text. That is because these are called headings. By default, HTML defines six sizes of headings we can use, with h1 using the largest default font-size, and h6 using the smallest. Here is a quick look at the six heading sizes as compared against our normal font-weight paragraph text.
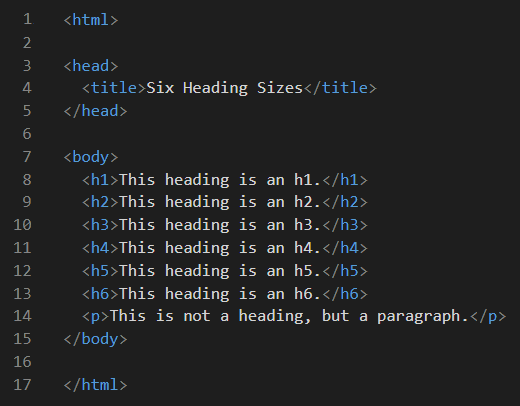
The HTML code listed above will produce a web page that looks something like the image below.
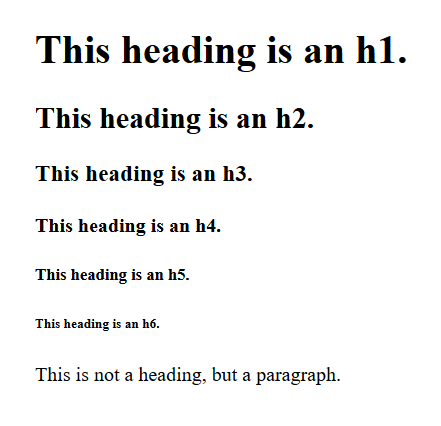
There isn't much more we can say about this web page. We can see that the default font-size for each heading gets progressively smaller from h1 to h6. We can also see that the default font-weight for all six headings is bold text, while the default font-weight for a paragraph is normal text. And by default, the font-family is a serif font. We can also see that the default color for the text is black, and that the default background-color for the web page is white. However, these are only the HTML defaults that are assigned by the web browser. All default font-size, font-weight, font-family, color, and background-color values can be changed through Cascading Stylesheets (CSS). And the real beauty of web design can only be achieved through CSS, so we won't spend a whole lot of time on HTML before we introduce you to CSS.
But before we move on too far, we need to talk about images. Web pages can become very boring without images on them. And the more beautiful and exciting these images are, the better your web pages will be. There are actually two types of images: foreground images and background images. Background images are defined through CSS, so for this discussion, we will only be talking about foreground images and they are defined in HTML using the <img> tag. Please remember that this tag stands alone and does not require a closing tag.
We already mentioned that some tags do not require both opening and closing tags. For tags that have no values to place between the opening and closing tags, this actually makes a lot of sense. For instance, the <hr> tag is completely self-sufficient and a closing tag would not add any value. The <img> tag is similar in that it actually has more parameters inside the tag to define how to interpret the image, so we don't need a closing tag to mark where the image ends. You will also notice that HTML sometimes shortens the spellings of words in its tags. So, an image becomes <img> in HTML. And no <img> tag is complete without at least defining a source for each foreground image. The source is spelled src and points to the actual image file used. So a proper image tag might be <img src="guy-inside-house.jpg"> and no closing tag is required. An in-depth discussion of images would require an entire lesson devoted to it, but this is enough information to help you create a proper and functional HTML image tag.
We hesitate to even mention the <br> tag which allows us to insert line breaks in our web pages. And while this tag is certainly useful, it is often the most abused tag in our HTML source code files, especially for beginners. The proper use of a <br> tag would be to break up a long line of text and force it to continue on the next line. However, beginners often use <br> tags as substitutes for the CSS rules of display, margin, and padding. For now, it might be helpful to simply not use <br> tags. If you find that text and images are not being forced to the next line, then there is probably something wrong in your HTML code. Maybe you are missing a closing tag or an angle bracket somewhere. If so, please inspect your code for errors. It is always best to write properly written code than to attempt to repair poorly written code with <br> tags.
We have only scratched the surface of HTML with this lesson on elements and tags. So far, we have learned about 14 different elements and their associated tags including the three most important ones. According to MDN (formerly known as the Mozilla Developer Network), there are at least 142 HTML tags. And of course, more lessons on HTML will be required to expand our knowledge of elements and tags. Perhaps the best way to learn HTML is by using online resources, so a list of those will be provided soon. But the sheer beauty of web development can only be discovered through styling our HTML pages through CSS. And we will be diving into CSS headfirst very soon as well.
Oh, did we forget to mention that the first HTML document in any website by default is called index.html? Yes, we apparently did. Even though we often call the first page in a website the Home Page, its real name is index.html.